TeamViewer has a built-in VPN service that allows you to connect to a device to share files and printers.
What does VPN mean?
A virtual private network (VPN) is a technology that seamlessly extends an intranet and its resources across the globe using public networks such as the Internet.
This is achieved by creating a secure data tunnel or virtual point-to-point access between the host and the client. Once the connection is established, data is sent and received with the same security, functionality, and management policies as if the systems were in the same network location.
This article only applies to the Windows operating system and the Business, Premium, Corporate, and Tensor licenses.
How the TeamViewer VPN works
TeamViewer VPN is a one-to-one connection between two computers. TeamViewer will use a TeamViewer connection (handled as a remote connection) to establish a VPN with IP addresses that are added to the involved TeamViewer IDs.
The VPN service is unlike your standard VPN, for example, Private Internet Access (PIA).
Our service acts more like a VLAN as the machines are placed into a virtual private network so that the devices think they are in the same network. PIA takes your traffic and forwards it from the country server you are connected to.
For the VPN to work, a VPN driver must be installed on both sides and can either be started during a remote control connection or on its own from within the TeamViewer settings.
How to install the VPN driver
To install the VPN driver, please follow the instructions below:
- Go to Settings.
- Click Advanced settings.
- Click Open advanced settings.
- Scroll down to the Advanced network settings, find the Install VPN driver section, and click Install.
- TeamViewer will restart. Click OK to confirm.
You have successfully installed the VPN driver on your device.
📌Note: You need administrative rights on the device to install the VPN driver.
Use cases for TeamViewer VPN
Here are some example use cases for which TeamViewer VPN can be used:
- Print documents on an enabled printer connected to the remote computer.
- Run applications locally on your machine that accesses a remote database by setting up a VPN connection to the remote database server (e. g., for home office).
- Give external participants access to devices (e. g. hard drives or USB sticks) connected to the remote computer.
VPN dialog box options
Once connected to the remote computer via VPN, the VPN-TeamViewer dialog box will open within this VPN TeamViewer window.
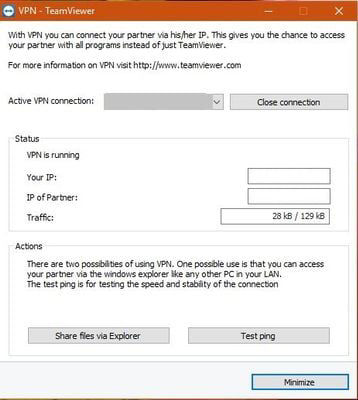
Set up TeamViewer VPN with the following options:
- In the case of multiple simultaneous VPN connections, you can select the required connection from the Active VPN Connection drop-down list . The details and available actions for this connection are displayed in the dialog box.
- Click the Close connection button to close the selected connection.
- The Status area shows the assigned VPN IP addresses of both computers. Once assigned, the VPN IP address will stay the same. The amount of data transmitted is also shown.
- The Share files via Explorer button opens Windows Explorer, giving you access to the remote file system. If folders on the remote computer are shared via the local network, you can access them and delete, copy or move files as needed. Please note that you may need to authenticate yourself on the remote computer.
- The Test ping button sends a ping signal to the remote computer. This lets you check whether a connection has been established successfully.
📌Notes :
- You do not need a VPN connection to remotely control your partner's computer or transfer files using TeamViewer.
- If you connect your local computer to the remote computer via TeamViewer VPN, only those two computers will be linked in a virtual private network. No other computers in the LAN of either computer will be accessible.
- In case the TeamViewer VPN driver is not yet installed, the VPN option button is not visible within the main TeamViewer window!
Troubleshooting for TeamViewer VPN
In case you are experiencing issues with TeamViewer VPN, our technical support put together a list of recommended troubleshooting below.
🚨Important: If none of the below troubleshooting steps resolves the issue you are experiencing, there might be an incompatibility between the VPN driver and the operating system. Please understand that TeamViewer Support can not assist in these cases.
How to reinstall the VPN driver
💡Hint: If possible, do the connection reinstallation on both sides.
Please follow the below steps for reinstallation.
- Go to Settings.
- Click Advanced settings.
- Click Open advanced settings.
- Scroll down to the Advanced network settings, find the Install VPN driver section, and click Uninstall.
- Download TeamViewer from our website and install it.
- Install the VPN driver and try the connection again.
How to install the VPN driver manually
Windows makes it possible to install drivers without using the software. That allows you to install the TeamViewer VPN driver.
You will find the file needed for this in the installation folder of TeamViewer:
C:\Program Files\TeamViewer\x64\TeamViewerVPN.inf
For the manual installation, please follow the below steps:
- Press Windows-Key + R and enter hdwwiz.cpl
- Click in the Window and then on Action ➔ Add legacy hardware ➔ Next
- Select Install the hardware that I manually select from a list (Advanced) ➔ Next
- Select Network adapters ➔ Next
- Click on Have Disk… ➔ Browse and select the TeamViewerVPN.inf ➔ Open ➔ OK
- Click on Next until the installation is finished.
- Now please try the VPN connection again.
How to force TeamViewer to use Port 443
In case the steps above did not work for you, please create the following registry key to force TeamViewer to use Port 443:
32 bit:
HKEY_LOCAL_MACHINE\SOFTWARE\TeamViewer
64 bit:
HKEY_LOCAL_MACHINE\SOFTWARE\Wow6432Node\TeamViewer
DWORD registry key AllowedConnectionProtocols and add the value 4.
Afterward, restart the TeamViewer service via services.msc on both Computers and try the connection again.
⚠Important: Only use this registry entry for this case (or when recommended by TeamViewer Support) to avoid unwanted side effects like TeamViewer slowing down.
Test Ping troubleshooting
In case the test ping does not work, please follow these steps:
- Open your file explorer
- Enter the following string in the address bar on your device and change 123.123.123.123 to the IP address shown in the dialog box in the box IP of Partner
- \\123.123.123.123\c$
- If you can now see the C: drive from the remote side, the connection is working