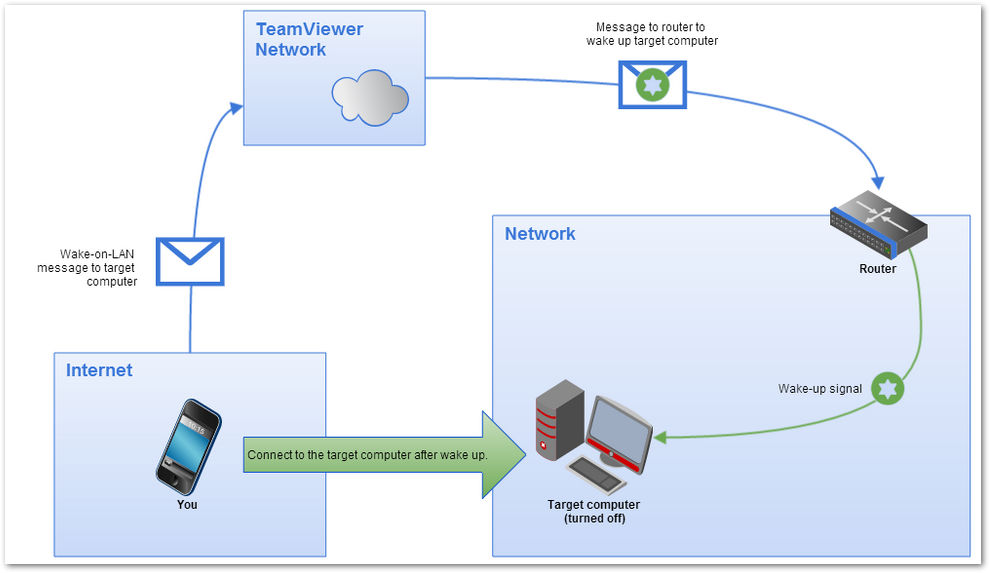
Wake-on-LAN allows you to turn on a sleeping or powered-off computer. This means you can remotely control an offline computer by waking it up first before establishing a connection to it.
You can initiate the wake-up request from another Windows or Mac computer or even an Android or iOS device running the TeamViewer Remote Control app.
📌Note: It’s not possible to wake up a Mac computer that is fully powered down, as Apple doesn’t allow this. Macs can only be woken up from sleep mode. However, Windows and Linux PCs can be woken up from sleep and hibernation mode, as well as fully powered down, so long as the hardware supports this.
This article applies to Remote Access, Business, Premium, Corporate and Tensor customers.
How to use Wake on LAN
Wake-on-LAN can be used through two different methods:
- Wake up a computer (hereafter called the remote computer) via another computer within the same network.
- Wake up the remote computer via its public address.
Choose one of the methods depending on the circumstances.
Method 1: Wake up the remote computer via another computer within the same network
Choose this method if there is a second computer (e.g. a server) within the remote computer's network that is turned on permanently.
In this case, you can use the second computer to wake up the remote computer. The second computer acts as a “middleman” to forward the wake-up request to the remote computer. This method requires considerably less configuration effort than the second method.

If you can answer the following questions with "Yes", this is the appropriate method:
- Is the remote computer located in a network?
- Is the remote computer connected to the internet using a network cable?
- Is a second computer (PC, Mac, Linux) located on the same network?
- Does TeamViewer start automatically with the operating system on both computers?
- Is the second computer turned on 24/7 (the operating system and TeamViewer are running)?
If you can match all the above, you can wake up the remote computer in three easy steps:
- Configure the hardware of the remote computer.
- Configure TeamViewer on the remote computer.
- Wake up the remote computer.
Method 2: Wake up the remote computer via its public address
Choose this method if the remote computer can be reached via a public address. This is the case if you have either a fixed, static IP through your Internet provider or if your router has a public domain address with the help of a dynamic DNS provider.
In these cases, you can configure TeamViewer so that the remote computer is woken through this address. The configuration effort of this method is higher and more complex than in method 1 because you have to set up your router accordingly.
If you can answer the following questions with "Yes", this is the appropriate method:
- Is the remote computer located in a network?
- Is the remote computer connected to the network using a network cable?
- Is the remote computer connected to the internet via a router?
- Does the router support port forwarding?
- Does the router have a public address (either a fixed IP address or a public domain address)?
- Does TeamViewer start automatically with the operating system on the remote computer?
If yes to all of the above, the following steps are necessary to use Wake-on-LAN via a public address:
- Configure the hardware of the remote computer.
- Configure the router for port forwarding.
- Configure TeamViewer on the remote computer.
- Wake up the remote computer.
How to set up Wake-on-LAN on my devices
Step 1: Set up Wake-on-LAN on your OS
On Windows
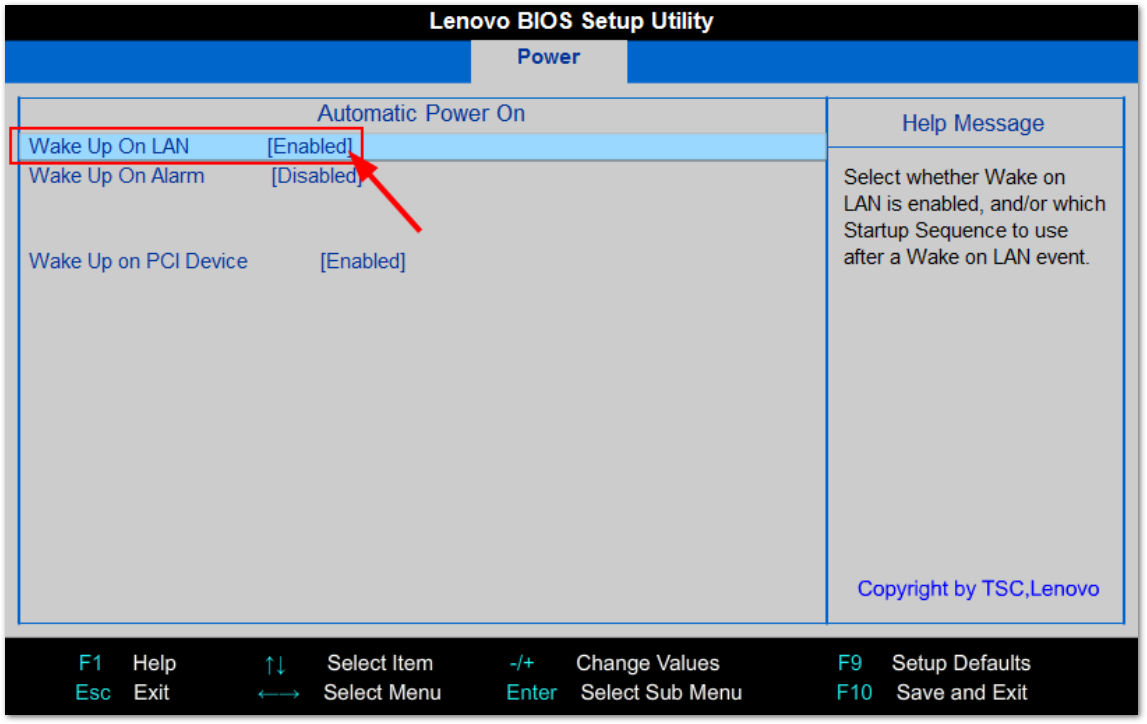
Configure the BIOS:
- Start the computer.
- Press the F2 key (or the equivalent) to access the BIOS setup.
- Open the Power tab.
- Activate the Wake-on-LAN option.
- Save and exit the BIOS set-up.
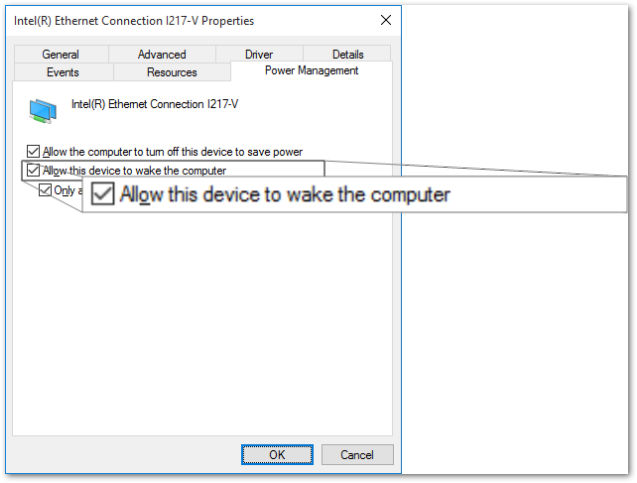
Configure the network card:
- Start the computer.
- In the Windows search, type device manager, then select Device Manager from the menu.
- Under Network adapters, right-click your network card and click Properties.
- Go to the Power Management tab.
- Activate the Allow this device to wake the computer option.
Deactivate fast startup:
- Start the computer.
- Open the Control Panel.
- Click System and Security.
- Under Power Options, click Change what power buttons do.
- Click Change settings that are currently unavailable.
- Uncheck the Turn on fast startup (recommended) box.
- Click Save changes.
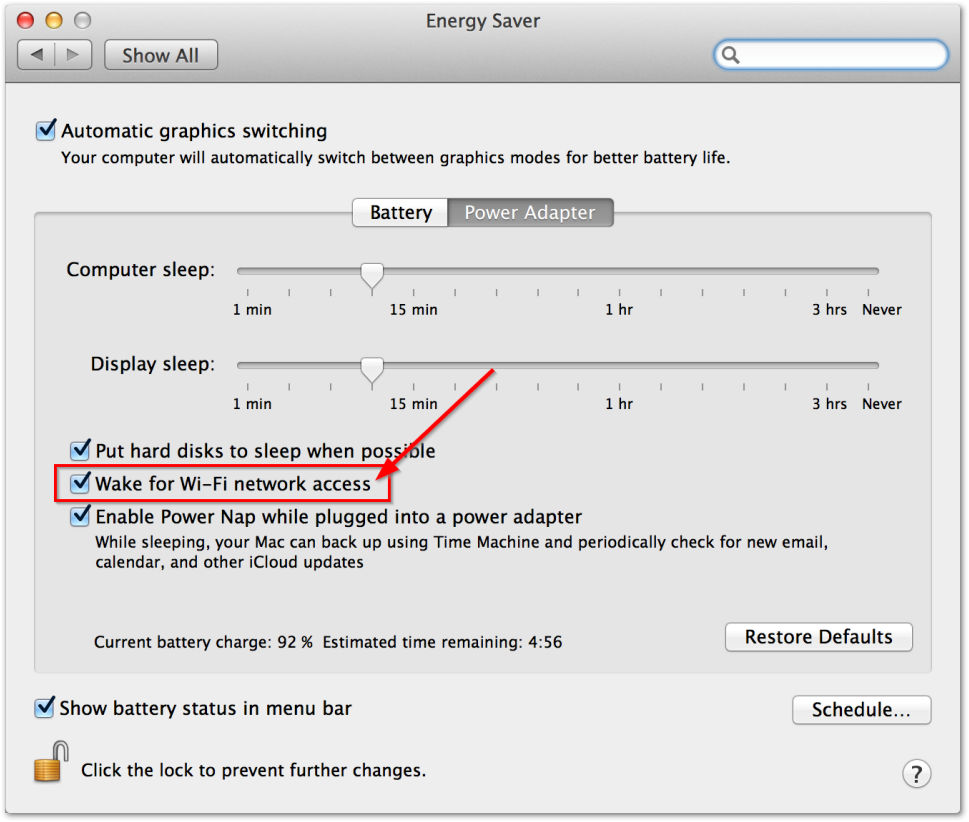
On macOS
- Start the Mac.
- Open the System Settings.
- Click Save Energy.
- Click the Power Supply tab.
- Activate the Wake for Wi-Fi network access option.
Step 2: Install TeamViewer Host and assign the device to your account
To install TeamViewer Host on your device and assign the device to your account, please follow the instructions of this article: Provide unattended remote support
Step 3: Configure Wake-on-LAN in TeamViewer
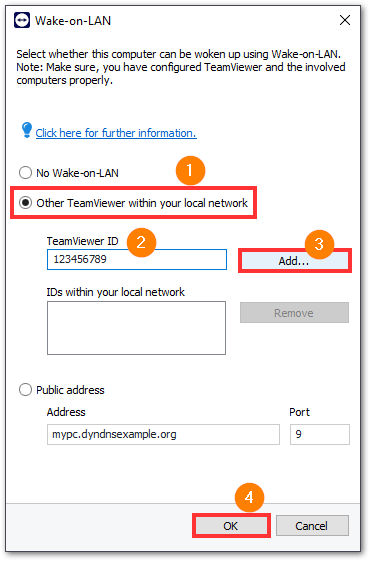
If you want to wake up the remote computer via another computer within the same network, you need to indicate which TeamViewer ID should wake up the remote computer.
- Open TeamViewer.
- Go to Settings.
- Under the Device menu, go to Network.
- Click Wake-on-LAN.
- Click Other TeamViewer within your local network.
- Enter the TeamViewer ID of the device waking up the remote computer, click Add..., and confirm by clicking OK.
If you want to wake up the remote computer via its public address, you need to configure Wake-on-LAN accordingly.
- Open TeamViewer.
- Go to Settings.
- Under the Device menu, go to Network.
- Click Wake-on-LAN.
- Click the Public address button
- In the address field, enter the fixed IP address or DNS name of the computer.
- In the port field, enter the UDP port via which the computer can be reached.
- Click OK.
Additional information
Configure the router
The router only needs to be configured if you have chosen the Public address option. If you have chosen the option TeamViewer IDs within your network, you can skip this section.
Configuring the router depends on the device used and the firmware installed on it. Not all types of devices support the necessary configuration.
Support of Wake-on-LAN via a router's public address requires port forwarding to be set up. Depending on the router used, only some of the following alternative configuration possibilities may be supported.
📌Note: In order to configure the router, please refer to the manufacturer's manual if necessary.
Set up port forwarding to the broadcast address of the local network
In order to be able to wake up all computers in the local network, set up port forwarding as described in the router manual from an incoming UDP port (e.g. 9) to the broadcast address of the local network (this often ends in ".255"). This configuration makes it possible to wake up all computers in the router's local network that have been configured according to the directions mentioned above.
Example:
If the local network is configured with 192.168.1.0 and the subnet mask 255.255.255.0, then port forwarding must be configured from UDP port 9 to 192.168.1.255:9. Sometimes routers do not allow a broadcast address ending in ".255" as the port forwarding destination. This problem can sometimes be avoided by selecting a smaller subnet mask for the local network (e.g. 255.255.255.128), thus, the broadcast address ends with “.127”.
Set up port forwarding to a certain computer
In order to wake up a certain computer in the local network, set up port forwarding as described in the router manual from an incoming UDP port (e.g. 9) to the local IP address of the computer to be wakened.
It must also be ensured that your router can address the appropriate computer, even when this computer is turned off. In order to do so, a static ARP entry must be saved on the router (see instructions for the router), showing the IP address of the computer to be wakened on the MAC address of this computer.
Some routers generate appropriate static ARP entries if a fixed IP address is reserved for this computer (no DHCP). In some cases, an appropriate configuration of the static ARP entries cannot be achieved via the router's configuration menu.
The ARP entries can then be configured via Telnet or SSH. This is the case for example, with the Fritzbox.