How To Make Full Use Of The Record A Session Feature

Today I want to highlight a feature that was introduced in the early years of TeamViewers’ existence: the Record a Session feature.
The feature name basically speaks for itself, it allows you to record a TeamViewer session. Both, for a meeting or remote-control session.
There are two different options on how to record a session to cover your individual use case:
You can choose to have your session recorded automatically (1) with every connection you make, or manually (2) choose which session you want to record after making a connection with the remote computer.
To make things easier, here's a nice and simple 5 step tutorial, complete with screenshots:
Step 1 – establish a remote connection and take a minute to check out the beautiful toolbar we have.

Step 2 – after some moments of admiration, click on Files & Extras.

Step 3 – click on Start session recording to begin recording your session.

Step 4 – you can Pause/Stop and save the recording by pressing the red button and choosing your option.

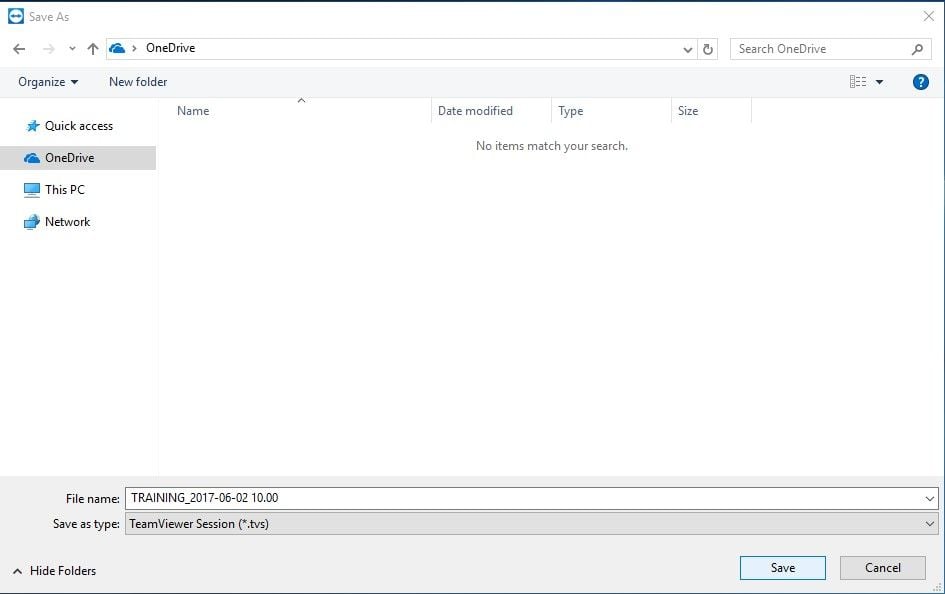
Step 5 – your session automatically gets saved in TeamViewer´s own .tvs-format and a pop up dialog box prompts you to select a location where you might want to store your file. Choose your preferred destination.

As I mentioned earlier, you can also enable TeamViewer to automatically record all your sessions. Let me explain it with a nice 3 step tutorial. Also, complete with screenshots.
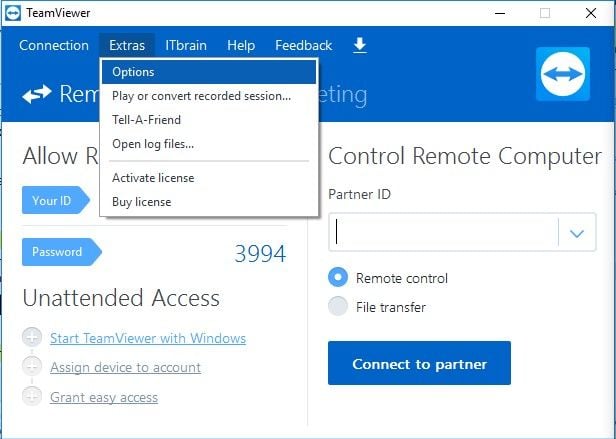
Step 1 – Open your TeamViewer software and click on Options which is right under the Extras tab. (When you are using TeamViewer´s new interface, click on Menu --> Options)

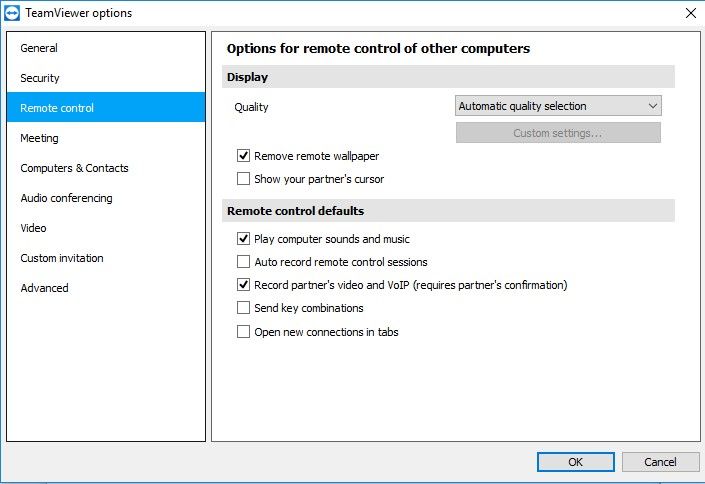
Step 2- Choose the Remote control tab.

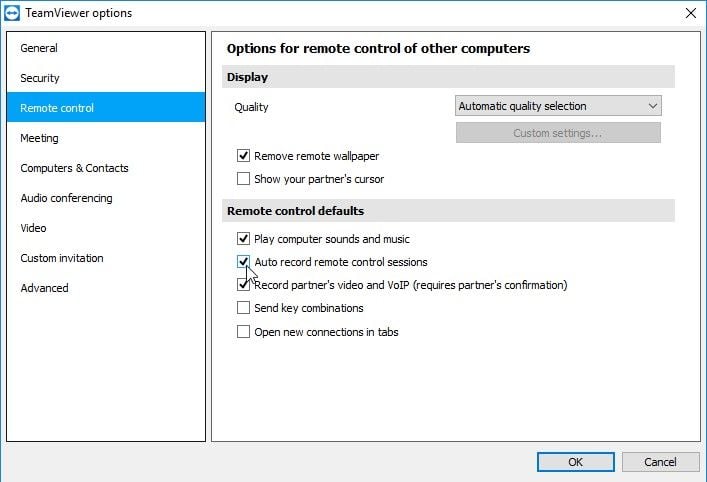
Step 3 – Put a tick mark on the box that says Auto record remote control sessions and OK to save your settings.

Other things you can do with the recording a session feature includes:
- converting a recorded session into the .avi-format
- and playing the recorded session directly via the software with no need of third-party media players.
For more information, you can always refer to chapter 9 of the TeamViewer Manual for Remote Control.
Why Should We Record A Session?
After establishing how we can fully make use of the session recording feature, we should also talk about how we can benefit from this feature.
Amongst many, I have personally handpicked 3 of my favorites.
For training purposes
This would be most beneficial for people, companies/agencies and businesses that provide training to others. The recorded session can be played with any media player (after conversion) and will be an important help for re-using clips that can be for tutorials, how-to guides, and teaching separate groups of people.
For quality control
If you are a customer service team, this feature is a blessing. By recording sessions, the team manager can go through it repeatedly to improve the quality of the customer service team. This benefits the teams extensively for constantly being able to better their service and go over their recordings so that they can see which areas they are not performing too well in.
For protection/dispute avoidance
When connecting to a remote computer, things we do can be used against us. Which is why recording a session will not allow any disputes to happen due to avoiding ‘who did what’ moments. By having a recorded session, proper evidence is available for protection of the business from mistaken accusations.
Start recording your sessions!
Now that you know how to work around recording a TeamViewer session, feel free to give us some feedback on how you like the feature. What are your reasons to record a session? Do you have another use case than the above mentioned?
Former Community Manager
Comments
-
With Automatic Recording set and a default directory to save the recording to, can we customise the file name that the recording receives? I'd like to have the User Name appended to the file name for quicker identification of the agent that was in that session.
1 -
Hi @Michael_C The filename cannot be customized at the moment, but the filename is showing the display name which can be customized in the TeamViewer options --> General --> Your display name. If you do not customize this name, TeamViewer will take the Windows-computer name. Please feel free to add your idea into the ideas board. I hope, this info will help you. Best, Esther
Former Community Manager
0 -
Hi Esther,
No, it didn't work like that. The recording ended up with the QuickSession name (I guess that is the same as the computer name?).

That being said, I just wasn't thinking about it the right way. I should just use individual directories per agent, problem solved!
1 -
Is there an option to configure this settings in a way that the automatic recording could not be turned off by a regular user? We plan to use this feature with our outsourced support contractor and all of their TV sessions should be recorded.
Thanks.
0 -
Hi @sl_iternity If you have the possibility to deploy a policy to the devices which will start the remote control sessions and enforce the setting Start recording of remote control sessions automatically, every session will be recorded automatically. With that you can prevent, that they forget to start the recording. Since the setting is enforced, they cannot change it on their device. I hope that helps, Esther
Former Community Manager
0 -
Just went to v13, before when I left a session the recording would save automatically. Now I have click to on the SAVE AS 'Save' button to actually save and exit that session.
Is there a way around that.
Don
0 -
Is there a way to record two monitors at the same time but record each monitor separately?
I want to record each monitor on its own, I know that if I see both monitors, on the same session, they will be recorded, but I want to have one window for each monitor recording each monitor separately but at the same time. I have not been able to accomplish that. I have TeamViewer 13. I start the remote session and open monitor 1 then I open monitor two on a separate window. If I click Record on Monitor one, it records monitor one just fine but it does not allow me to record monitor 2. When I try to click on Record for monitor 2 while monitor one is recording, monitor 2 does not begin to record. So I'm trying to record both monitors at the same time but in separate recordings.
Thank you
1 -
hi @Esther
how we can deny the remote access device to stop the recording and is the recorded video will saved if the session crashes
>>> Hi @sl_iternity If you have the possibility to deploy a policy to the devices which will start the remote control sessions and enforcethe setting Start recording of remote control sessions automatically, every session will be recorded automatically. With that you can prevent, that they forget to start the recording. Since the setting is enforced, they cannot change it on their device. I hope that helps, Esther
0 -
Thanks
0 -
Hallo can teamviewer on linux ubuntu 16.04 create recording enforce?
0 -
Hi,
What is the max length of a session that can be recorded?
Can the session log be saved on some network location and not on the local disk?
Thanks0 -
Hey there,
I don't know if there is a hard limit to the recordings. I've ran sessions for 120 minutes and they save just fine. There may be a PC specification requirement though.
We save our TV recordings to a mapped drive network location and there isn't any issue with that. You may be able to use UNC paths too, but I have not tested.
1 -
How can I stop automatic recording in v14? The options window only has 3 tabs: General, Security ans Advanced.
0 -
I searched but I did'nt find any comment.
Is there a way to set up automatic recording to start and stop at specific times in an unantended remote PC?
0 -
Community Manager Esther last gave a reply here more than two years ago. There have been nine questions added here since that time. I hope that the answers are still being given, perhaps by email.
Early in the article it says "... it allows you to record a TeamViewer session. Both, for a meeting or remote-control session." The article goes on to describe recording during a remote-control session. However, no information is given on recording in a meeting. How is recording in a meeting done?
Thank you for your help.
0 -
Recording a meeting can be done within the Meeting panel via the Screen sharing menu --> Record Meeting --> Start recording

Or you can set up auto record meeting as default for all meetings via the TeamViewer Options --> Meeting --> Auto record meeting

To disable the auto-recording, simply untick the feature again.
Former Community Manager
0 -
Hello, it seems that on some of my remotes, I am not able to record the session. The Monitoring Record button (Record/Pause/StopandSave) does not appear in the toolbar. I am using licensed TV15 and work on TV11 Remotes mostly. So far I believed it was due to a TeamViewer 11 Host, but does not seem to be the reason. Can you help on this ?
0
