TeamViewer (Classic) can record remote control or meeting sessions (including sound, voice-over IP, video, and webcam images). Such recordings can be useful for training, quality control, and many other use cases. This article will walk you through recording a TeamViewer (Classic) session or meeting.
📌 Note: It is currently only possible to record outgoing sessions.
This article applies to all TeamViewer (Classic) users.
How to record a remote session
On Windows
Once a connection is made through TeamViewer (Classic) to another device, navigate to the remote control toolbar's Files & Extras menu and select Start session recording:
Once the recording is ended, a prompt will appear, allowing the recording to be saved:
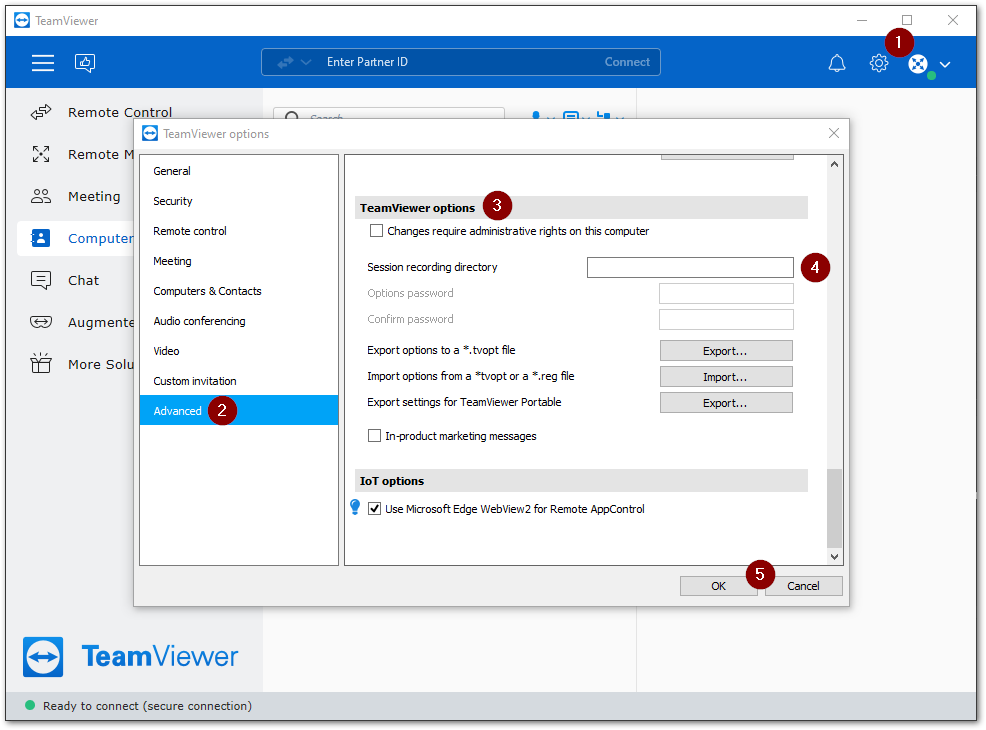
How to set the session recording directory
It is possible to designate a specific folder to store all TeamViewer (Classic) recordings automatically. This means that the recording will automatically be saved at the end of the session (or when the recording is stopped).
📌Note: Recordings automatically saved will use the default file name format:
Device Name (Device ID)_[YYYY-MM-DD] [HH.MM]
To Enable this feature:
- Click the Gear icon (⚙) in the upper right corner of TeamViewer (Classic)
- Navigate to Advanced
- Scroll down to TeamViewer (Classic) options
- Type the desired folder path in the textbox for Session recording directory
- Click OK to save
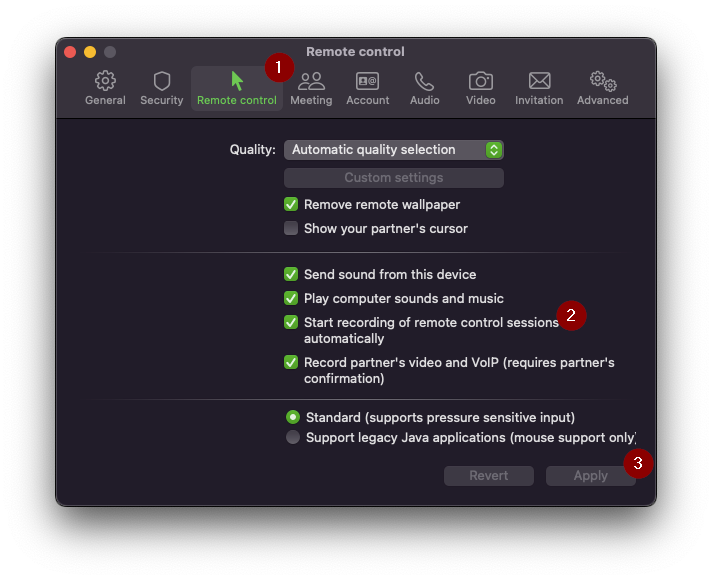
How to enable auto-recording
It is possible to record all connections made from a device via TeamViewer (Classic) automatically. When set, the recording will start at the beginning of each TeamViewer (Classic) session automatically
To enable this feature:
- Click the Gear icon (⚙) in the upper right corner of TeamViewer (Classic)
- Navigate to Remote Control
- Check the box next to Start recording of remote control sessions automatically
- Click OK to save
On macOS
Once a connection is made through TeamViewer (Classic) to another device, navigate to the remote control toolbar's Extras drop-down. Hover over Record and then select Start:
Once the recording is ended, a prompt will appear allowing the recording to be saved:
How to set the session recording directory
It is possible to designate a specific folder to store all TeamViewer (Classic) recordings automatically. This means that at the end of the session (or when the recording is stopped) the recording will automatically be saved.
📌Note: Recordings automatically saved will use the default file name format:
Device Name (Device ID)_[YYYY-MM-DD] [HH.MM]
To Enable this feature:
- Click TeamViewer in the top menu bar
- Select Preferences from the drop-down
Once in the TeamViewer (Classic) settings:
- Select Advanced
- Scroll down to TeamViewer Settings
- Type the desired folder path in the textbox for Session recording directory
- Click Apply to save
How to enable auto-recording on macOS
It is possible to record all connections made from a device via TeamViewer (Classic) automatically. When set, the recording will start at the beginning of each TeamViewer (Classic) session automatically
To enable this feature:
- Click TeamViewer in the top menu bar
- Select Preferences from the drop-down
Once in the TeamViewer (Classic) settings:
- Select Remote Control
- Check the box next to Start recording of remote control sessions automatically
- Click Apply to save
On Linux
Once a connection is made through TeamViewer (Classic) to another device, navigate to the remote control toolbar's Files & Extras menu and select Start session recording:
Once the recording is ended, a prompt will appear, allowing the recording to be saved:
How to convert a recorded session
- Click on the three-line menu (≡) in the upper left corner of TeamViewer (Classic). Navigate to Extras and select Play or convert recorded session...
- Choose the desired .tvs file.
- The video clip will be played back in TeamViewer (Classic). You will have the usual options for playing a video file.
- In the recorded session window, click the Convert icon.
- Select the desired Codec and Resolution for the session recording. If audio is included, check the box to Include Audio
- 📌Note: TeamViewer can only use the Codecs currently offered by the operating system.
- Click Convert.
Once the conversion starts, a progress window will appear. Once completed, a confirmation pop-up will allow you to open the containing folder or the file itself.
Convert to other formats
If you require a different format, for smaller video sizes, or for any reason, you can install additional encoders. A list of video codecs, such as “ffdshow” can be found at http://en.wikipedia.org/wiki/Video_codec.
After installation, the desired codec will appear in the Codec drop-down in the convert dialogue.