Frontline Command Center (FCC), Database, and Keycloak are self-hosted and are considered the central components of the Frontline system environment. All customer-sensitive data is hosted in the self-hosted database and on the VM's local storage.
Installation on an Ubuntu system
Database
- Install Maria DB following the official installation instructions.
- Verify the installation with the following command (depending on the actual MariaDB, the service may be called
MariaDBormysqld):
systemctl start mysql
systemctl status mysql
3. Configure the database and corresponding user:
sudo mysql -uroot -e "CREATE DATABASE frontlinecommandcenter CHARACTER SET = 'utf8' COLLATE = utf8_bin;"
sudo mysql -uroot -e "CREATE USER 'frontline'@'localhost' IDENTIFIED BY '$PASS'"
sudo mysql -uroot -e "GRANT ALL ON frontlinecommandcenter.* TO 'frontline'@'localhost' IDENTIFIED BY '$PASS' WITH GRANT OPTION;"
4. Replace the $PASS placeholder with a secure password.
If a suitable database has already been installed and configured before, create a user for this database and change -u root to -u name_of_user -p.
Note: We recommend adhering to your internal backup strategy for the installed database.
Frontline Command Center
1. Create a directory for the frontline.jar file: sudo mkdir /var/opt/frontline
2. Create a directory for the user data: sudo mkdir /var/data/frontline
3. Download the Server application JAR file from the Frontline Downloads page.
4. Rename it to frontline.jar and copy it to /var/opt/frontline: sudo cp ~/Downloads/frontline.jar /var/opt/frontline
5. Make frontline.jar executable: sudo chmod +x /var/opt/frontline/frontline.jar
6. Frontline runs as a Spring Boot Service. Navigate to /etc/systemd/system and create a file with the service details: sudo touch frontline.service
7. Edit frontline.service and add:
[Unit]
Description=frontline command center
After=mysql.service

[Service]
Environment="UBIMAX_HOME=/var/data/frontline/"
ExecStart=/var/opt/frontline/frontline.jar
SuccessExitStatus=143

[Install]
WantedBy=multi-user.target
8. To enable the service, use systemctl enable frontline.service
9. Start service via systemctl start frontline.service
10. The service will create some configuration files /var/data/frontline and then shut down.
Installation on a Windows system
Database
1. Download the latest stable version of MariaDB from the official website and follow the installation guide.
2. Run the MariaDB installer, including the HeidiSQL support program.
3. Create a root password for the database.
Note: The root password will be referred to as dbrootpassword in this manual.
4. Click on Next.
5. After finishing the installation, start the HeidiSQL utility. Assuming a default installation, the file is located here: C:\Program Files (x86)\Common Files\MariaDBShared\HeidiSQL\heidisql.exe
6. Click on New.
7. Create a new database with a given name (e.g., Frontline_Test).
8. Replace the $PASS placeholder with your previously created dbrootpassword.
9. Optional: customize the hostname/IP and port number.
Note: For a more detailed guide, please see the HeidiSQL help page.
If a different database system is used, adjust the SQL statement below to fit the database:
CREATE DATABASE FrontlineCommandCenter CHARACTER SET = 'utf8' COLLATE = utf8_bin;
CREATE USER 'frontline'@'%' IDENTIFIED BY '$PASS';
GRANT ALL ON FrontlineCommandCenter.* TO 'frontline'@'%' IDENTIFIED BY '$PASS' WITH GRANT OPTION;
Frontline Command Center
- Go to the Frontline Downloads page.
- Download the server application file and rename it to frontline.jar.
- Download the server service wrapper from the same page.
FCC requires an installation directory and a DATA Directory:
- Installation Directory - Contains the frontline.jar file and the WinSW_frontline.exe and WinSW_frontline.xml service wrapper files.
- Location:
C:\Frontline - ID:
$BASE$
- Location:
- DATA Directory - This is used as the home directory. It is used for customer assets such as login cards and themes. Create a new folder inside the installation directory and name it DATA.
- Location:
C:\Frontline\DATA - ID:
$FRONTLINE_HOME$
- Location:
Note: The $BASE$ and $FRONTLINE_HOME$ location IDs will be used as a reference in the following code samples.
The WinSW_frontline.exe service wrapper allows users to install the FCC service as a Windows service.
- Optional: If you need to configure a forward proxy (e.g., to let FCC access our license server), open the WinSW_frontline.xml file and add
-Dhttps.proxyHost=$HOST -Dhttps.proxyPort=$PORT -Dhttps.nonProxyHosts=localhostto the beginning of the<arguments>element, replacing$HOSTand$PORTwith the values of your proxy. - Open a command prompt (with administrator rights).
- Change the directory to
$BASE$. - Run
WinSW_frontline.exe install. - net start frontline(default service ID is frontline).
During the first startup, the service will automatically stop after extracting the configuration files. Windows may report the service as failed or crashed.
The FCC config directory is located inside the $FRONTLINE_HOME$ directory. The location should be C:\Frontline\DATA\config\configuration\. The xserver.properties configuration file should be edited as explained below.
Initial configuration of Frontline Command Center (Ubuntu and Windows)
- Open the xserver.properties file located at
UBIMAX_HOME/config/configuration/. - Change the database IP, username, and password (to view the IP address, use the
ip addr showcommand). - If the customer has a host name,
xserver.url.external.httpcan be used instead of the IP address. The port needs to be mentioned inserver.port. SSL needs to be configured unless there is a reverse proxy with SSL termination.
Depending on the individual system and requirements, the setup or configuration of components such as Keycloak, xAssist Stack, ffmpeg, Email and FaaS is needed.
FaaS (Mandatory)
1. To use Frontline cloud services, set the following property:
fcc.faas.base-url=https://functions.svc.frontlineworker.com/function/
2. For self-hosting, the endpoint of each FaaS may be overridden individually:
fcc.faas.function.<function>.override-url=
whereas function is imagemagick, pdfmake or proglove.
3. For ImageMagick and Proglove, no additional configuration is required.
4. For PDFMake, the following environmental variables need to be set:
RAW_BODY: "true"
MAX_RAW_SIZE: "100mb"
Starting the server
- After the setup of the properties has been completed, start the server by using this command:
systemctl start frontline.service(UBUNTU) ornet start frontline(WINDOWS) - The state of the service can be checked under
UBIMAX_HOME/log/server/fronline.log. - On the first successful start of FCC, a system administrator user called
sysadminis created with a random password. This user is used to configure FCC. - The password for the
sysadminuser can be retrieved from the log files located at$FRONTLINE_HOME\logs. - Open the frontline.log file and the password is displayed in the following format:
INFO  de.ubimax.xserver.DatabaseSetupManager - ########################################################## - -:-/-
INFO  de.ubimax.xserver.DatabaseSetupManager - ########################################################## - -:-/-
INFO  de.ubimax.xserver.DatabaseSetupManager - ########################################################## - -:-/-
INFO  de.ubimax.xserver.DatabaseSetupManager - ########################################################## - -:-/-
INFO  de.ubimax.xserver.DatabaseSetupManager - YOUR GENERATED SYSADMIN PASSWORD: 123456789 - -:-/-
INFO  de.ubimax.xserver.DatabaseSetupManager - CHANGE THIS PASSWORD AS SOON AS POSSIBLE TO A PERSONALIZED ONE. - -:-/-
INFO  de.ubimax.xserver.DatabaseSetupManager - ########################################################## - -:-/-
INFO  de.ubimax.xserver.DatabaseSetupManager - ########################################################## - -:-/-
INFO  de.ubimax.xserver.DatabaseSetupManager - ########################################################## - -:-/-
INFO  de.ubimax.xserver.DatabaseSetupManager - #####################################################
6. Sign in using the sysadmin user and change the password.
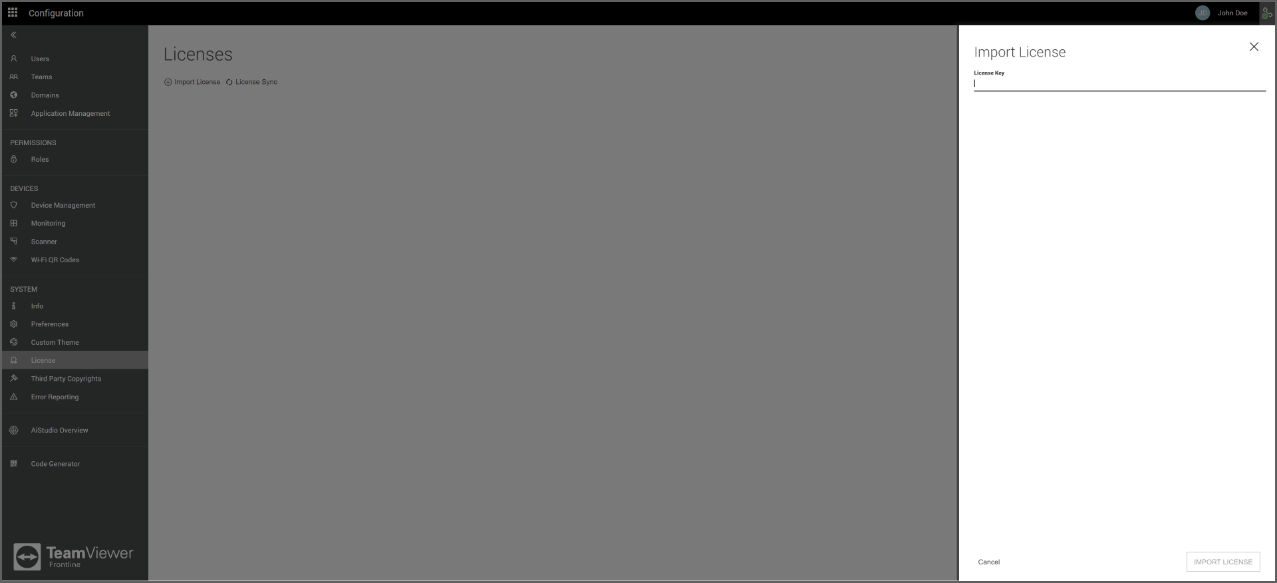
To import a license:
- Open Frontline Command Center.
- Go to Configuration.
- Go to Licenses.
- Click on Import License.
- On the subsequently displayed modal, click on Import License to sync the entry with the license server.
Keycloak (Mandatory)
There are two modes of operation when running Keycloak: standalone mode and clustered mode. Which one to choose depends on your individual requirements. For a detailed guide on how to set up either of them, please see the official Keycloak installation guide. Frontline supports version 15 or later.
After Keycloak has been successfully installed, the realms to be used in this installation need to be created. Each domain for an FCC installation needs to have a separate realm.
- Download this JSON file.
- Open the realm export JSON file.
- Replace all occurrences of
<the-fcc-url>with the actual FCC URL. - Optional: Replace all occurrences of
frontline-realmwith another realm name (only applicable, if multiple Frontline realms are required in Keycloak). - Optional: Search for
"claim.name": "domain"and replace the corresponding domain value (only applicable, if FCC will use a domain other than the defaultubimaxdomain). - Sign in to the Keycloak Administration console via the browser.
- Click on Select Realm.
- Choose Add realm.
- Select a file to be imported.
- Open the imported realm.
- Navigate to
Clients/FCC/Credentials. - Click on Regenerate Secret.
- Copy this value.
- The copied value needs to be set in the FCC's xserver.properties file as
fcc.keycloak.realms.<domain>.clientSecret(<domain> isubimaxby default). - Optional: Configure an SMTP server in the email tab of the Realm Settings.
- Once Keycloak has been configured, the following properties must be set per domain in the FCC's xserver.properties file:
- All placeholders written in chevrons (<>) must be replaced with the corresponding details.
- It is intended to set the
KeyMan URItonull.
fcc.keycloak.enabled=true
fcc.keycloak.realms.<domain>.name=<realm-name>
fcc.keycloak.realms.<domain>.domainTag=<domain>
fcc.keycloak.realms.<domain>.realmId=<realm-name>
fcc.keycloak.realms.<domain>.serverUrl=<keycloak-external-url>
fcc.keycloak.realms.<domain>.clientId=fcc
fcc.keycloak.realms.<domain>.clientSecret=<client-secret>
fcc.keycloak.keyman.uri=
Note: KeyMan is a service that performs all of the above described steps automatically on Frontline Cloud instances and is not needed for self-hosted Keycloak.
Upload client application
Once the Keycloak is configured an admin user must be created and the client application must be uploaded to the Frontline Command Center.
- Create a user with an admin role using the steps mentioned on the User Management page.
- Download the latest Frontline Workplace smart glass application from the Downloads page.
- On Frontline Command Center on the top left select Navigation Pane.
- Go to Configuration.
- Follow the steps mentioned on the Application Management page to upload the application.
IAM integration
For easier user management, Frontline supports the synchronization of user details from your identity provider to FCC. If this mapping is enabled, FCC will process IDP user details and will not allow to override them on the FCC administration level. The synchronized user details are language preferences, roles, license allocation, and teams.
Currently, Frontline supports the following IAM types:
- Microsoft Azure Active Directory
- Microsoft Active Directory
- AWS Identity and Access Management
Roles, licenses, and teams will not be successfully applied in the following cases:
- License, roles, or team do not match 100% in IDP and FCC (case sensitivity applies)
- FCC has no free licenses (for roles and license mapping)
- The user has not yet signed in (syncing only takes place when a user signs in)
The available roles and teams of identity providers must be carefully defined so that roles, licenses, and teams can be successfully mapped:
- <LicenseName> allocates the license for a particular user (e.g., License_xAssist)
- <RoleName> assigns a role to a particular user and assumes a license (e.g., Administrator)
- <Team> assigns a particular user to a team in FCC
Identity brokering (optional)
Note: Identity brokering is only supported on FCC installations where the users are fully present in Keycloak. It only works after all existing users have signed in with Keycloak at least once or on new installations where Keycloak has been enabled right from the beginning.
With identity brokering, Keycloak realms can be connected with external OpenID-based identity providers (IDPs). This means that instead of entering credentials in Keycloak, the user is being redirected to an external IDP (e.g., Azure AD or Okta) and, after successful authentication, is taken back to Keycloak (and then on to Frontline).
The image below shows the basic authentication process whenever a user signs in:
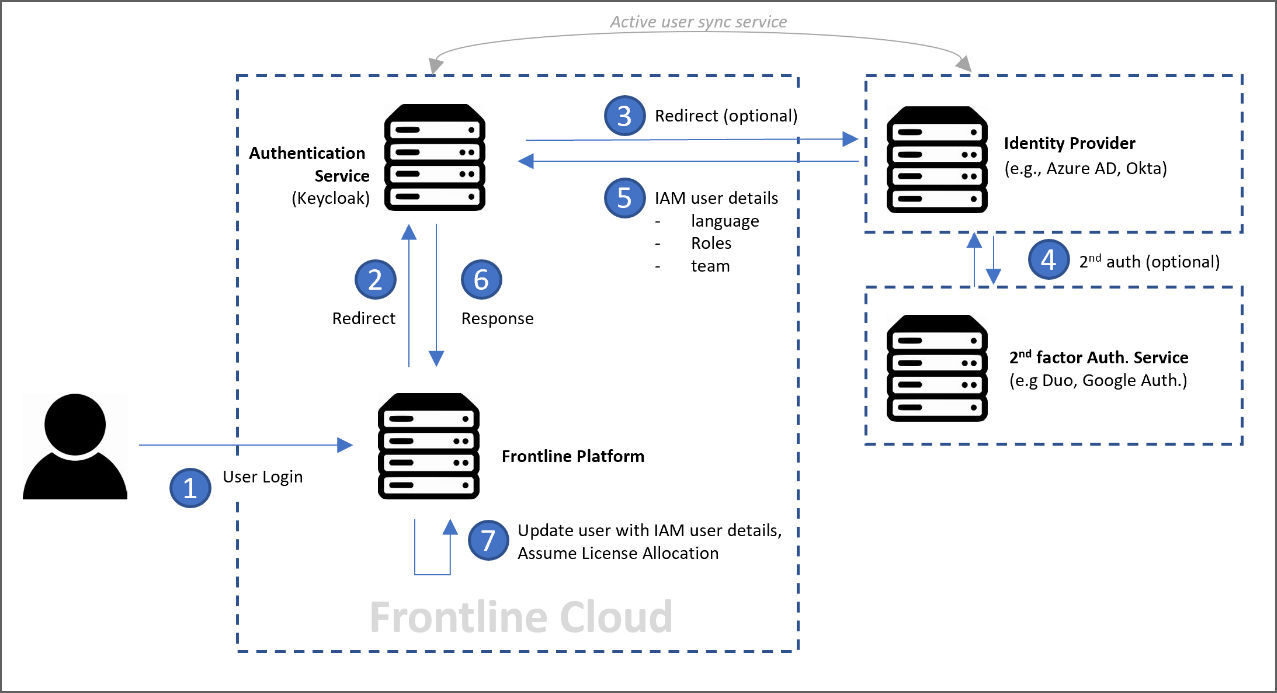
The user will never share their password with FCC but will be redirected to Keycloak and the identity provider that will create an authentication token. By default, Keycloak tries to match the external user with an existing Frontline user via the email address. If that is not possible (if no matching user was found), the sign-in procedure is aborted and access to Frontline is denied.
A Keycloak realm can contain multiple identity brokers (e.g., Azure AD). This adds a possibility to sign in with local accounts as well as different external accounts. In certain scenarios, it might be beneficial to create users on-the-fly once a new user tries to sign in. This is called user provisioning and can be enabled by using the following property in FCC:
fcc.keycloak.user-provisioning.enabled=true
In addition to that, the following properties need to be configured:
server.servlet.session.cookie.same-site=none
server.servlet.session.cookie.secure=true
Doing so will indeed create user accounts upon first sign-in, but the account itself is virtually useless at this point as it neither has a license tier nor any roles assigned. This behavior can be changed via the following properties. The following changes will result in all provisioned users ending up in FCC with the xAssist role from the xAssist license tier assigned.:
fcc.keycloak.user-provisioning.default-license-tiers=xAssist
fcc.keycloak.user-provisioning.default-roles=xAssist
Identity brokering will require some setup on the side of the identity provider you want to use. The below example shows how to configure Azure AD as an identity provider. Other identity providers follow similar approaches.
To configure Azure AD as an identity provider in Keycloak:
- Select your realm.
- Go to Identity Providers.
- Add a new OpenID Connect v1.0 provider.
- Scroll all the way down to Import External IDP Config.
- Paste your Discovery URL.
- Click on Import. This should fill populate fields like Authorization URL or Token URL.
- Manually edit the following values:
- Alias and Name - These can be set to custom values, the name is the one later shown on the sign-in page, while the alias is found in the redirect URI.
- ClientAuthMethod - Select
client_secret_post. - ClientID - Found when creating an app in Azure.
- ClientSecret - Found when creating an app in Azure.
- Save the newly added identity provider. Afterwards, it should appear on the single-sign-on page.
Azure AD as identity provider
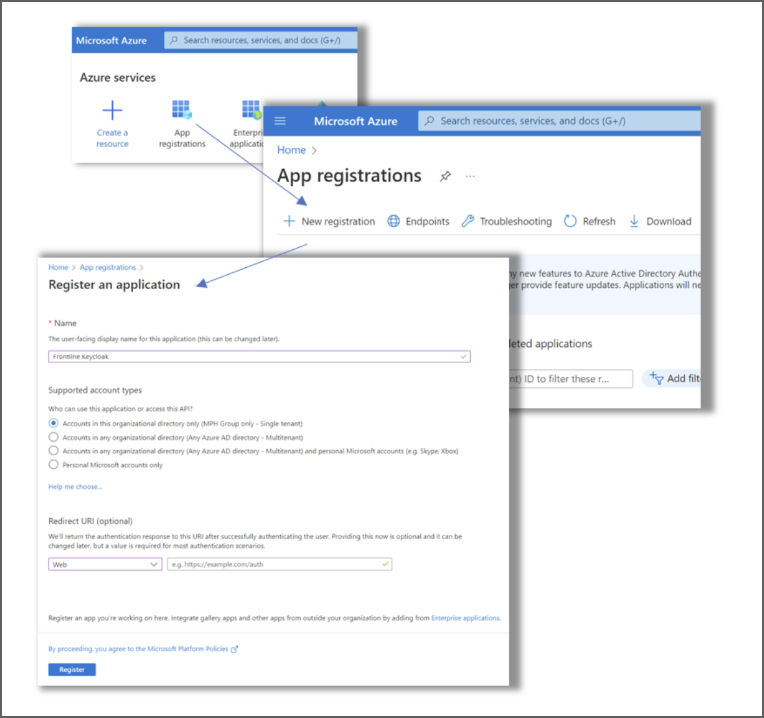
- Sign in to Azure.
- Navigate to App Registrations.
- Go to New Registration.
- Name the app Frontline Keycloak.
- Set it to Single Tenant. The redirect URI is not yet needed.
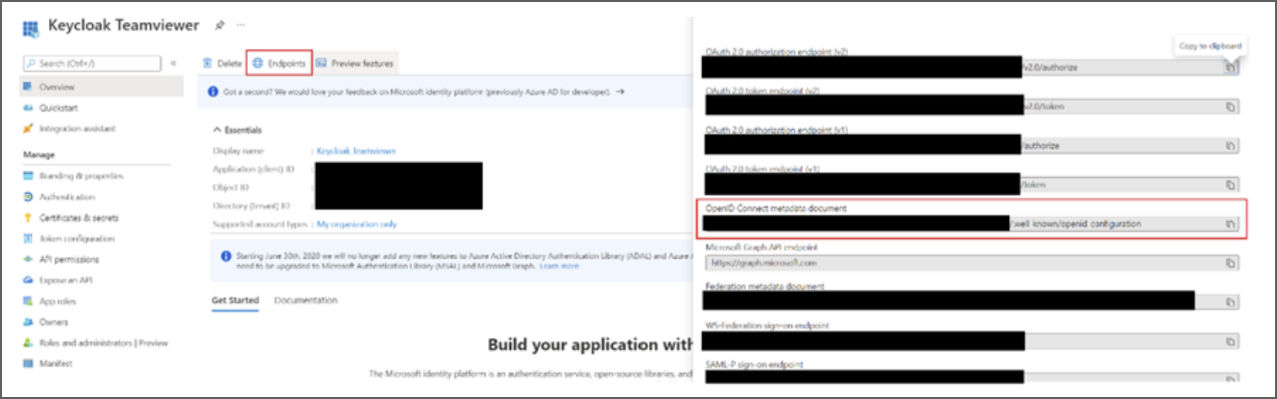
6. Once the app has been created, it shows the Client ID on the main page.
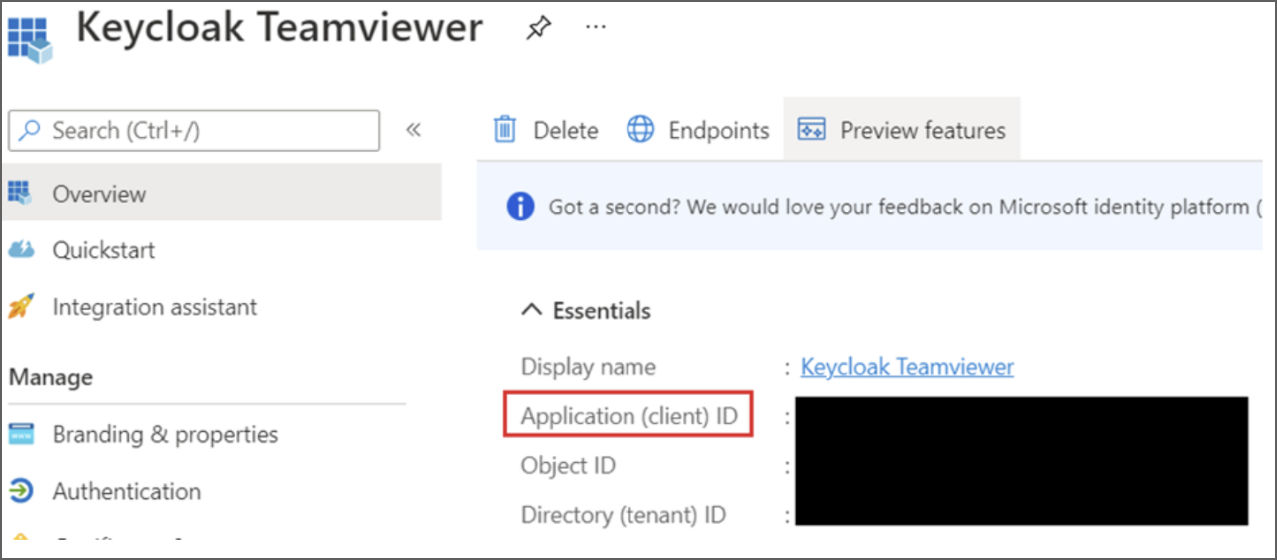
7. The Discovery URL can be found under Endpoints. It is the OpenID Connect metadata document.
8. Generate the client secret. For this, click on the current client credentials.

9. To add a new client secret, click on New client secret. The description should be Frontline secret and the duration should be set to 24 months.
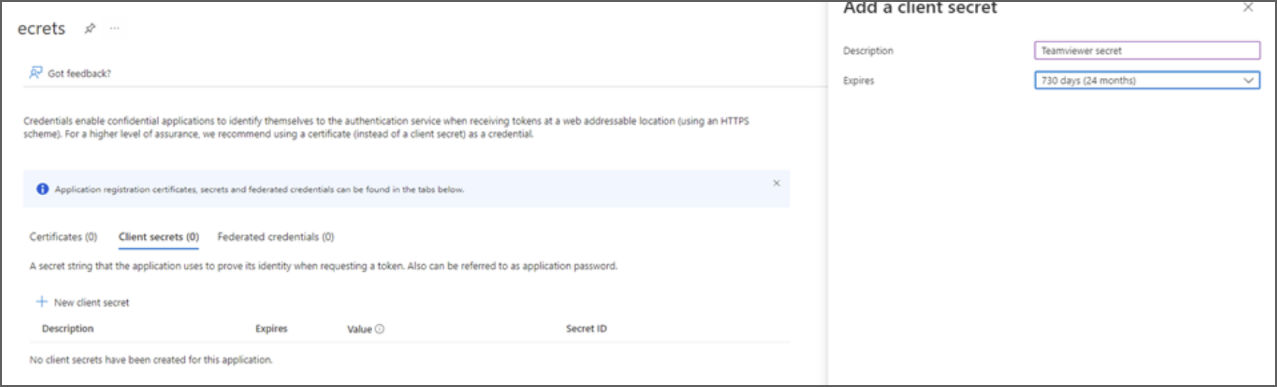
10. Once the secret has been added, an entry with a Value and a Secret ID will be generated.
Note: Immediately copy and securely store the value as it will not be available later, it is the Client Secret.
To configure the missing redirect URI in Azure:
- Navigate to our App Frontline Keycloak via App registration.
- Select Redirect URIs.
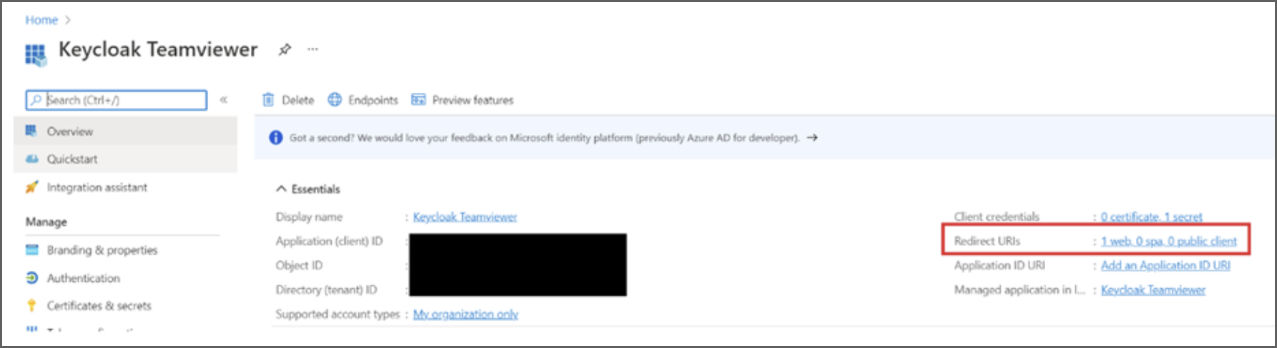
3. Select Add a platform/ Web.

4. The Redirect URI that needs to be entered looks like this:
<Local-Keycloak-Url>/auth/realms/<your-realm-name>.