All connections between TeamViewer clients use certificates to authenticate the identity of both participants. These certificates are issued for individual TeamViewer IDs by the TeamViewer CA and prevent those devices from impersonating another one. The “bring your own certificate” (BYOC) feature enables TeamViewer users to use their own certificates to authenticate the devices involved in a TeamViewer connection. This is independent of and always in addition to the authentication of the TeamViewer certificates.
TeamViewer installations can be configured to require custom certificate authentication for incoming connections, outgoing connections, or both. When custom certificate authentication is required, the connection can only succeed if the other side has a private key for a certificate signed by the configured certification authority. This is an effective way to restrict TeamViewer connections to a specific set of devices.
This article applies to all TeamViewer Tensor holders who have purchased the Conditional Access feature.
Certificates
Using BYOC requires a single certificate authority (CA) to sign the certificates of all devices that need to authenticate themselves. All devices that require certificate authentication from other devices must have access to the CA certificate. All devices that want to authenticate themselves to other devices must have access to a certificate signed by the CA, the matching private key, and all intermediate certificates (if any). TeamViewer supports X.509 certificates and can import them and their private keys either from files or from the Windows trust store.
Using the Windows Trust Store
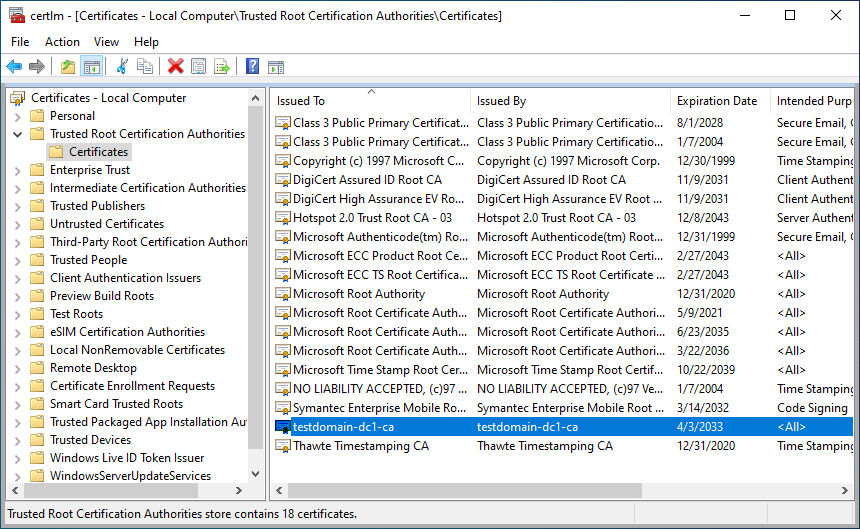
Certificates and private keys loaded from the Windows trust store must be installed in the machine-wide trust store. This store can be accessed using certlm.msc.
The CA certificate has to be installed inside the “Trusted Root Certification Authorities” directory. The specific CA certificate used for authentication is identified by its unique, hex-encoded fingerprint. The fingerprint can be found as “Thumbprint” inside of the “Details” tab when double-clicking on the desired certificate.
The device certificate has to be installed inside the “Personal” directory of the local computer certificates. It must have a private key available; this can be verified by double-clicking the certificate, where a small key icon will be shown.

For convenience, the BYOC feature can be configured to use the client certificate with the same name as the local machine. This will allow using the same configuration for all machines and is the recommended way to set up the client certificates.
Using Certificate Files
Certificates and private keys loaded from files must either be DER-encoded binary X.509 or base-64 encoded X.509 (PEM format). Other formats like PFX are not supported.
If there are any intermediate certificates between the device and the root ca certificates, they have to be included in the device certificate file. This is only supported with PEM format files; DER format files can not contain certificate chains.
The file containing the private key should be sufficiently protected using the access controls of the operating system. If the TeamViewer service is running, it will access the private key, so on Windows, only access for the SYSTEM user is required.
Configuration
By default, the BYOC feature is disabled, and neither incoming nor outgoing connections require certificate authentication. Conversely, it is also not possible to connect to or receive connections from any machine that requires certificate authentication.
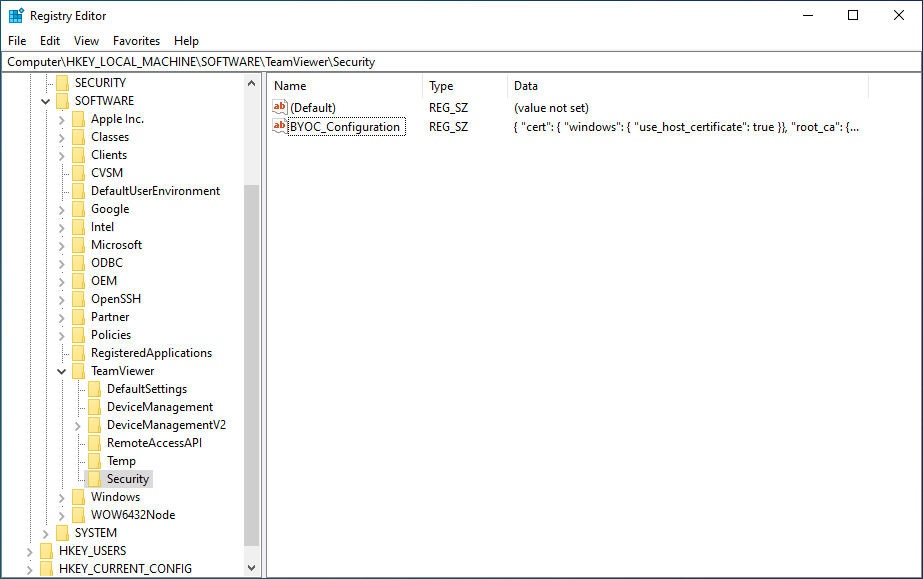
To enable the BYOC feature and to require certificate authentication, a configuration string has to be placed in the TeamViewer settings. These are located inside the Windows registry. The exact location depends on what combination of 32-bit or 64-bit versions of Windows and TeamViewer are used:

The BYOC configuration is inside the “Security” sub-key. This registry key must be created if it doesn’t exist yet. Then, to enable the BYOC feature, a new value with the type “String” and the name “BYOC_Configuration” must be created.
If this value exists and is not empty, then the BYOC feature is active, even if the configuration isn’t valid. With an invalid configuration, no connections will be possible.
PowerShell can be used to create this value from the command line:
New-Item -Force `
         -Path HKLM:\SOFTWARE\TeamViewer\Security
New-ItemProperty -Force `
                 -Path HKLM:\SOFTWARE\TeamViewer\Security `
                 -Name BYOC_Configuration
The configuration itself uses JSON format. The JSON can either be directly typed or copied into the Registry Editor, but the UI only allows one line, so the JSON must be stripped of all newline. Alternatively, the registry key can also be set from a file via PowerShell. Assuming the configuration is saved in a file called TeamViewerBYOC.json in the current directory, it can be loaded like this:
New-ItemProperty -Force `
                 -Path HKLM:\SOFTWARE\TeamViewer\Security `
                 -Name BYOC_Configuration `
                 -Value $(Get-Content TeamViewerBYOC.json)
The content of the JSON determines when certificate authentication is required and where to find the certificates. The following sections show some example configurations.
Using the Windows Trust Store
Certificates and private keys can be loaded from the machine-wide Windows trust store. To identify the correct certificate, the TeamViewer client can look for a certificate with the same name as the local machine. This certificate is called the host certificate in this document.
The configuration to load the host certificate looks like this:
{
 "cert": {
  "windows": {
   "use_host_certificate": true
  }
 }
}
This will use the host certificate to authenticate to this device and use the CA that signed the host certificate to authenticate other devices. By identifying the correct certificate by the hostname, this configuration can be used on different devices and use the device specific.
Alternatively the CA certificate can also be explicitly specified via its fingerprint:
{
 "cert": {
  "windows": {
   "use_host_certificate": true
  }
 },
 "root_ca": {
  "windows": {
   "fingerprint": "d2dcdd02666b6335736c137fbbecff84730837af"
  }
 }
}
Using Certificate Files
Alternatively, certificates can also be loaded from files. For the client certificate, the key must also be available as a file, using the same format (PEM or DER) as the certificate itself. Only the TeamViewer Service is required to have access to the key; on Windows, this process runs as the SYSTEM user. It is recommended to limit access to the private key file.
If there are any intermediate certificates, they should be appended to the client certificate file. In that case, a PEM file has to be used; it is not possible to use a certificate chain with DER files.
The configuration to load PEM files looks like this:
{
 "cert": {
  "pem": {
   "path": "/etc/teamviewer/certs/client_chain.pem",
   "key_path": "/etc/teamviewer/certs/client.key"
  }
 },
 "root_ca": {
  "pem": {
   "path": "/etc/teamviewer/certs/ca.pem"
  }
 }
}
Alternatively, to load binary DER files it looks like this:
{
 "cert": {
  "der": {
   "path": "/etc/teamviewer/certs/client.der",
   "key_path": "/etc/teamviewer/certs/client.key"
  }
 },
 "root_ca": {
  "der": {
   "path": "/etc/teamviewer/certs/ca.der"
  }
 }
}
Disabling Certificate Verification
By default, authentication is required for both incoming and outgoing connections. These can be individually disabled inside the root_ca section.
To only require certificates for incoming connections:
{
 "cert": {
  ...
 },
 "root_ca": {
  "dont_validate_outgoing": true
 }
}
Alternatively, to only require certificates for outgoing connections:
{
 "cert": {
  ...
 },
 "root_ca": {
  "dont_validate_incoming": true
 }
}
Both options can be combined to not require certificate authentication for either incoming or outgoing connections. This can be useful since it still enables the client to authenticate itself with other devices that do require certificate authentication.
Improved Security with certificate revocation verification using CRLs
Furthermore, an enhanced security feature allows for the verification of certificates using Certificate Revocation Lists (CRLs), if they are supported. By default, the CRL verification option is not enabled. This means that in addition to the existing methods, there is now a mechanism in place to revoke and oversee certificates using CRLs (Certificate Revocation Lists).
{
"cert": {
...
},
"root_ca": {
"verify_crl": true
}
}
(Issuing certificate in this section refers to RootCA certificate or IntermediateCA certificates, which issue the next certificate in the chain. E.g., RootCA->IntermediateCA->Client, RootCA issues IntermediateCA and IntermediateCA issues RootCA)
(Issued certificate in this section is referred to IntermediateCA certificates or client certificates, which are issued by the previous certificate in the chain. E.g., RootCA->IntermediateCA->Client, IntermediateCA is issued by RootCA, and Client is issued by IntermediateCA)
Any issuing certificate can revoke an issued certificate for reasons which is updated in CRL with the serial number of the revoked certificate.
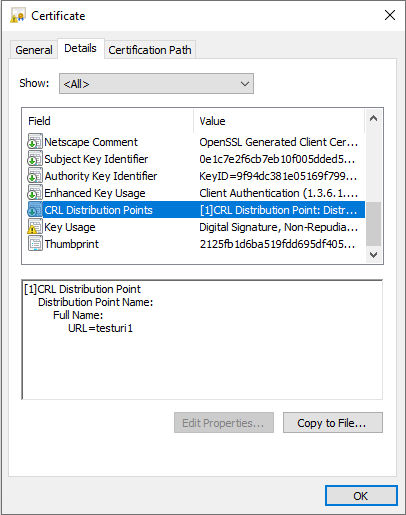
CRL is downloaded from a URL available in the certificate as CRL Distribution Points. Certificates are allowed to support multiple URLs in CRL Distribution Points, hence multiple CRLs for a certificate. CRLs in PEM and DER format are supported. For now, only base CRLs are supported; there is no support for delta CRLs.
How is Certificate Verification performed?
For a Certificate Chain, may it be a RootCA->Client or RootCA->IntermediateCA->Client, for every issued certificate, through distribution points (URL/s), CRLs are downloaded. Issued certificates are then verified against CRL/s.
The verification fails; hence, authentication fails for any of the following scenarios:
- if a certificate chain is not verifiable or certificates are expired
- if a URL is not reachable or does not allow downloading CRL
- if a CRL is not in the right CRL format or is an empty file or missing bytes
- if a CRL is expired
- if CRL is not generated by the issuing certificate of a certificate URL
- if an issued certificate is revoked
Limitations
This feature is still in development and has a few known limitations at this time:
- Meetings are, by design, not covered by BYOC restrictions.
- This feature is currently only compatible with Windows.