The menu bar which is located at the top of the workspace, provides users with to access the functionalities listed below.

- Open: Redirects to the Home Page window
- Save: Saves the current project or gives the option to save as different
- Import Model: Gives options to import a model from the PC or the FCC File Manager
- Export Model: Exports the model in the selected format
- Edit: Gives undo and redo option
- device
- Scene: Hides or makes visible the Scene panel
- Connector: Hides or makes visible the Connector panel
- Workflow: Opens Workflow Settings window
- Script: Opens the Script Editor window
- Language: Opens Workflow Languages window to manage language translation
- Settings: Opens the Settings window
- Marker PDF: Creates PDF for ArUco Marker or QR Code Marker
- Help: Redirects to Documentation, Support, and Third Party Licenses
- Logout: Logout from the Spatial Editor
Creating a new project and importing a 3D model
A Spatial project is a file created in Spatial Editor that stores the information about the 3D model in use along with markers, pins, and other content added to it.
- After signing in, click on Create New Project.
- Click on Import Model in the top bar and select the file you want to upload.
- To try it out, you can download this file. It is a 3D model of a pump that is also shown as an example to explain features in the subsequent text.
- Choose the import scale according to your requirements. If you are using the pump model, you can select Meter (Note: Do not worry if the chosen scale turns out to be incorrect. This can be changed later in the model settings. If the pins added to the workflow seem to be too big or too small, the scale needs to be adjusted accordingly.)
- To change the orientation of the model, click inside the Scene Explorer on the left of the window. For the pump model, you can select the “WaterPump” root assembly of the model and then use the Transform or Quick-Rotate menu on the right to adjust the model as needed.
- To rotate the 3D scene, left-click over the scene and drag the mouse. Doing the same with a right-click instead pans the scene. Scrolling with our mouse wheel zooms in and out of the scene.
Supported 3D / CAD models
The supported formats are:
- IGES (.igs, .iges)
- STEP (.step, .stp)
- JT (.jt)
- ACIS (.sat, .sab, .asat, .asab)
- XCGM (.xcgm)
- CATIA V5 1 (.catproduct, .catpart)
- 3DExperience (CATIA V6) 2 (.3dxml)
- Solid Edge (.par, .asm)
- SolidWorks 9, 10 (.sldprt, .sldasm)
- NX 5 (.prt)
- DFX/DWG 3 (.dwg, .dxf)
- Inventor 4 (.ipt, .iam)
- Parasolid 6 (.x_t, .x_b)
- Viscopic3D (.v3d)
- VDA-FS (.vda)
- STL (.stl)
- FBX (.fbx)
- OBJ (.obj)
- Creo (.prt, .prt.*, .asm, .asm.*)
- GLTF(.gltf)
- USDZ(.usdz)
Note: The models of formats .gltf and .fbx can be imported with diffuse textures (base color) the Spatial Editor software can visualize these textures. Also if the parts or models of these formats are made visible in the workflow, these textures would also be visible when the workflow is run on the Spatial Workplace app.
Saving a project as .v3pproj file
Project files are created in the Frontline Spatial Editor and contain information about the 3D model in use, along with the markers, pins, and content added to it. The projects can be saved locally in the form of a .v3pproj file. To do so:
- Click on Save in the top menu.
- Choose the folder where the file should be saved.
- After the file is saved, the name of the saved project appears at the top of the software window. If there are any unsaved changes in the project, the name is followed by an asterisk (*).
Export Model
To export the model:
- Select the Export Model option on the top.
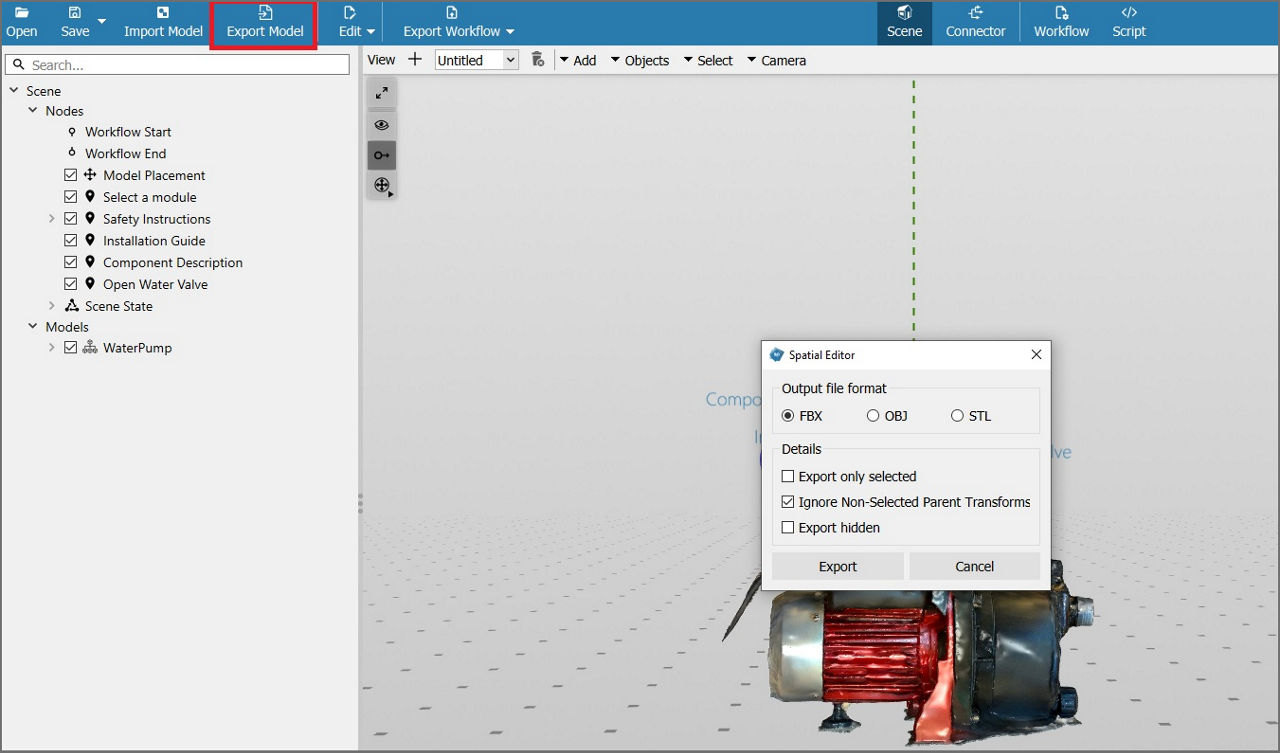
2. Choose the desired output file format:
- FBX
- OBJ
- STL
3. Select the appropriate details according to your needs:
- Export only selected: Only the selected model will be exported.
- Ignore Non-Selected Parent Transforms: When enabled, any non-selected parent assembly transformations will be ignored and the selection is exported to the center. When disabled, the parent transformations will be taken into account and the selection is exported in the same position relative to its parent transformations, even though the parent transformations themselves are not exported.
- Export hidden: Hidden transformations will also be included.
For more information on the connection status, please see the Server Connection section for the Workplace app.
Export a workflow to FCC
Workflow files contain the components of a workflow, which are basically a set of pins that portray information over a real component, e.g. a machine. Additionally, at least one marker (or other spatial references) is added to the workflow to enable the correct positioning of the pins over the real component.
Note: A workflow does not keep information about the reference CAD model itself (so no context and project settings are stored within a workflow).
To export workflow files:
- Once the user is done editing the project in Spatial Editor, they can click on Export Workflow > Export Workflow to FCC in the top menu to upload it to FCC where they can manage it.
- By default, the editor automatically creates a template from this workflow and assigns it to the currently signed in user while uploading it to FCC. This way, the template will be already available on the user's device once the upload has been completed. However, the user can also choose to uncheck the Create Template checkbox to later create a template or task manually in FCC.
3. The user can select the preferred device for the upload and click on Export.
4. After the upload has been completed, the user can see the template in the template list of their selected device.
Note: This template has no connection to the FCC account of the user and only exists on this device. Every time the user clicks on this template, a task will be created from it on the same device, but the status of its execution will not be shared with FCC. The user works entirely local. As a result, the user can also delete the directly uploaded workflow from the device by clicking on the corresponding button that appears next to it in the template list.
Export a workflow to a device (direct upload)
The user can pair one or more devices to upload workflow templates to them.
- In Spatial Editor, click on Export Workflow > Export Workflow to Device in the top menu.
- In the modal that appears, you can see a list of paired devices and the options to pair a new device or unpair an existing one.
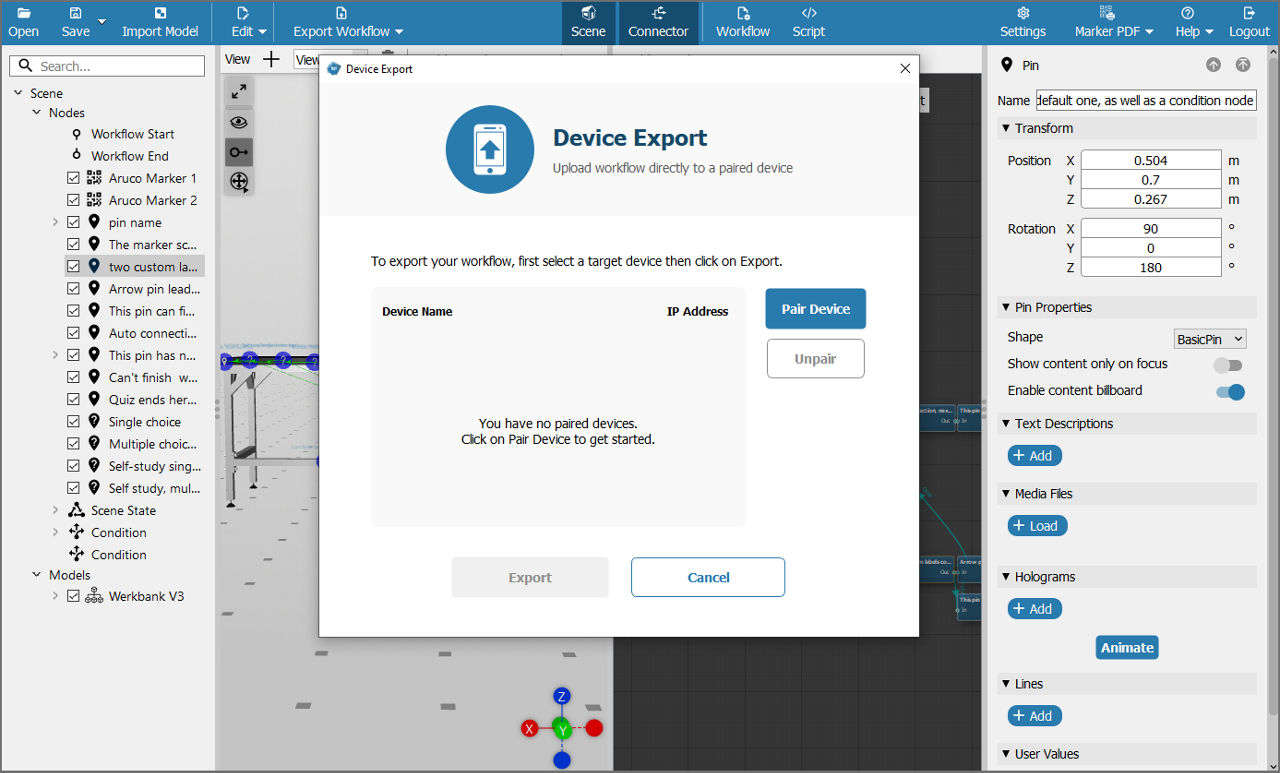
3. The user can select the preferred device for the upload and click on Export.
4. After the upload has been completed, the user can see the template in the template list of their selected device.
This template has no connection to the FCC account of the user and only exists on this device. Every time the user clicks on this template, a task will be created from it on the same device, but the status of its execution will not be shared with FCC. The user works entirely locally. As a result, the user can also delete the directly uploaded workflow from the device by clicking on the corresponding button that appears next to it in the template list.
Workflow assignments
In Spatial Workplace, all assignments happen based on user accounts. A task or template is assigned to a user via FCC, which makes them available for the user to view on any device after they have signed in to Spatial Workplace. For more information on how to assign previously created templates to other users and how to further manage them, please see the Templates section of the Solutions guide.
Workflow Languages
Workflow Language is the language that appears in the UI of the Editor, which appears in the inspectors of the pins, and in the connections for a particular workflow. It appears everywhere where there is a string in the workflow inside Spatial Editor. This is the default language for all tasks that originate from this particular workflow.
Users can extract all the strings present in a workflow in a CSV file and get them translated by an external translator or translate the strings themselves in the CSV file outside Spatial Editor. This will allow reusability of the same workflow in different locations.
Note: Current additional workflow languages are German, Spanish, French, Portuguese, Chinese Simplified Mandarin, and Japanese.
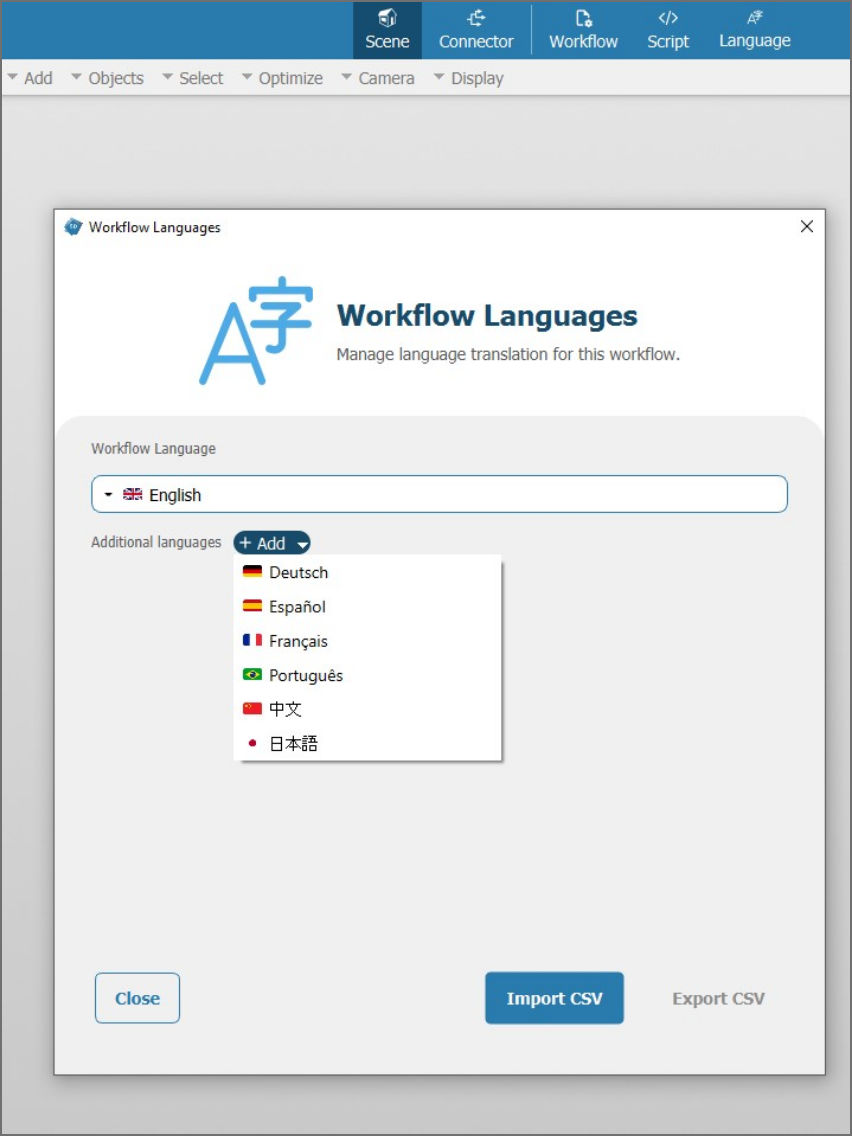
To translate the present strings in a workflow:
- Select Language from the toolbar.
- Click on Add to choose the additional language you want the workflow to be translated into.
- Click on Export CSV.
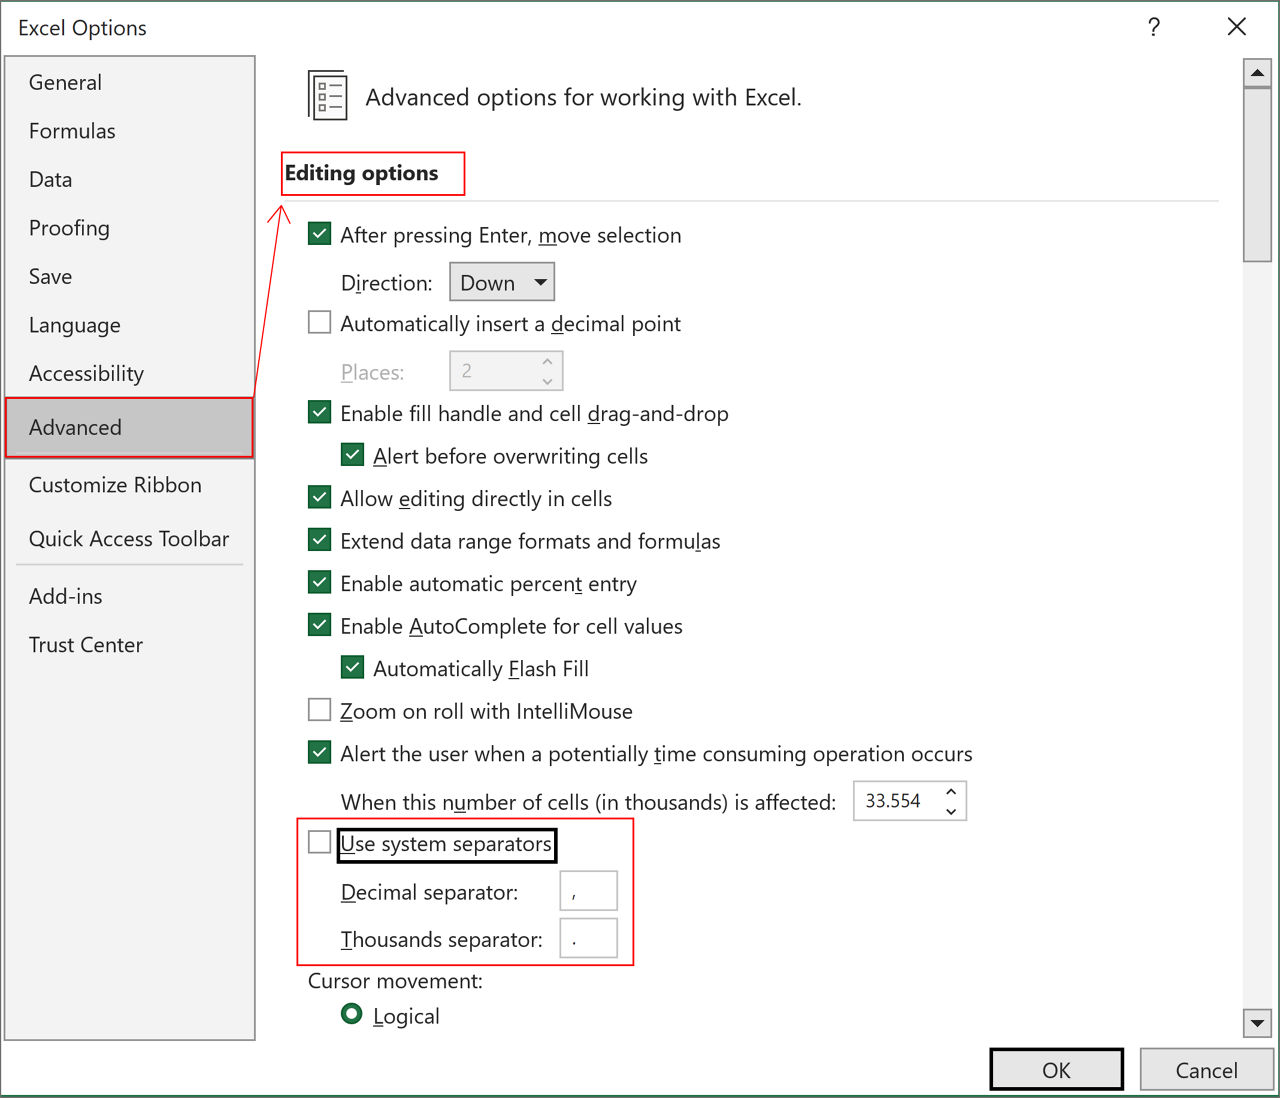
In order to display the CSV file correctly, the user should uncheck the Use system separators box in Excel (File -> Options -> Advanced). The user should then configure the default Decimal Separator as comma (,) and Thousands Separator as period (.).
In the file, the first column contains string IDs. The second column has the existing strings in the chosen Workflow Language, and the rest of the columns represent other languages.
These additional language columns will be empty for untranslated strings. Users must translate these strings on their own or hire an external service.
4. After getting the file translated, go back to Spatial Editor.
Note: the CSV file needs to be saved and closed before it can be imported.
5. Click on Language from the toolbar.
6. Click on Import CSV.
7. Upload the new file.
⇒ The additional languages are added to the workflow.
Note: While the workflow is running in Spatial Workplace, the application will continue the task in the preferred app language, if available in the task. If it is not available, it will run the task in the Workflow Language.
Note: The added translations are also exported along with the workflow and can be used again.
Settings
Settings gives users options to configure the Editor, Pin content, keyboard hotkeys, and text-to-speech.
- Editor: Gives information about the version of the software and allows users to configure autosave time intervals and enable/disable the Scripting function.
- Pin Content: Allows users to configure the target resolution of video conversion, the default color for Holograms and Lines, and gives the option to downscale images.
- Keyboard Hotkeys: Allows users to configure shortcuts for available commands.
- Text-To-Speech: Allows users to configure language selection for text-to-speech function.
- Restore Defaults: Allows users to undo all the configurations they have made.