Scheduling a TeamViewer Meeting - TeamViewer Support
<main>
<article class="userContent">
<p><br></p><h3></h3><h2 data-id="general">General</h2><div class="blockquote"><div class="blockquote-content"><p class="blockquote-line"><em>This article applies to all TeamViewer Meeting</em> <em>users. </em></p></div></div><p>Besides having the possibility to start a spontaneous TeamViewer Meeting, you can schedule meetings upfront.</p><p>Scheduling a meeting means, you can prepare a meeting that will be held at a later point in time and re-use the same meeting ID again for recurring meetings with the same topic (e.g. Jour-fixe) or delete the meeting ID once it is no longer needed.</p><p>The benefit of a scheduled meeting is that </p><ul><li>you can provide your participants upfront with the meeting access credentials (a unique Meeting ID and a password)</li><li>you do not need to use your personal Meeting ID for each meeting you are organizing</li><li>you can set passwords for secure access to the meeting for invited participants only. </li></ul><p><strong>📌Note</strong>: You can only use this feature if you are logged in with your TeamViewer account. If you do not have an account yet, you will find the instructions on how to create it <a href="https://community.teamviewer.com/English/kb/articles/26241-your-blizz-account" rel="nofollow noreferrer ugc">here</a>.</p><p> </p><h3 data-id="-1"></h3><h2 data-id="scheduling-a-new-meeting">Scheduling a new meeting</h2><p>Scheduling a meeting works both for <strong>recurring or one time meetings</strong>. To schedule a meeting, please follow the steps below:</p><p>1. Navigate to <strong>Scheduler </strong>and click the <strong>New Meeting</strong> button. </p><div class="embedExternal embedImage display-large float-none">
<div class="embedExternal-content">
<a class="embedImage-link" href="https://us.v-cdn.net/6032394/uploads/3GRCORBO1DTQ/image.png" rel="nofollow noreferrer noopener ugc" target="_blank">
<img class="embedImage-img" src="https://us.v-cdn.net/6032394/uploads/3GRCORBO1DTQ/image.png" alt="image.png" height="634" width="919" loading="lazy" data-display-size="large" data-float="none"></img></a>
</div>
</div>
<p><br></p><p>2. The <strong>Schedule a Meeting</strong> dialog will open.</p><p>In this dialog, you can enter a <strong>subject</strong> for the meeting, <strong>start-</strong> and <strong>end </strong>(day and time) for the meeting. If needed, you can change the time zone.</p><p>Additionally, you can choose a <strong>password</strong> for the meeting and <strong>save the meeting for later reuse. </strong>Using a password is recommended.</p><p> </p><div class="embedExternal embedImage display-large float-none">
<div class="embedExternal-content">
<a class="embedImage-link" href="https://us.v-cdn.net/6032394/uploads/6BHH7RW3HC0C/image.png" rel="nofollow noreferrer noopener ugc" target="_blank">
<img class="embedImage-img" src="https://us.v-cdn.net/6032394/uploads/6BHH7RW3HC0C/image.png" alt="image.png" height="291" width="460" loading="lazy" data-display-size="large" data-float="none"></img></a>
</div>
</div>
<p><br></p><p>3. Click on <strong>Save</strong>.</p><p> </p><h2 data-id="starting-a-scheduled-meeting">Starting a scheduled meeting</h2><p>A scheduled meeting needs to be started by the organizer manually.
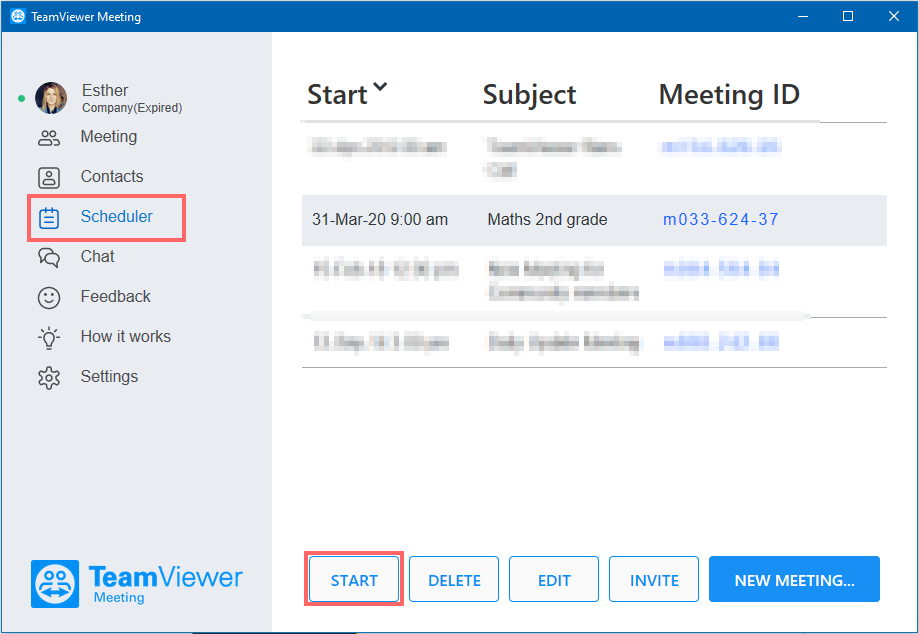
</p><p>1. Navigate to the <strong>Scheduler </strong>and select the desired meeting you would like to start. To start the meeting, click on the <strong>Start</strong> button. The meeting will start immediately and the participants are able to join.</p><div class="embedExternal embedImage display-large float-none">
<div class="embedExternal-content">
<a class="embedImage-link" href="https://us.v-cdn.net/6032394/uploads/DYQVHZJ19XJU/image.png" rel="nofollow noreferrer noopener ugc" target="_blank">
<img class="embedImage-img" src="https://us.v-cdn.net/6032394/uploads/DYQVHZJ19XJU/image.png" alt="image.png" height="634" width="919" loading="lazy" data-display-size="large" data-float="none"></img></a>
</div>
</div>
<p> </p><h2 data-id="recurrent-meetings">Recurrent Meetings</h2><p>If you have scheduled and saved a meeting that takes place e.g. every Monday Morning at 9:00 am with the above steps, this meeting will remain in your Scheduler until you manually delete it. </p><p>As the Meeting ID will not change you can <a href="https://community.teamviewer.com/English/kb/articles/26247-scheduling-a-blizz-meeting" rel="nofollow noreferrer ugc">send an invitation for this recurring meeting</a> to your contacts through your E-Mail program or any other communication method. The participants can always join the meeting with the same access credentials.</p><p>For security reasons, you might want to change the password regularly. Please keep in mind to inform the participants about this change.</p><p> </p><h2 data-id="deleting-a-meeting-from-the-scheduler">Deleting a meeting from the Scheduler</h2><p>If you no longer need the scheduled meeting, you can <strong>delete</strong> it.</p><p>The Meeting ID will no longer be available once you deleted the meeting.</p><p>To delete a scheduled meeting, navigate to the <strong>Scheduler</strong>, select the meeting that you want to delete, and click on the <strong>delete</strong> button.</p><div class="embedExternal embedImage display-large float-none">
<div class="embedExternal-content">
<a class="embedImage-link" href="https://us.v-cdn.net/6032394/uploads/H1DUOC8AUQGB/image.png" rel="nofollow noreferrer noopener ugc" target="_blank">
<img class="embedImage-img" src="https://us.v-cdn.net/6032394/uploads/H1DUOC8AUQGB/image.png" alt="image.png" height="634" width="919" loading="lazy" data-display-size="large" data-float="none"></img></a>
</div>
</div>
<p> </p><h2 data-id="editing-a-meeting-from-the-scheduler">Editing a meeting from the scheduler</h2><p>You can make changes to a scheduled meeting at any time or edit an old meeting and re-use it.</p><p>Once you change the date, the same meeting ID will still be valid for re-use.</p><p>1. Navigate to the <strong>Scheduler</strong>, select the meeting that you want to edit, and click the <strong>edit</strong> button. The <strong>Schedule a meeting</strong> dialog appears and you can edit the data as needed.</p><div class="embedExternal embedImage display-large float-none">
<div class="embedExternal-content">
<a class="embedImage-link" href="https://us.v-cdn.net/6032394/uploads/V6UW8874PNU9/image.png" rel="nofollow noreferrer noopener ugc" target="_blank">
<img class="embedImage-img" src="https://us.v-cdn.net/6032394/uploads/V6UW8874PNU9/image.png" alt="image.png" height="634" width="919" loading="lazy" data-display-size="large" data-float="none"></img></a>
</div>
</div>
<p><br></p><p>2. Click on <strong>Save </strong>to save the changes.</p><p>TeamViewer Meeting automatically creates an e-mail that you can send to the participants to notify them about the changes.</p><p> </p><h2 data-id="inviting-participants">Inviting participants</h2><p>To invite your participants to your meeting easily, you can use the <strong>Invite</strong> feature within the TeamViewer Meeting software.</p><p>1. Navigate to the <strong>Scheduler</strong>, select the meeting you want to invite the participants to, and click on the <strong>Invite </strong>button.</p><div class="embedExternal embedImage display-large float-none">
<div class="embedExternal-content">
<a class="embedImage-link" href="https://us.v-cdn.net/6032394/uploads/4BWYC8NBQGOW/image.png" rel="nofollow noreferrer noopener ugc" target="_blank">
<img class="embedImage-img" src="https://us.v-cdn.net/6032394/uploads/4BWYC8NBQGOW/image.png" alt="image.png" height="634" width="919" loading="lazy" data-display-size="large" data-float="none"></img></a>
</div>
</div>
<p> </p><p>2. The <strong>Invite Participants</strong> dialog opens.</p><p>It provides you with an invitation text that already includes all relevant information for the participants to join the meeting:</p><ul><li>A link to access the meeting,</li><li>the Meeting ID,</li><li>the dial-in number,</li><li>and the password if added.</li></ul><p>You can edit this text freely.</p><div class="embedExternal embedImage display-large float-none">
<div class="embedExternal-content">
<a class="embedImage-link" href="https://us.v-cdn.net/6032394/uploads/WT9QQRA5PEEY/image.png" rel="nofollow noreferrer noopener ugc" target="_blank">
<img class="embedImage-img" src="https://us.v-cdn.net/6032394/uploads/WT9QQRA5PEEY/image.png" alt="image.png" height="357" width="478" loading="lazy" data-display-size="large" data-float="none"></img></a>
</div>
</div>
<p> </p><ul><li><strong>Open as e-Mail</strong>: an e-mail with this text opens in your default mail program, e.g. Outlook.</li><li><strong>Copy to clipboard</strong>: you can copy the text to another program using the clipboard and use it there for the invitation.</li></ul><p><br></p><h3 data-id="-2"></h3>
</article>
</main>