The full version of TeamViewer on Windows can run command line parameters that initiate a session to a remote device using a pre-set ID, password, and connection mode.
You can use these parameters to run TeamViewer from the Command Prompt, a script (for example, a .bat file), or a shortcut on your Desktop or Start menu.
This article applies to TeamViewer users with Windows or macOS.
How to use Command line parameters
Parameters with and without value
📌Note: Some parameters are only available with TeamViewer (Classic) version 13.2.
There are two types of parameters, with value and without value.
Example for a parameter without value:
TeamViewer.exe --noInstallation
Example for a parameter with value:
TeamViewer.exe --id 123456789
In most cases, only one value is expected; if multiple are given, only the first one is used.
If the value of a parameter contains a space, the value must be enclosed in quotation marks.
📌Notes:
- A long parameter is called like this (with two “-“ -> “--“): TeamViewer.exe --Minimize
- If the parameter has a short variant, it can also be called with only one “-“: TeamViewer.exe -n
- However, using “--n” is also possible on some platforms. Multiple parameters can be combined in one call, and parameters are case-sensitive.
Application
The following options are supported:
📌NOTE: Please find the Parameter and short variant on the first line, with the description for each beneath.
Minimize
Start TeamViewer minimized. If "Start TeamViewer with Windows" is enabled, TeamViewer will be started in the tray instead.
id -i
Starts a connection to the given partner ID.
Password -p
Used in combination with "id". Password to use for the connection.
PasswordB64 -B
Used in combination with "id". Base64 encrypted password to use for the connection.
mode -m
Used in combination with "id". Connection mode to use for the connection.
If omitted, the remote control is used-
Supported values:
Example: --mode fileTransfer
quality -q
Used in combination with "id". Connection quality setting to use for the connection.
Supported values:
- automatic quality selection
- optimize quality
- optimize speed
- custom settings
- undefined
Example: --quality2
ac -a
Used in combination with "id". Access control rights to use for the (outgoing) connection.
Supported values:
0. full access
- confirm all
- view and show
- custom
📌Note: When using the custom parameter, the previous custom outgoing access control values will be applied.
9. undefined
Example: --ac1
play
Play a TeamViewer session file (*.tvs)
Example: TeamViewer.exe --play C:Users\shvarts\Desktop\A\abc.tvs
control
Start a connection (RC/Meeting) to an id specified in given control file (*.tvc)
Where to find .tvc files:
- %appdata%\TeamViewer\MRU\RemoteSupport
- %appdata%\TeamViewer\MRU\Meeting
Example: TeamViewer.exe --control C:\Users\shvarts\Desktop\A\abc.tvc
ProxyIP
Proxy IP and Port, formatted like: IPAddress:Port
Example: TeamViewer.exe --ProxyIP 192.168.0.2:8080
ProxyUser
Used in combination with "ProxyIP". Proxy Username.
Example: TeamViewer.exe --ProxyIP 192.168.0.2:8080 --ProxyUser admin
ProxyPassword
Used in combination with "ProxyIP". Proxy Password Base64 encoded.
Example: TeamViewer.exe --ProxyIP 192.168.0.2:8080 --ProxyUser admin --ProxyPassword test
sendto
Send a list of files to a partner in your partner list. Prompts may open for login and selection of the recipient.
Examples:
Single file: TeamViewer.exe --Sendto C:\Users\shvarts\Desktop\A\abc.jpg
Multiple files: TeamViewer.exe --Sendto C:\Users\shvarts\Desktop\A\abc.jpg C:\Users\shvarts\Desktop\A\abcd.jpg
Examples
teamviewer.exe -i <ID> -P <Password>
teamviewer.exe -i <ID> -P <Password> -m fileTransfer
teamviewer.exe -i <ID> -P <Password> -m vpn
Device assignment (Legacy)
On Windows, the assignment task is started like this:
TeamViewer.exe assign <options>
On macOS, it is started like this:
Host version:
sudo /Applications/TeamViewerHost.app/Contents/Helpers/TeamViewer_Assignment <options>
Full version:
sudo /Applications/TeamViewer.app/Contents/Helpers/TeamViewer_Assignment <options>
"sudo" is required to obtain admin rights because AssignmentData.json is written with restricted rights by TeamViewer_Service. The tool can only be executed from within the app bundle; otherwise, the tool cannot find its required frameworks.
If the value (e. g. group) contains a space, the value must be enclosed in "", or each space must be encapsulated with "\" on macOS.
Use “--" for Windows in front of each option and “-“ for macOS in front of each option.
Parameters
The following options are supported:
📌NOTE: Please find each option and its description below.
api-token - REQUIRED
Token needed to access the API, which could be generated in the management console (e.g., in "profile settings/Apps"). Tokens for the deployment of custom hosts can also be used.
alias
Alias for the new device in the computers & contacts list. If the device is already in the contact list, no alias will be applied
grant-easy-access
DEFAULT VALUE: falseGrants easy access after assignment (same as the "GRant easy access" option in the TeamViewer main window)
reassign
DEFAULT VALUE: falseAssigns the device to the account even if the device is already assigned to an account.
wait
DEFAULT VALUE: 10Waiting time in seconds for the assignment to wait for the data file to be created. Usually, the default value is sufficient.
group
Only required if no custom host is used, as the group is already defined in the custom configuration. Name of the group in which the device will be added. If the group doesn't exist, it will be automatically created. If the device is already present in the computers & contacts list in a different group, it will not be moved to the group
group-id
Alternative to the --group parameter if the id of the group is known. It can be useful for larger customer environments as it speeds up the assignment process.
Usually, using --group is sufficient
proxy
URL of your proxy in the format <name>:<port>,
Example: --proxy yourproxy:3201
proxy-user
The username used for authentication against the proxy
proxy-pw
Password used for authentication against the proxy
proxy-pwbase64
Same as --proxy-pw but the password needs to be entered as a Base64 encoded string.
verbose
Only required for macOS. It can be used to enable more detailed logging. Only used in cases of error analysis.
retries
The assignment is retried in case of temporary errors. Note that there is a waiting time of 1 second between each try.
timeout
Set the overall timeout in seconds used for all assignment tries.
Examples:
Windows
Basic assignment:
TeamViewer.exe assign --api-token 12345678 --group SomeGroup
Using an alias & grant easy access:
TeamViewer.exe assign --api-token 12345678 --group "Some Group" --alias %COMPUTERNAME% --grant-easy-access
Using a proxy with authentication:
TeamViewer.exe assign --api-token 12345678 --group SomeGroup --reassign --proxy testproxy:3201 --proxy-user someuser --proxy-pw passwd
macOS
📌Notes: Examples are for the Host version. For the full version, replace TeamViewerHost.app with TeamViewer.app)
Basic assignment:
sudo /Applications/TeamViewerHost.app/Contents/Helpers/TeamViewer_Assignment -api-token 12345678 -group SomeGroup
Using an alias & grant easy access:
sudo /Applications/TeamViewerHost.app/Contents/Helpers/TeamViewer_Assignment -api-token 12345678 -group "Some Group" -alias $USER -grant-easy-access
Using a proxy with authentication:
sudo /Applications/TeamViewerHost.app/Contents/Helpers/TeamViewer_Assignment -api-token 12345678 -group Some
Device assignment (New)
For mass deployment on TeamViewer version 15 and higher, we recommend using the new command line parameters - you may find out more information in the Knowledge-Based - Assign a device via command line - 8/9
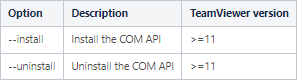
COM API
On Windows, the COM API could be used like this:
TeamViewer.exe api <options>
How to verify successful installation
Via logfile
Open TeamViewer logfile from %appdata%\TeamViewer and find the following entries:
CommandLineTasks: initializing...

CommandLineTasks: installing COM-API

API: Installing API ...

API: ... successfully installed, calling SignalServiceParamChange ...

API: ... SignalServiceParamChange finished

CommandLineTasks: installing COM-API successful

CommandLineTasks: finished
Via Windows Powershell
Use the following Powershell commands:
$tv = new-object -com TeamViewer.Application
$tv.ApiVersion
Verify that any version will be written in the Windows Powershell for example:
How to verify successful un-installation
Via logfile
Open the TeamViewer logfile from %appdata%\TeamViewer and find the following entries:
CommandLineTasks: initializing...

CommandLineTasks: uninstalling COM-API

API: Uninstalling API ...

API: ... successfully uninstalled, calling SignalServiceParamChange ...

API: ... SignalServiceParamChange finished

CommandLineTasks: uninstalling COM-API successful

CommandLineTasks: finished
Via Windows Powershell
Use the following Powershell commands:
$tv = new-object -com TeamViewer.Application
Verify that an error will be printed in the Powershell