The TeamViewer integration for Dynamics CRM embeds TeamViewer remote control functionality into your CRM Service Cloud and On-premise environment. This allows you to:
- Create and join a support session directly from a CRM service case
- Remotely control the customer’s device
- View and Manage TeamViewer Sessions in the TeamViewer (Classic) Management Console
With TeamViewer, you can easily create TeamViewer Service Cases and provide remote support right from your Dynamics CRM cases. The remote troubleshooting experience is improved by optimizing communication between users and Call Center staff. Remote control helps to increase efficiency of service desks and to improve customer satisfaction significantly.
📌Note: The TeamViewer integration for Dynamics CRM will be supported only on the Microsoft Dynamics CRM supported browsers. Microsoft recommends latest version of Internet Explorer browser.
Please keep in mind that Integrations are not included in basic license packages. They have to be purchased separately as AddOns. For more information, please visit our website: http://www.teamviewer.com/integrations
Prerequisite
To be able to use this feature, you must meet the following requirements:
- Email router/SMTP/Outlook configuration should be configured already in Microsoft Dynamics CRM.
📌Note: All the screenshots are used as per Microsoft Dynamics CRM2016 On-Premise.
- Dynamics CRM 2016-Online and On-premise
- Dynamics 365: Online
- TeamViewer Integration for Dynamics CRM is supported on the following versions of both Cloud and Onpremise versions
Installing and configuring the TeamViewer integration
This article describes the installation and configuration of the TeamViewer App for Dynamics CRM Cloud and On-premise environments. It also provides a short overview of the various features provided by the application.
Installation
Installing the TeamViewer application is optional. In case you do not install TeamViewer, a run-once version of TeamViewer is downloaded when you try to join/initiate a TeamViewer session. Else, the TeamViewer window will be opened automatically. We recommend installing the TeamViewer application as this will reduce the time required to join a session. However, please note that you will need administrator access on your system in order to install TeamViewer.
To install the TeamViewer App, follow the below steps:
1. Download the TeamViewer installer by invoking the following URL: https://download.teamviewer.com/download/TeamViewer_Setup.exe
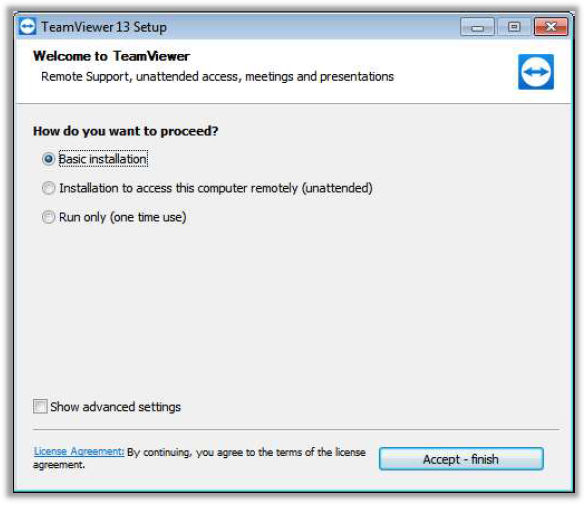
2. Run the downloaded application. Choose the Basic Installation option as shown below and then click the Accept – Finish button.
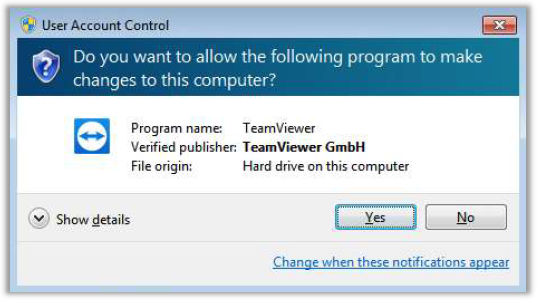
3. In case the User Account Control dialog pops up, click the Yes button. TeamViewer installation will proceed and complete.
Using TeamViewer for Microsoft Dynamics
You may create a service case against any of the following entities:
- Account
- Contact
- Opportunity
- Lead
- Case
You are allowed to create one service case per instance of the entity. Creating a service case initiates a new TeamViewer session. The below snapshot shows the various UI elements that will be available for the purpose of integrating with TeamViewer. While the snapshot shows an Account entity, the integration related UI elements will be common across all of the above entities.

The above image shows the state of a newly created account record. Since no service case has yet been created, the “New Service Case” button is in an enabled state. The remaining buttons are disabled. Here’s a quick note of the functions of the various buttons. These will be explained in more detail in the subsequent sections.
New Service Case
As the name suggests, this button allows you to create a new service case i.e. to establish a TeamViewer session. This button remains enabled as long as no valid service case exists for this entity instance or if the service case has expired.
Join As Admin
In case the TeamViewer app is not installed on the system, clicking on this button either downloads the use-once TeamViewer app and then opens the corresponding TeamViewer session; else, it directly opens the relevant TeamViewer session. This button remains enabled as long as a valid and unexpired service case exists for this entity instance.
Send Customer Link
Clicking this link opens up the default email client with the addresses of all relevant contacts (i.e. all contacts associated to the entity instance) added to the “To” list and with the relevant email links (that enable the end users to join the TeamViewer session) in the body. This button remains enabled as long as a valid and unexpired service case exists for this entity instance.
Close Service Case
Clicking this button closes the service case associated with the current entity instance. This button remains enabled as long as a valid and unexpired service case exists for this entity instance.
Notifications
You will see a notification in case the customer has joined TeamViewer session corresponding to the current entity instance.
Creating a TeamViewer Service Case
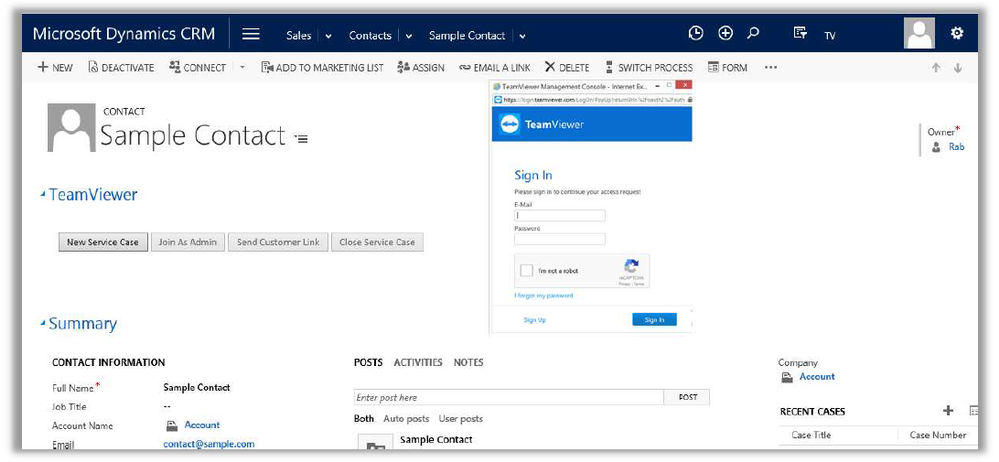
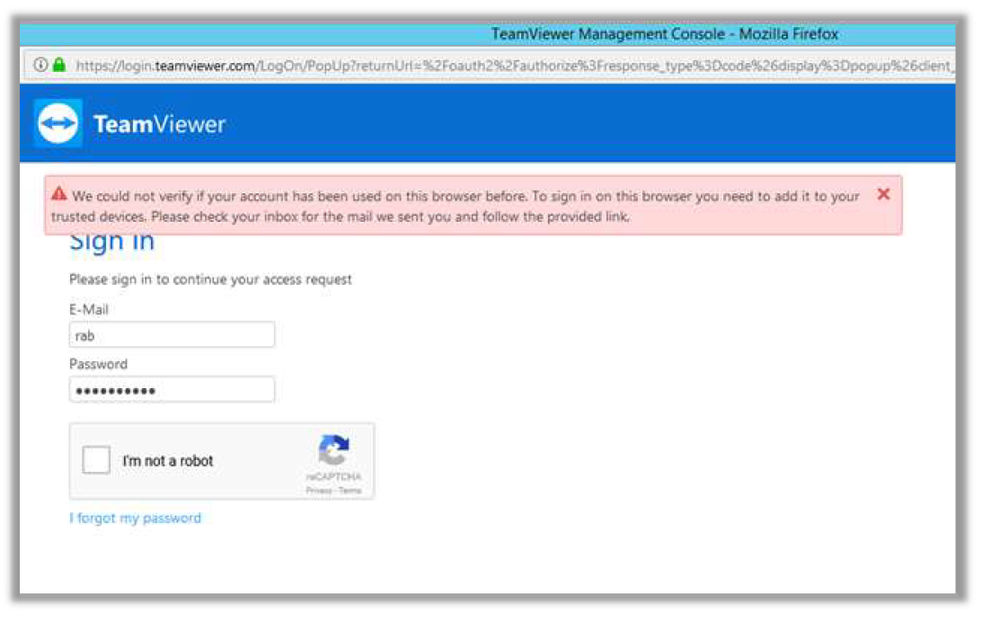
As mentioned earlier, In order to create a new service case, click on the New Service Case button. This will open up a new popup pointing to the TeamViewer site as shown below. Please note that the popup may get blocked by the browser’s popup blocker as shown below. In such cases, please instruct the browser to allow popups from the TeamViewer site.

Once the popup opens up, enter your TeamViewer credentials. In case the I’m not a robot checkbox does not show up, click on Sign In. Else, please check the checkbox, complete the reCAPTCHA challenge and then click on Sign In.
For the first time the supporter/customer need to verify and add devices in in the TeamViewer (Classic) Management console.
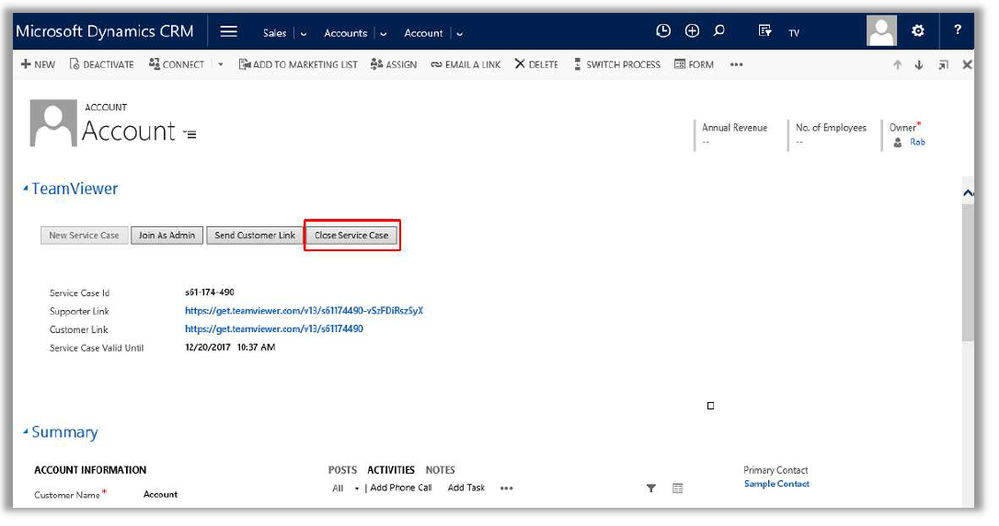
Now you will notice that the New Service Case button now gets disabled and the Join As Admin, Send Customer Link and Close Service Case buttons now get enabled as shown in the snapshot below. In addition, the details of the service case are also shown.
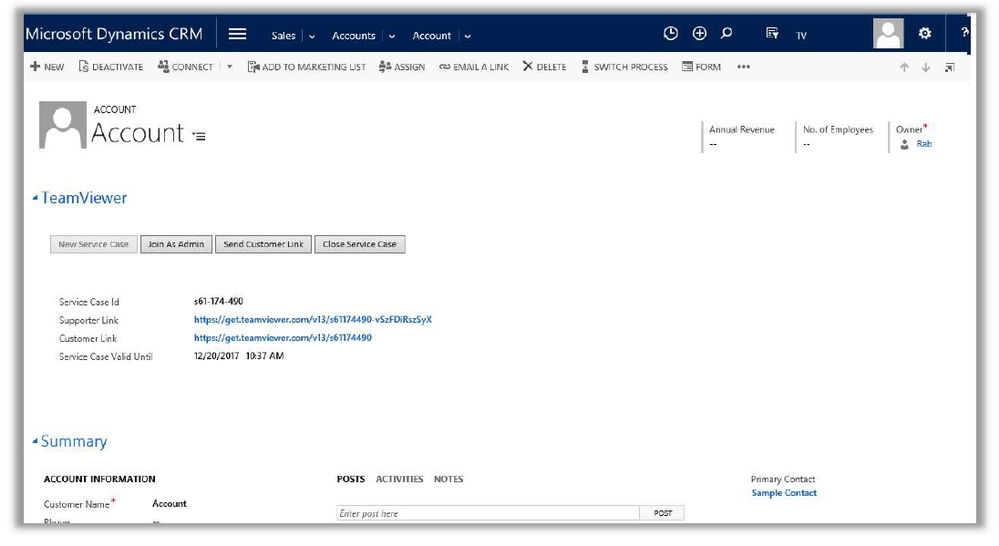
This includes the following fields
Service Case ID
As the name suggests, this is the ID of the TeamViewer session that was just created.
Supporter Link
Clicking this link allows you to join the TeamViewer session as an admin. Please note that clicking on the “Join As Admin” achieves the same result.
Customer Link
This is the link which will be sent to the customer when you send an email to the customer by clicking on the “Send Customer Link” button.
Service Case Valid Until
This fields shows the date and time until when the service case is valid. This shows the UTC time. Once the “Service Case Valid until” date and time expires then the notification popup can’t be seen. In order to get the new notification of that customer joins the TeamViewer only if the Email is sent to customer through Send Customer Link.
Send Customer Link to Customer
Click on the “Send Customer Link” button in order to send the Customer Link to the customer. Once you click on the button, a new popup opens up. The popup displays a list of Email Templates applicable for the entity along with the list of contacts associated with the entity instance.
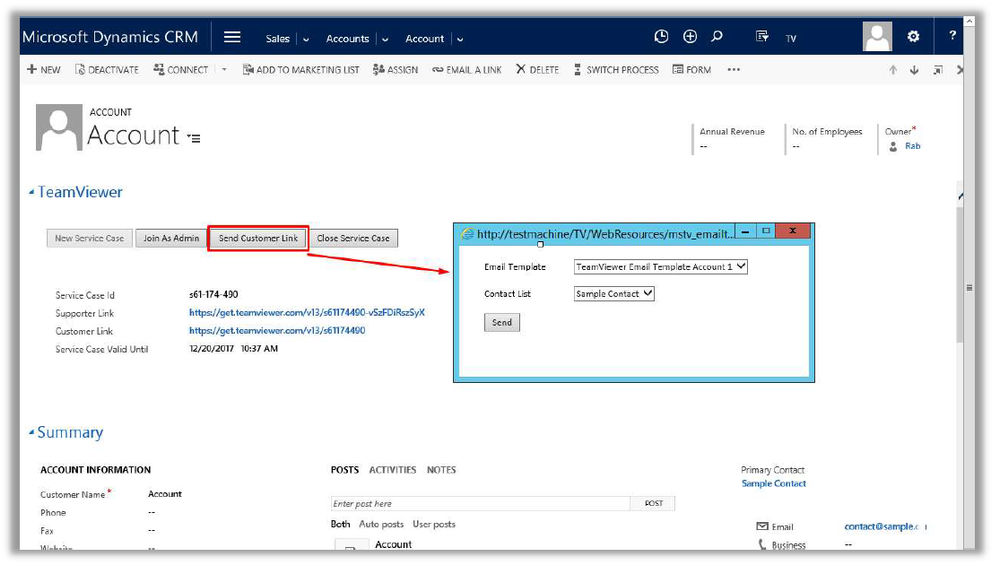
Choose the appropriate email template and contact and click on Send. Once the Send is clicked, an email message is opened on your default email client. The email id of the selected contact will be available in the "To" list. The remaining fields like the subject and contents will be populated as per the selected email template.

As an aside, please see the appendix to understand as to how you can add contacts to entities
Connecting to a TeamViewer session
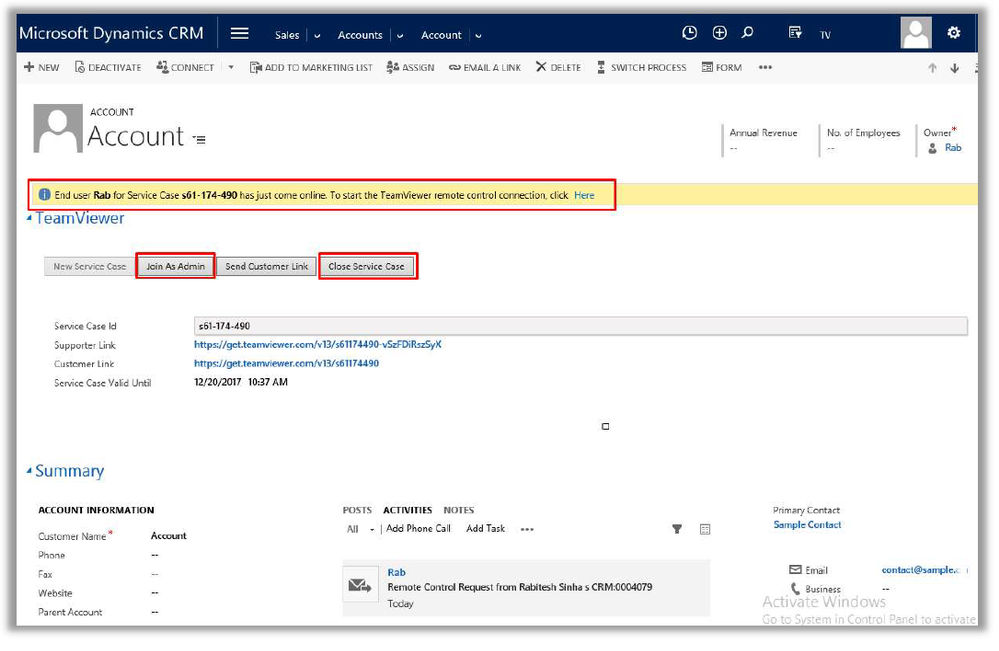
As mentioned earlier, once the customer receives the email and once they join the TeamViewer session by clicking on the customer link, you will notified via the notification message that appears on the Dynamics CRM page. Once notified, you can join the TeamViewer session by doing either of the following:
Clicking on the Join As Admin or on the Supporter link in case you are on the same entity instance that corresponds to the TeamViewer session.
- Clicking on the Supporter link that is available in the notification
Once you perform the above, in case you do not install TeamViewer, a run-once version of TeamViewer is downloaded when you try to join/initiate a TeamViewer session. Else, the TeamViewer window will be opened automatically. Once you join the TeamViewer session, the customer will be notified of the same and he/she will be asked to provide permission for you to be able to view/control their screen. Once the customer provides the permissions, the session will be established and you will be able to view and control the user’s screen.
Resolving the TeamViewer Service Case
Once you have been able to conclude the session and once you do not need the session any longer, please click on the “Close Service Case” button. This will close the Service case. Once this is done, the “New Service Case” button gets enabled and the “Send Customer Link”, “Join As Admin” and “Close Service Case” buttons get disabled. In case you need to re-establish a session with the customer, please click on the “New Service Case” button.
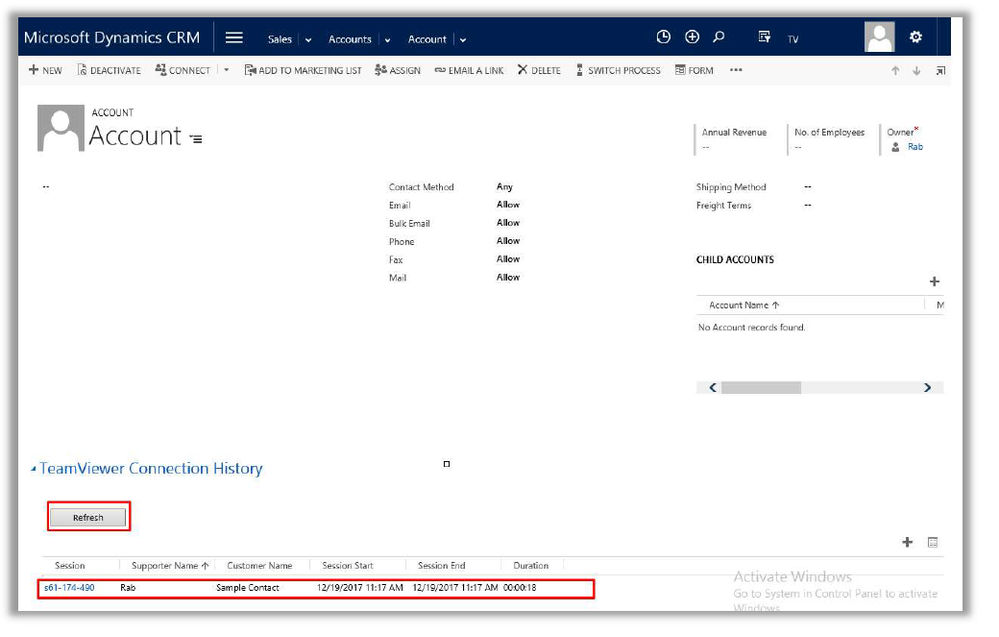
Connection Report (TeamViewer Connection History)
You may view the closed sessions in the TeamViewer Connection History area. In order to view any recently closed sessions (that were closed after you opened the TeamViewer Connection History Page), click the refresh button.
TeamViewer Security Role for Microsoft Dynamics CRM APP
TeamViewer CRM App are enabled to use on Account, Contact, Case, Lead, and opportunity entities in Microsoft Dynamics CRM supported versions. Therefore the security role for TeamViewer CRM App users should have the minimum privileges for below entities.
- Account
- Contact
- Lead
- Opportunity
- Case
- TeamViewer Connection History
- TeamViewer Current Session
- TeamViewer User
Microsoft Dynamics CRM Administrator & Customizers will have the full access of TeamViewer custom entities created on the solution “TeamViewer App”. Microsoft Dynamics CRM Administrator has a security role of “System Administrator” which gives full privileges to access and customize anything in the Microsoft Dynamics CRM.
CRM Administrators & Customizers manages the operation of application, and they are the owners of the customizations as well. Any change to the customizations, users, workflows, plugins, actions, web resources can be done by them. They manages the visibility of certain entity records to different agent users or teams. They are also responsible for importing and
exporting the solutions (customizations) in CRM Systems.
CRM Customizers manage the customization of the applications and other systems integrations. They are the owners for the customization deployed in CRM, such as workflows, plugins, actions, web resources.
Below are the custom entities (display name) in TeamViewer App Solution.
- TeamViewer Company Report
- TeamViewer Connection History
- TeamViewer Current Session
- TeamViewer User
Once TeamViewer App is installed from AppSource on the supported version of Microsoft Dynamics CRM then Microsoft Dynamics CRM system administrator should give proper security role to the user would be using TeamViewer CRM App.
Microsoft Dynamics CRM System Administrator has two choice to enable users to use TeamViewer CRM App and are listed below.
1. Adding the security role required to the existing security role enabled for CRM user. Please note that highest security role privilege will append/override the lowest security role privileges.
2. Adding the security role TeamViewer User provided in the TeamViewer CRM App as standalone or can be added with existing user’s security role.
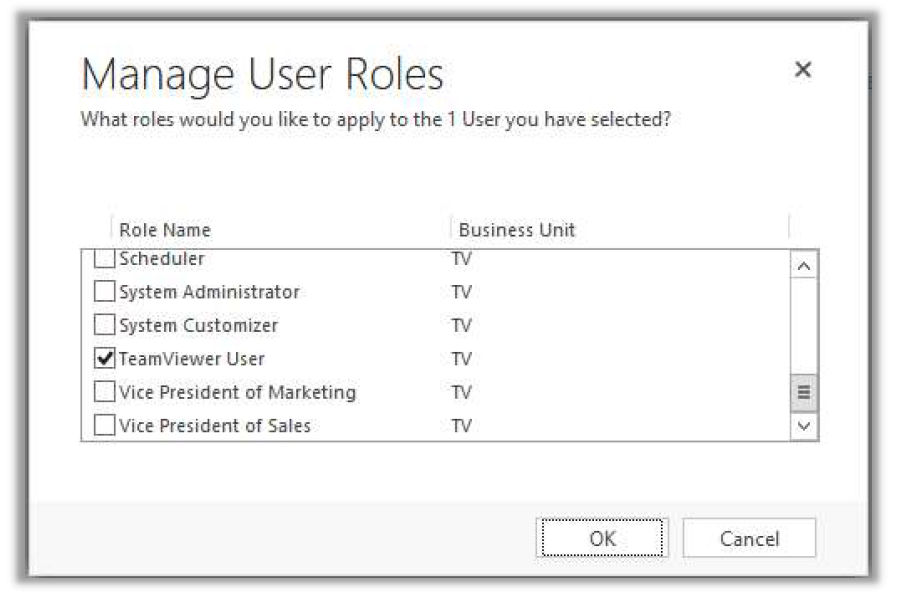
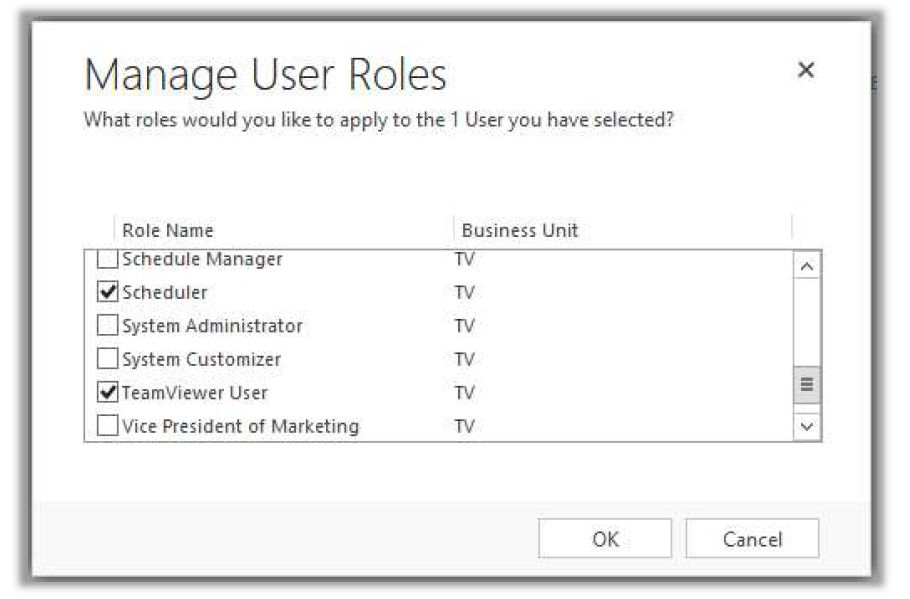
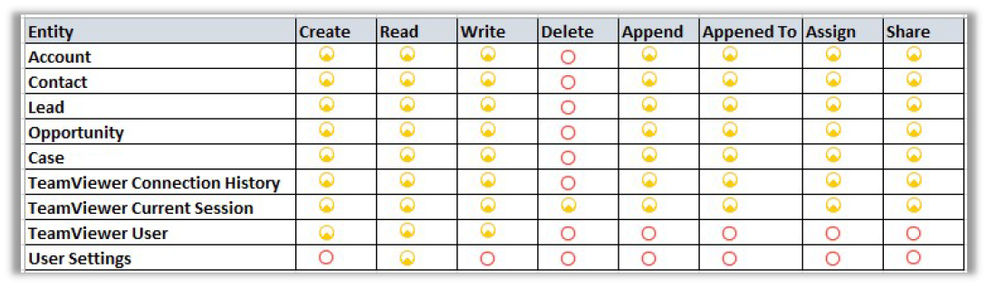
Minimum Security Role required for users to use TeamViewer CRM App are listed in below table. Apart from these security privileges users should have minimum privileges to login to Microsoft Dynamics CRM.
📌Note: The user with security role “TeamViewer User” will have user level access to TeamViewer Connection History, TeamViewer Current Session and TeamViewer User. Please refer below image.
📌Note: Additional security roles can be added by Microsoft Dynamics CRM administrator without affecting the existing functionality of the Microsoft Dynamics CRM, but needs to be careful while assigning the security roles to MS CRM users. Suggested method, is to test the affect in development or test environment and then deploy it in production.
Creating a TeamViewer Email Template
TeamViewer CRM App are enabled with TeamViewer email template to use on Account, Contact, Case, Lead, and opportunity entities to send the TeamViewer customer link to its customer through Microsoft Dynamics CRM. However the Microsoft Dynamics CRM Administrator or Customizers can create their own customized TeamViewer email template to send it to their customer.
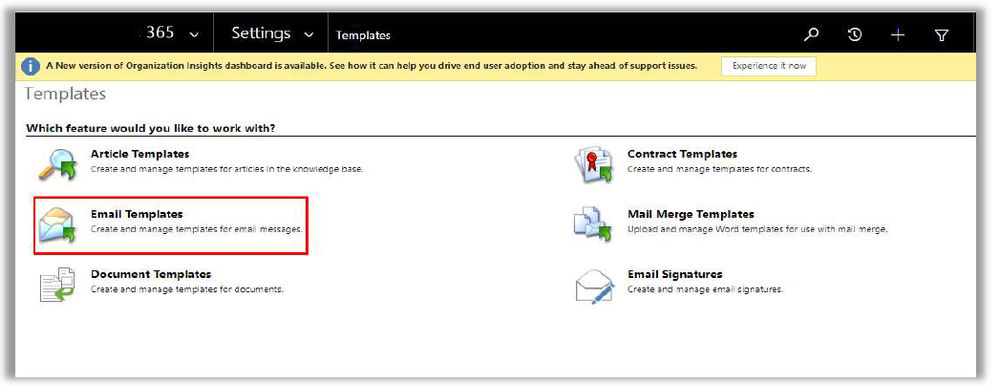
To create a TeamViewer email Template Microsoft Dynamics CRM Administrator or Customizers has to navigate to Settings ➜ Templates ➜ Email Templates do below customization.
- The TeamViewer email template should be of Template Type of target entity wise. For instance if Microsoft Dynamics CRM Administrator or Customizers wants to create TeamViewer email template for Account entity then the Template Type should be Account.

- The naming of TeamViewer email templates should begin with the keyword “”. For instance if TeamViewer email template is created for Account entity and the name is proposed as “Account TeamViewer customer support Link” then the correct naming of TeamViewer email template should be “TeamViewer Email Customer Support Link Account”. Here the key word “TeamViewer Email” is mandatory in the beginning of the TeamViewer email template naming. Please note that the key word “TeamViewer Email” is not case sensitive.
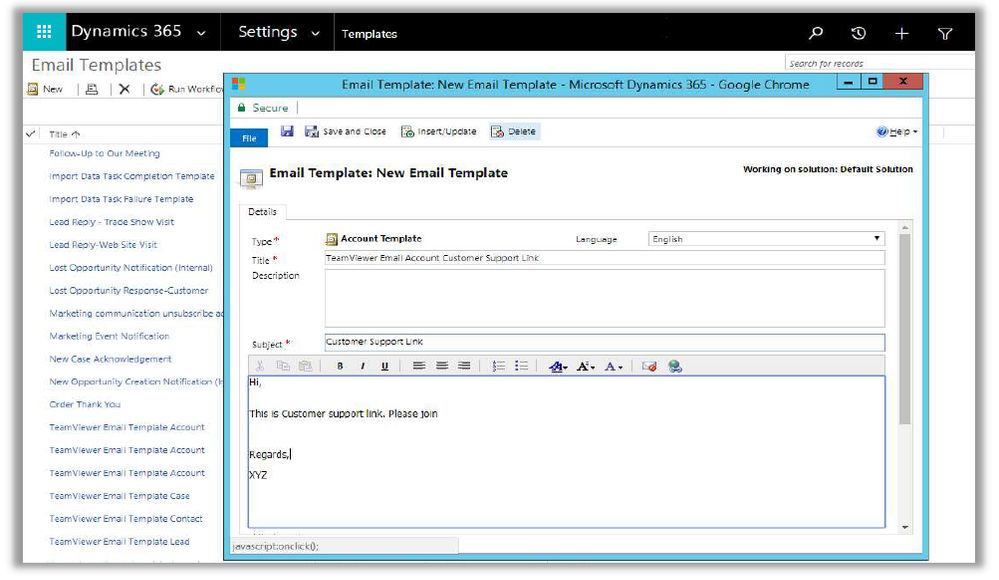
- To write the body of the email template, it is advised to not to use the customer name HTML code (As shown in below image) as the TeamViewer email template won’t pick the correct customer name from the contact given in the Lead, Opportunity and Case entity. However the Microsoft Dynamics CRM Administrator or Customizers can set the customer name HTML code to auto pick customer name and send to recipient.
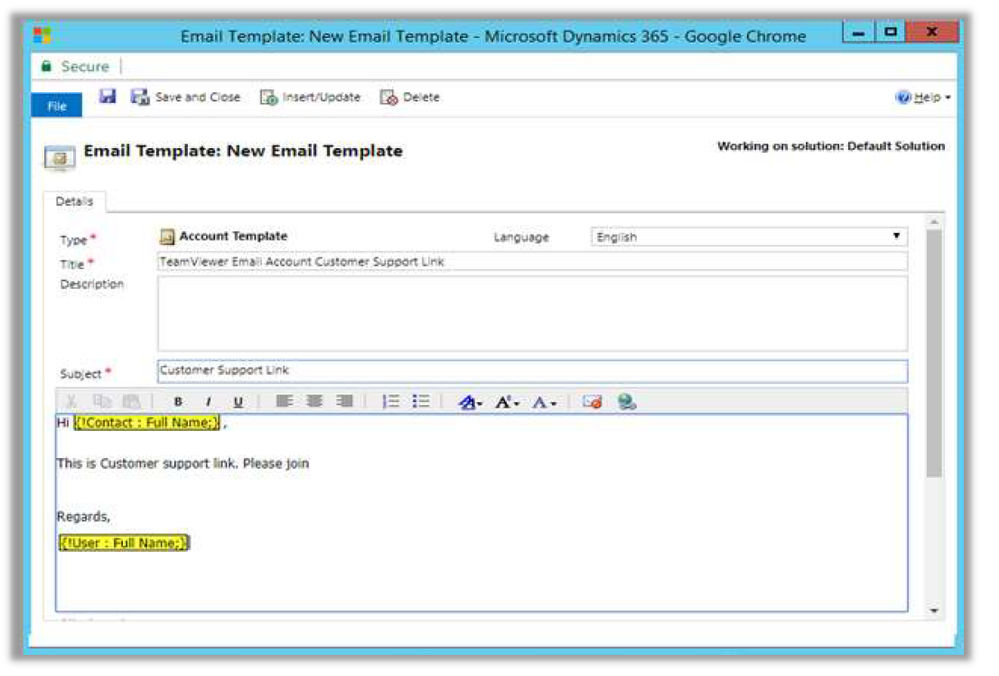
📌Note: The user name HTML code will set the correct user name as it is the Name of the CRM user which is not variable and sent correctly to recipient. Not used in default TeamViewer email template.
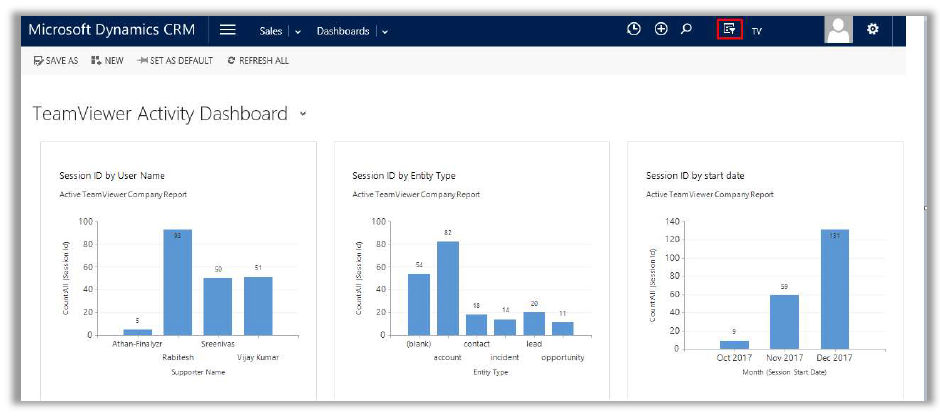
Using TeamViewer Dashboard, Views and Chart
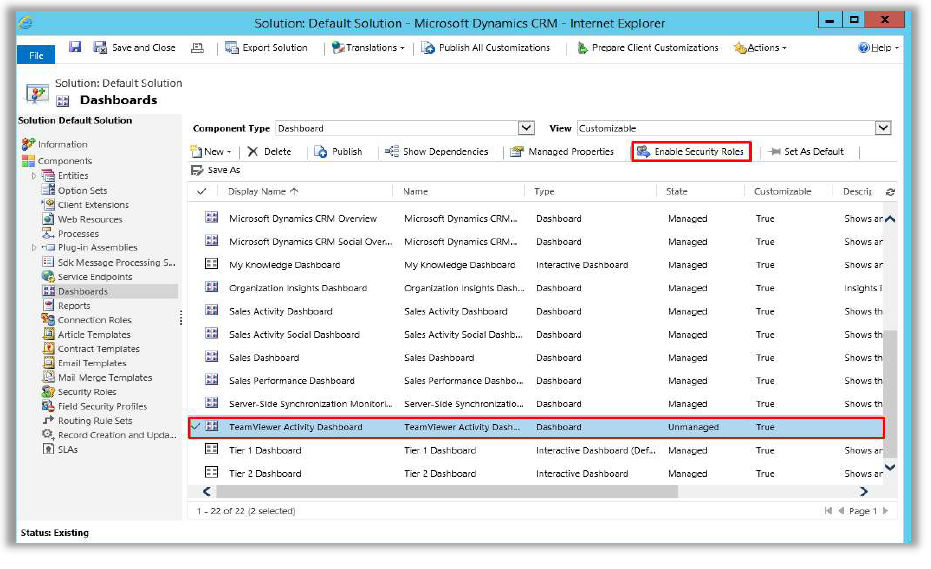
To view the dashboard only Microsoft Dynamics CRM Administrator or Customizers can navigate to Sales/Service/Marketing ➜ Dashboards ➜ TeamViewer Activity Dashboard
📌Note: Security roles other than System Administrator and System Customizer can’t view “TeamViewer Activity Dashboard”. However Microsoft Dynamics CRM Administrator or Customizers can give privileges to any security role to access “TeamViewer Activity Dashboard”.

Microsoft Dynamics CRM Administrator or Customizers can give privileges to any security role to access TeamViewer Activity Dashboard by navigating to Settings ➜ Customizations ➜ Customize the System ➜ Dashboards ➜ Then select the TeamViewer Activity Dashboard and then Enable Security Roles.
Creating/edit TeamViewer Dashboard
Microsoft Dynamics CRM Administrator or Customizers can create a new TeamViewer related dashboard or they can edit the existing TeamViewer Activity Dashboard.
Creation of new TeamViewer Dashboard
Microsoft Dynamics CRM system administrator can insert Charts, List (Views), Iframes, Web
resources.
Microsoft Dynamics CRM Administrator or Customizers should navigate to Settings ➜ Customizations ➜ Customize the System
They should open TeamViewer related entities and then they can proceed to create Views and Charts as per the requirement to add into the dashboard.
To know more about how to create Views and Charts kindly Google the procedure to create Microsoft Dynamics CRM Views and charts and also can refer different blogs on Views and Chart creation for Microsoft Dynamics CRM.
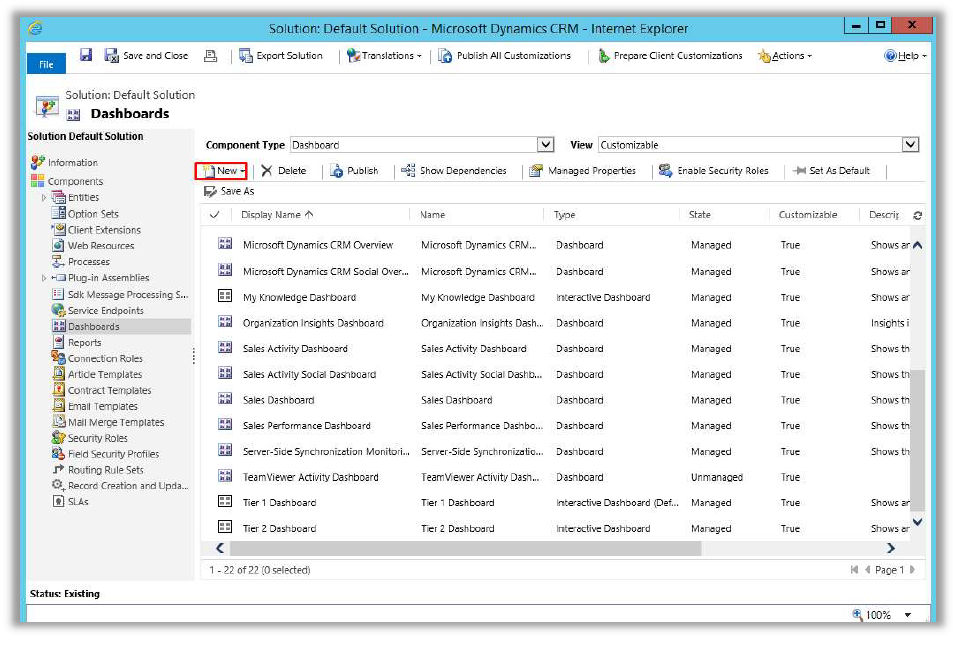
After the Views and Charts are created, go the Dashboard and then click new to create new dashboard.
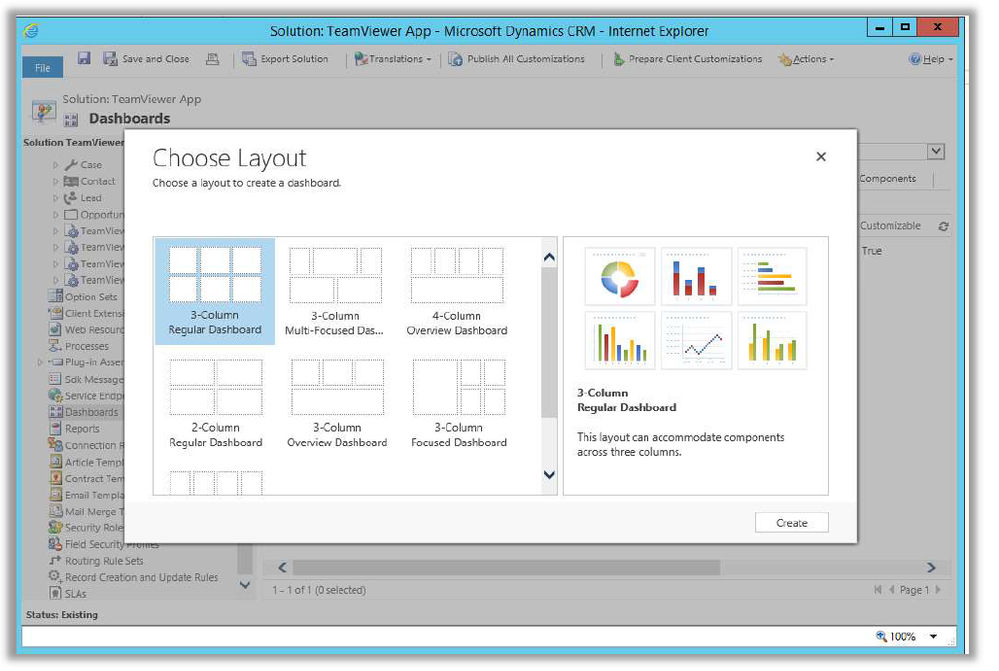
Select the Dashboard layout as required, refer the image below. And then click Create button.
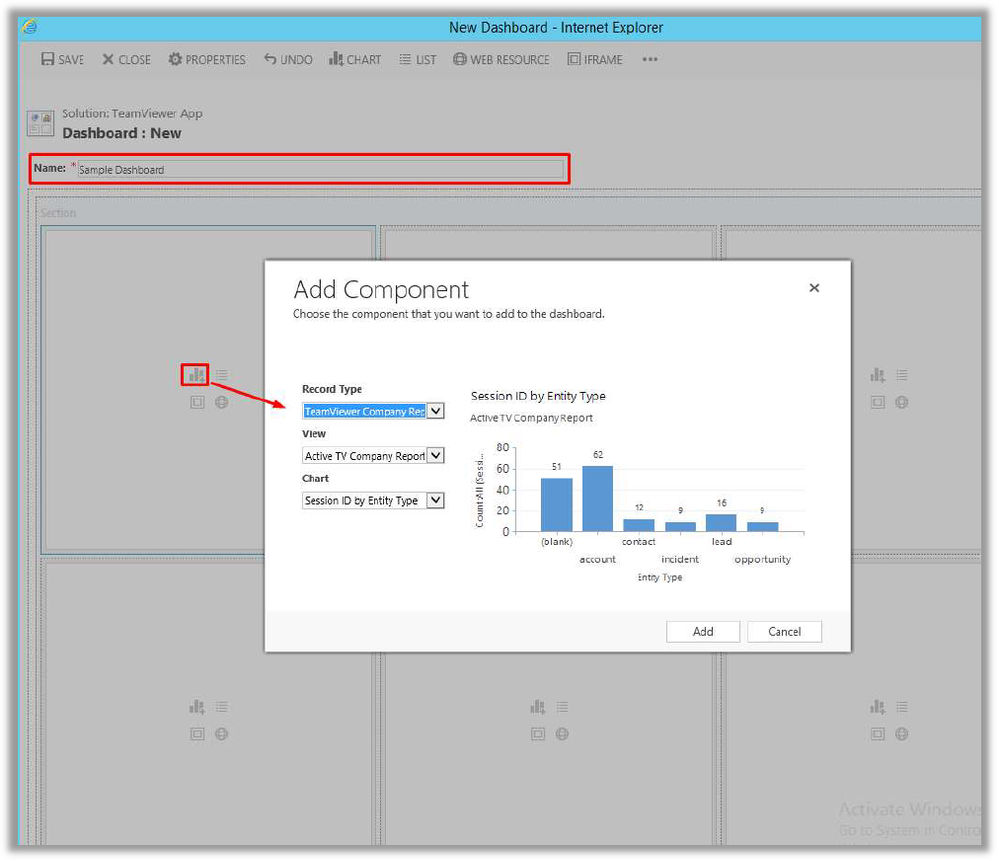
Give a meaningful name of the Dashboard. Example “Sample Dashboard” and then click the Chart icon inside the layout. Then select the Record Type, Views and Charts created earlier. Then click Add button and the Charts will be created for the dashboard. Now select the dashboard and “Publish” it.
📌Note: This newly created dashboard will be enabled for all the security role by default. To restrict this dashboard for other security roles the Microsoft Dynamics CRM Administrator or Customizers can give privileges to any required/selected security role to access the TeamViewer Dashboard.
By following above described process the Microsoft Dynamics CRM Administrator or Customizers can insert Charts, List (Views), Iframes, Web resources on the Dashboard.
Editing existing TeamViewer Activity Dashboard
Microsoft Dynamics CRM Administrator or Customizers can edit the existing dashboard provided though TeamViewer Application (TeamViewer Activity Dashboard). System Administrator or System Customizer should navigate to Settings ➜ Customizations ➜ Customize the System ➜ Dashboard. Double Click the TeamViewer Activity Dashboard.
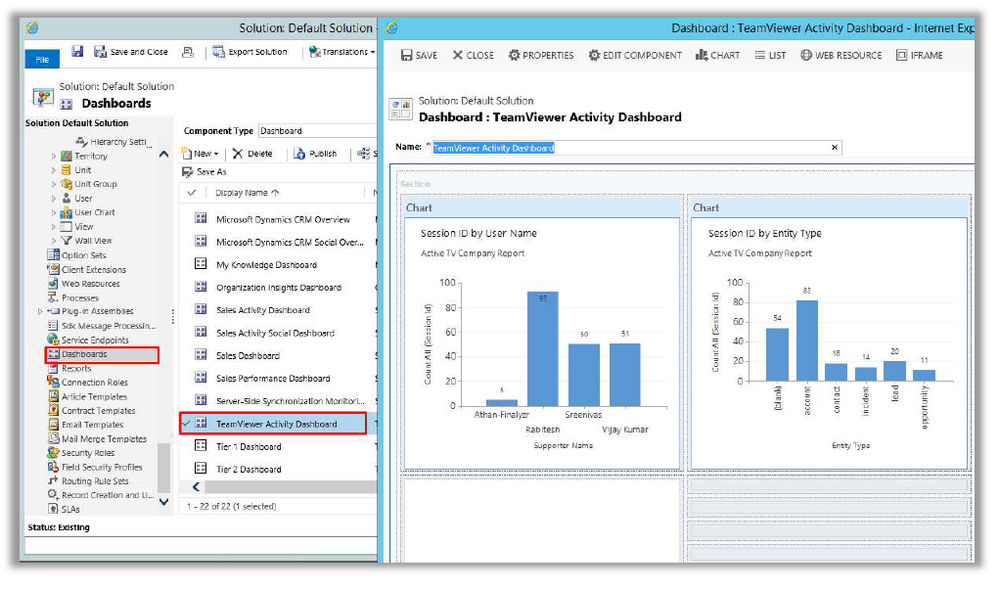
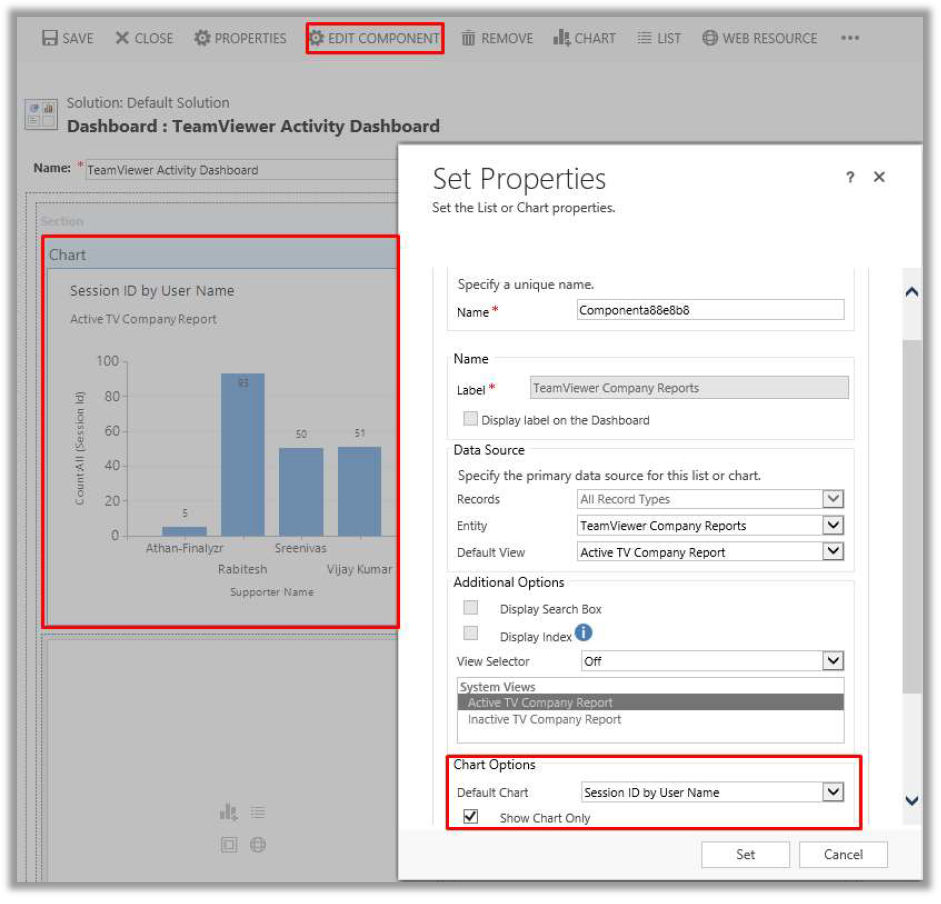
Microsoft Dynamics CRM Administrator or Customizers can change existing Charts by Clicking the old chart layout and then Click “EDIT COMPONENT” button. Then system Administrator or Customizers select another chart. And then click button set, SAVE and Publish the dashboard.
Microsoft Dynamics CRM Administrator or Customizers can also delete the Chart by clicking the “REMOVE” button. And then click button set, SAVE and Publish the dashboard.
In the same manner Microsoft Dynamics CRM Administrator or Customizers can increase/decrease the Width or increase/decrease height of the layout. Also they can do the operations on Charts, List (Views), Iframes, Web resources.
TeamViewer Company Report (Admin)
Microsoft Dynamics CRM Administrator or Customizers can only see the TeamViewer Company report at organization level.
There are two ways to view the TeamViewer Company report. Navigation through settings and Advanced Find.
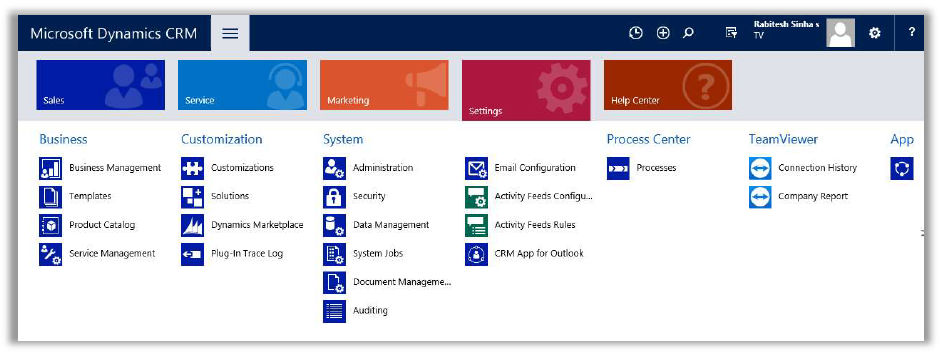
1. Navigation: Setting ➜ TeamViewer Are ➜ Company Report (Click to open the entity form)
Active TeamViewer Company Report will show all the established successful TeamViewer session between the Microsoft Dynamics CRM supporter and Customer. TeamViewer company report will show all the successful TeamViewer session created by the members of Company Group in TeamViewer (Classic) Management Console. TeamViewer Company Report shows all the completed session within Group Id.
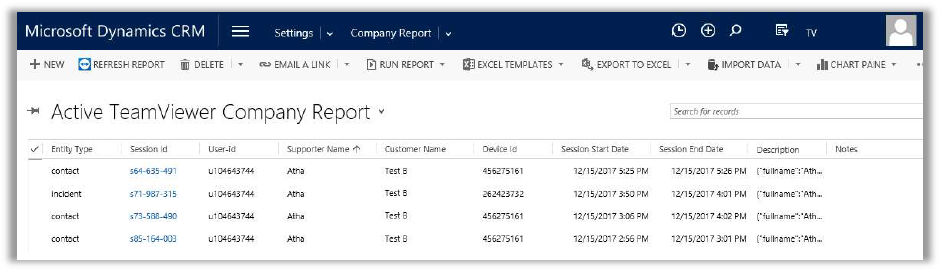
This Active TeamViewer Company Report are refreshes every 24hrs through Workflow scheduler but Microsoft Dynamics CRM Administrator or Customizers Can click on the button “REFRESH REPORT” to refresh the report manually.
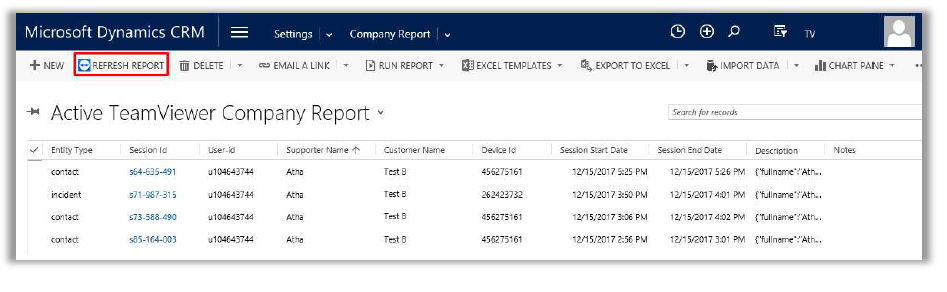
- Entity Type: Name of the entity where the TeamViewer session is created.
- Session ID: Unique TeamViewer session id created from the TeamViewer.
- User ID: User ID of the user the TeamViewer group is shared with.
- Supporter Name: Name of the user the TeamViewer group is shared with.
- Customer Name: Full name of the customer to whom "Send Customer Link' emails are sent.
- Device ID: The TeamViewer ID that is unique for this entry of the Computers & Contacts list.
- Session Start Date: Start date and time of the TeamViewer connection.
- Session End Date: End date and time of the TeamViewer connection.
- Description: This is used to store an arbitrary string but is only available to API functions.
- Notes: Notes for the TeamViewer connection.
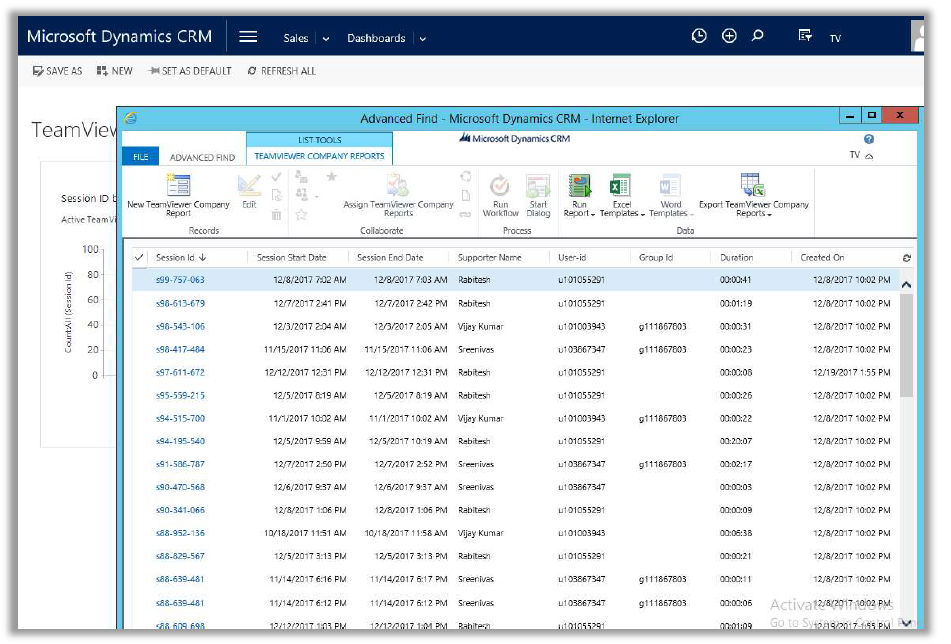
2. Advanced Find ➜ Select Look For ➜ TeamViewer Company Report and then click on Results.
On Click of the “Results” button the window will display all the Active TeamViewer Company Report.
TeamViewer Company Report Scheduling
TeamViewer App solution has the ability to run the TeamViewer Company Report automatically through Workflow scheduler. This Workflow scheduler runs every 10 hours and it fetch the details of company report from TeamViewer API.
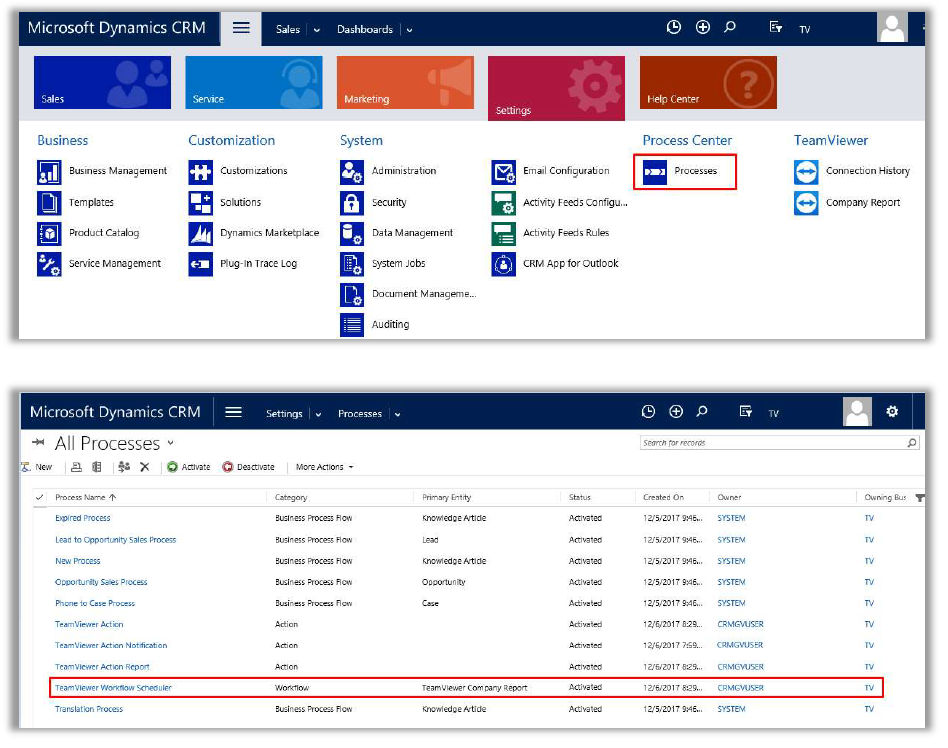
Microsoft Dynamics CRM Administrator or Customizers can modify the scheduler timings by Navigating to the Settings ➜ Processes, then Click on the “TeamViewer Workflow Scheduler”.
TeamViewer Workflow Scheduler can be configured by Clicking the blue marked time interval key word “Timeout until 23 Hours , 59 Minutes then”.
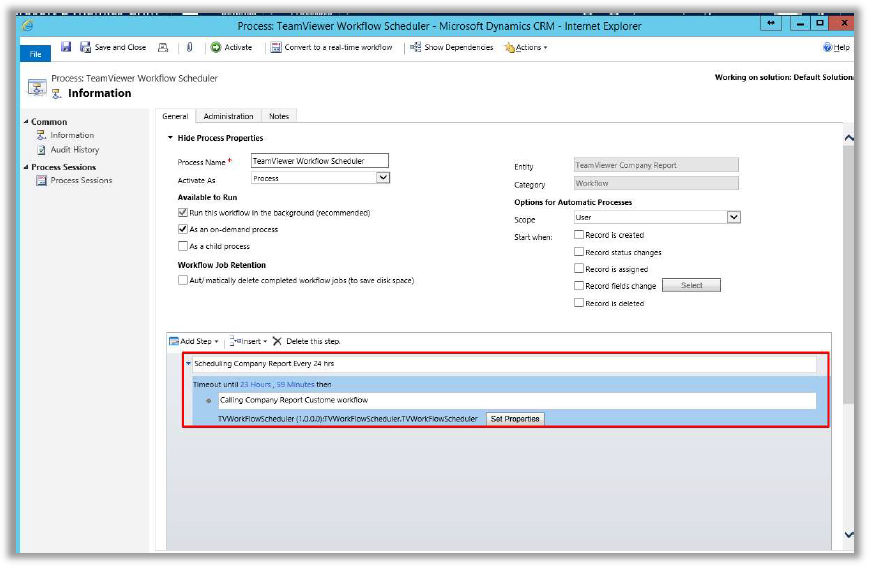
On Click of “Timeout until 23 Hours, 59 Minutes then”, a new window will open where the Microsoft Dynamics CRM System Administrator or System Customizer can select the “Dynamic Values” and “After” timing Hour and Minute to set the new timeframe to run the “TeamViewer Workflow Scheduler”.

📌Note: The TeamViewer Workflow scheduler will run automatically from the installation of TeamViewer App solution in Microsoft Dynamics CRM supported versions. The Microsoft Dynamics CRM Administrator or Customizers can view the status of the TeamViewer workflow scheduler by navigating to “Process Session” and get the details of status reason.
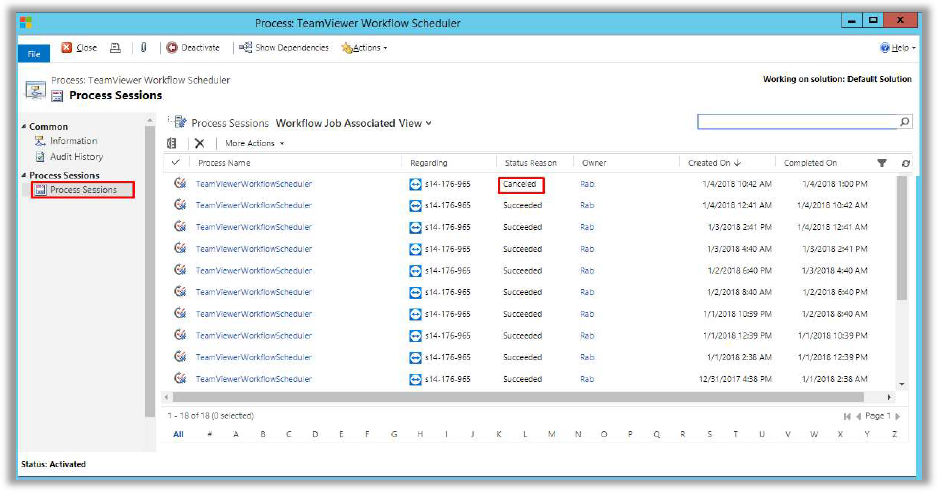
If Status Reason is Succeeded then the workflow will fetch records of all the TeamViewer successfully completed session id reports from TeamViewer API and will show on the CRM TeamViewer Report entity.
If Status Reason is Canceled/Failed then the workflow need to start manually.
📌Note: Microsoft Dynamics CRM Administrator or Customizers can create and configure an email notification on the TeamViewer Workflow scheduler for status reason Canceled or Failed to get notified on the stopped of TeamViewer Workflow scheduler. Thereafter they can run the TeamViewer Workflow scheduler manually through on-demand process.
Manually starting the TeamViewer Workflow scheduler through on-demand process.
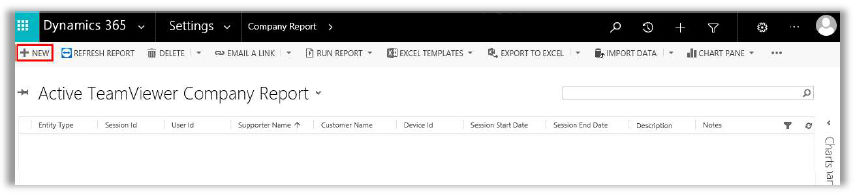
Microsoft Dynamics CRM Administrator or Customizers should navigate to Settings ➜ TeamViewer Area ➜ Company Report (Click to open the entity form).
If no record is available then create a new dummy record by clicking the “New” button to run on demand TeamViewer Workflow Scheduler. Initially the TeamViewer Workflow scheduler will show status reason as Waiting and will succeeded after 10 hours (Currently, TeamViewer Workflow Scheduler is configured for 10 hours).
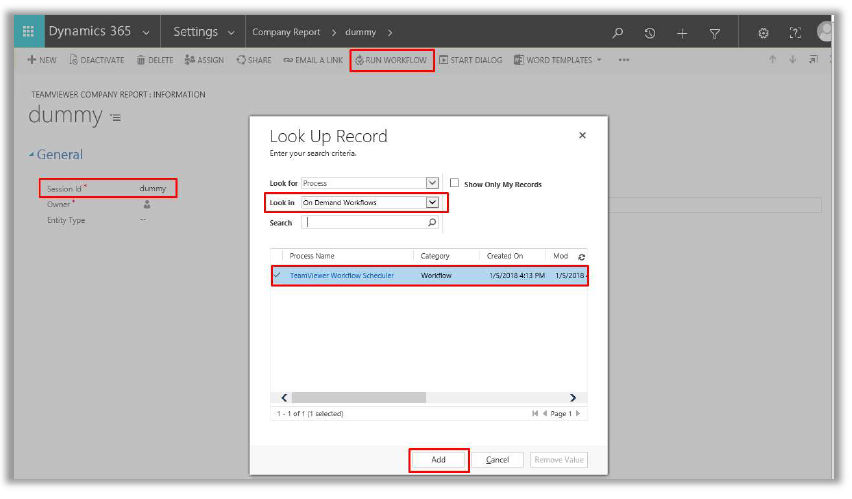
Then create a TeamViewer Company dummy record and run the on demand TeamViewer Workflow scheduler. And with this the TeamViewer Workflow scheduler will start running.
Enabling Plug-In Trace Log to report TeamViewer Plugin issues
Microsoft Dynamics CRM System Administrator or System Customizer can enable Plug-in Trace Log to get the error from any of the TeamViewer plugins. Which then can be reported to TeamViewer GmbH support team to get the fixes.
Navigation to enable Plug-in Trace Log: Settings ➜ Administration ➜ System Settings➜ Customization ➜ Plug-in and custom workflow activity tracing

To get the plug-In Tracing Log the Microsoft Dynamics CRM System Administrator or System Customizer should set Plug-in and custom workflow activity tracing to All. And then Click Ok.
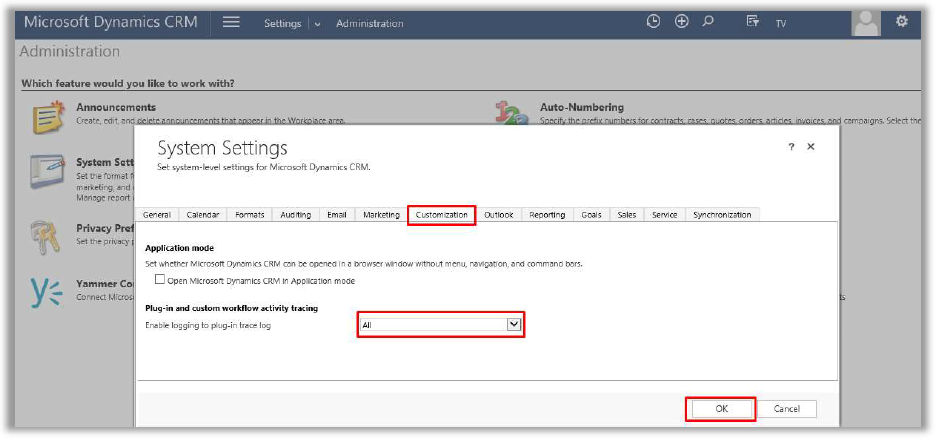
Once the Plug-in and custom workflow activity tracing to “All” then the Microsoft Dynamics CRM System Administrator or System Customizer should be able to see all the error report inside the “Plug-In Trace Log”.
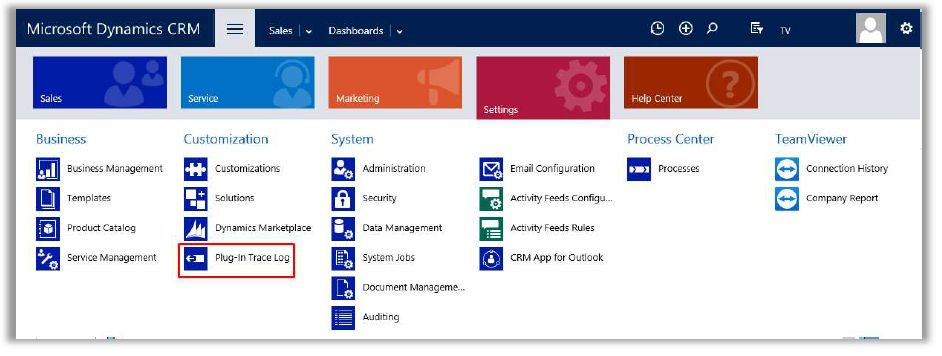
Navigation to Plug-In Trace Log: Settings ➜ Plug-In Trace Log, and then Click it to Open the form and view the issue log.
Appendix
Adding contacts to entities
You may add contacts to entities by clicking on the + button in the Contacts section. Please see the snapshot below for reference.
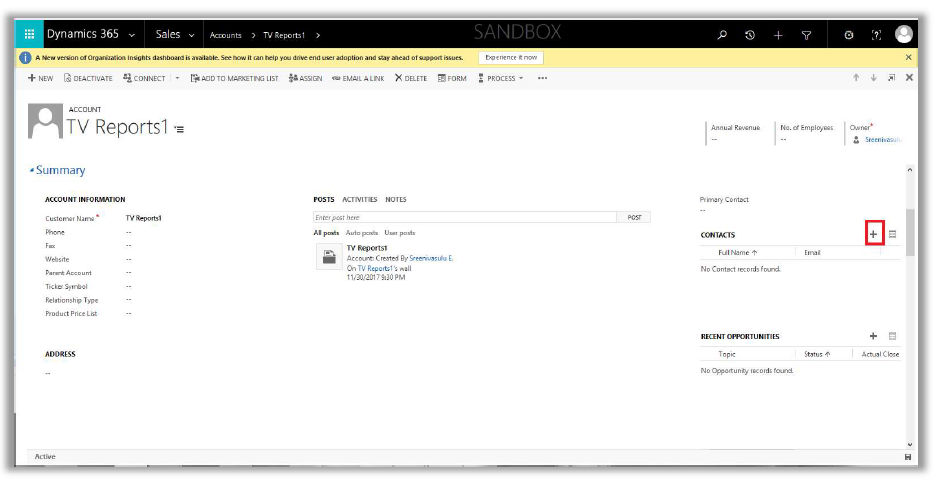
On click of the + button, a quick create form opens up where you can add the Name and email address of the contact. Click the Save button to link the contact to the account.
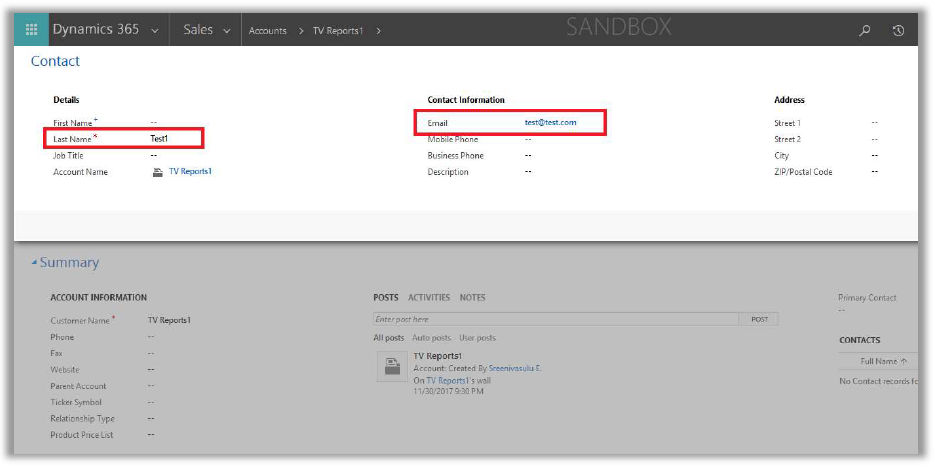
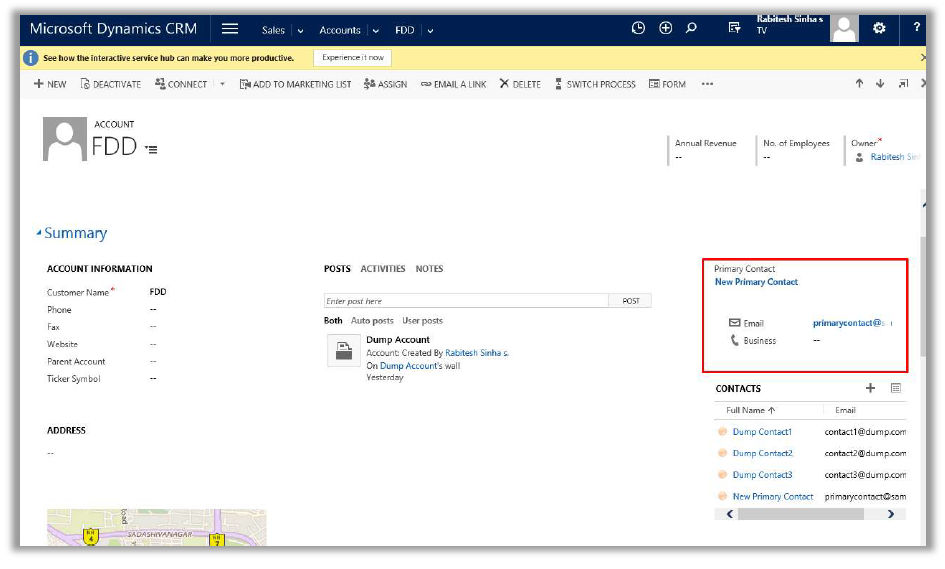
Once the contact is created and added, it appears in the grid as shown below. Please note that emails are sent to Account’s contact. For lead, Opportunity and Case if Account is selected then the email will be sent to the Account’s Primary contact.

To create Account’s Primary contact Click the lookup of the Primary customer and then Magnifying search button and then click on + New and create the Contact and that will be added to Account as Primary contact.

Create the contact from Quick create form and ensure that the Account name is same as the Account created.
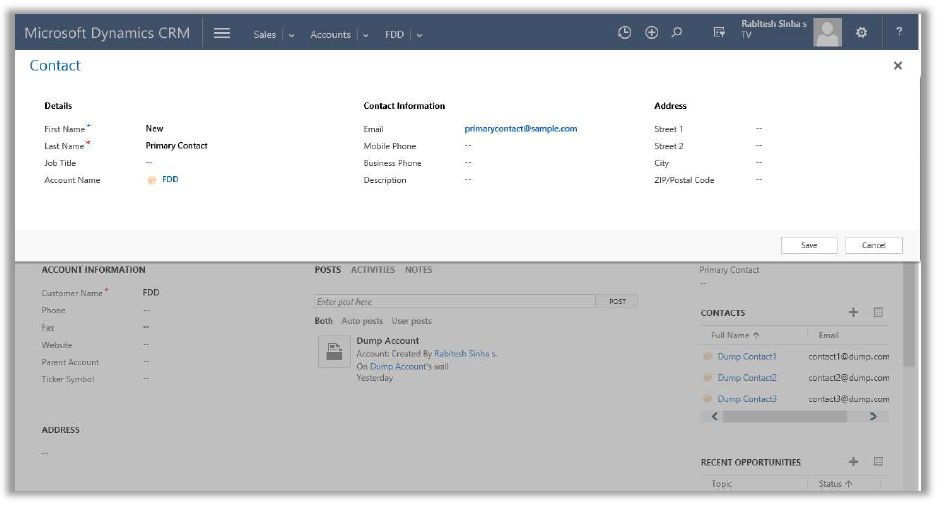
Once the Primary contact is created it will show up in the account form as shown in the below image with email id.