ServiceNow is a company that provides service management software as a service.
The TeamViewer integration for ServiceNow enables remote support for managed devices directly from the ServiceNow dashboard, easily initiating remote sessions. The integration provides ultra-easy collaboration while streamlining work processes as customers join the session by a simple click and IT support receive notification when a customer is online. Pre-built integrations are easy and make your experience seamless.
Please keep in mind that Integrations are not included in basic license packages. They have to be purchased separately as AddOns. For more information, please visit our website: http://www.teamviewer.com/integrations
Configuration Instructions
When configuring the TeamViewer application, please take into account the points below:
- For security reasons do not assign role used by Tokens table ACL to users
- Connections tables are for future use, do not delete
- Set the admin token provided by TeamViewer
Administration and Configuration
Admin Token
Instructions
To be able to access the TeamViewer API for certain features like scheduled company-wide connection reports, an admin TeamViewer Script token needs to be configured. Below are the steps on how to create one and configure your TeamViewer instance accordingly.
Creating an Admin Token
📌Note: In this description, it is assumed that the administrator has created a Company Profile on their TeamViewer license. For more information on how to setup a Company Profile and add users visit
All about the TeamViewer (Classic) company profile - TeamViewer (Classic) Support
This article applies to TeamViewer (Classic) customers with a Premium, Corporate or Tensor plan. General Within the TeamViewer (Classic) Management Console, you have the ability to change user permissions centrally. You can add users to your license (Premium, Corporate or Tensor) and create TeamViewer (Classic) accounts to give the users the ability to…
- Go to https://login.teamviewer.com
- Go to Profile on top right corner and select Edit Profile. Please note that you will need to have a Corporate or Tensor TeamViewer license to be able to use this functionality.

- Go to Apps and select Create Script Token

- Set up permissions as shown below
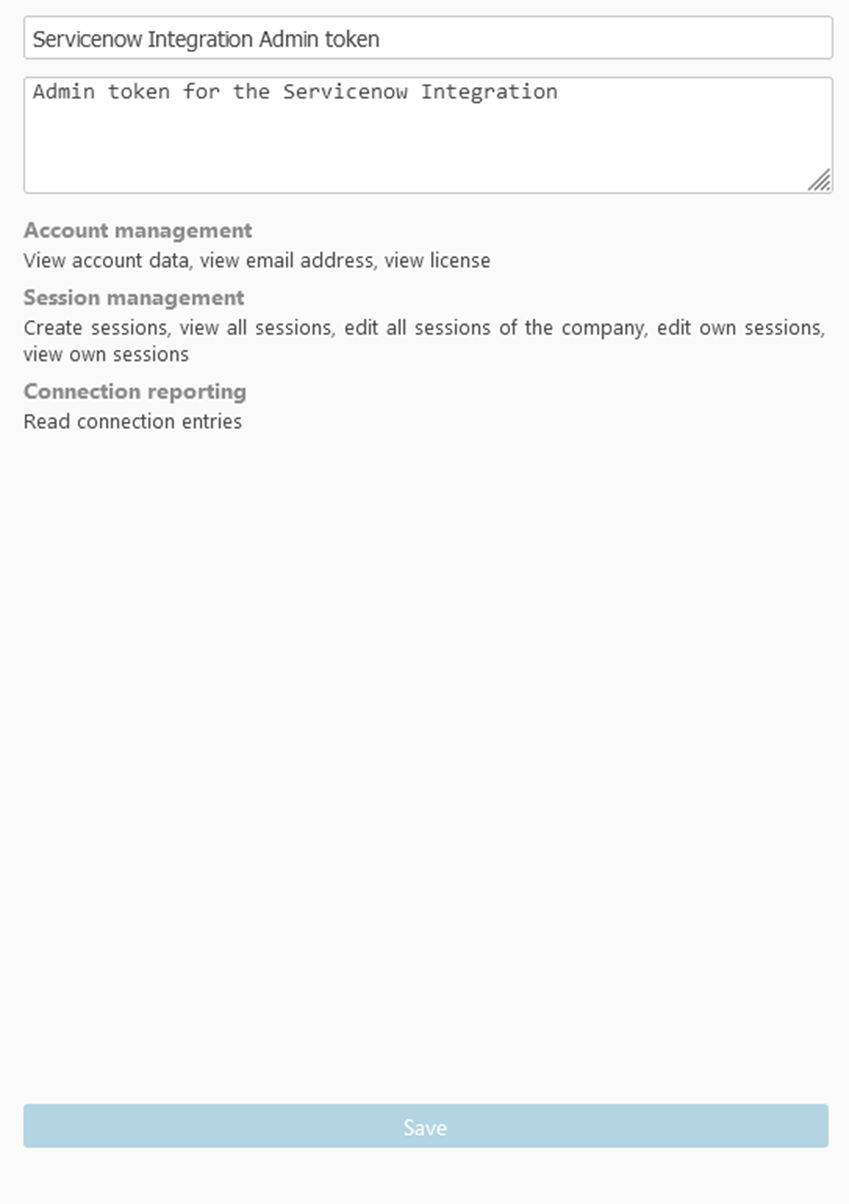
- Click Save to generate the Script Token
Setting the admin token
Role required: admin
- Connect to ServiceNow with the required user and role(s)
- Go to the system properties by typing sys_properties.list in the navigation filter.
- Find the property: x_tvgh_teamveiewer.adminToken
- Set the value to the admin property provided by TeamViewer
Adding TeamViewer to task extended table
Role required: admin
ServiceNow Store Application: TeamViewer Integration for ServiceNow 2.0 or later must be installed
The Following instructions can only be applied to records on tables that are an extension of the task table. The application comes preconfigured with the TeamViewer Control and TeamViewer Connection History on the Incident form (default view).
Adding the Remote Control section on a form
To add the TeamViewer Control to the form, follow the steps below. General documentation on how to add fields to a form can be found here: https://docs.servicenow.com/bundle/london-platform-administration/page/administer/form-administration/concept/configure-form-layout.html.
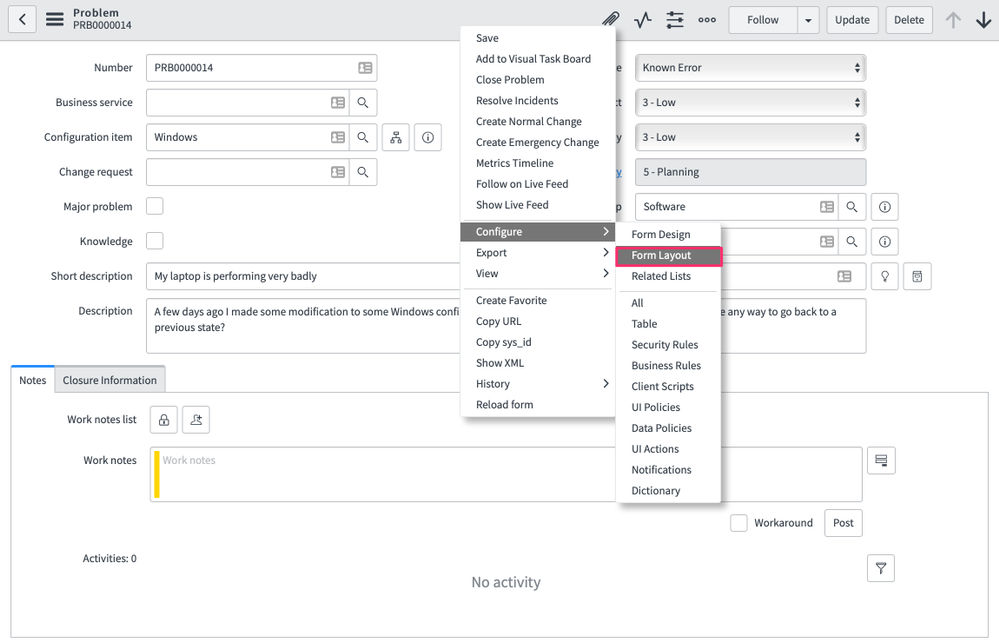
1. Open the form of the Task extended record type (e.g. problem, change request, requested item) where you want to add the TeamViewer Control
2. On the form, right-click on the form’s header
3. From the menu, choose Configure ➜ Form Layout
4. From the Section field, click on New, and a dialog for entering a name is shown. Enter a name (e.g. TeamViewer Remote Control) and click on OK. Documentation on how to create a form section can be found here: https://docs.servicenow.com/bundle/london-platform-administration/page/administer/form-administration/concept/configure-form-layout.html#t_CreateAFormSection
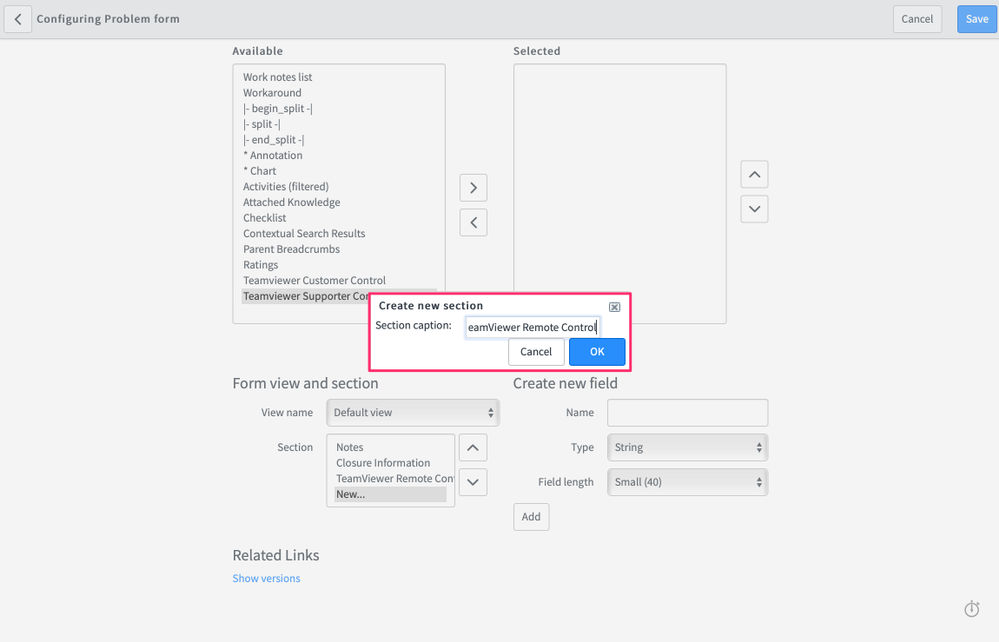
5. Add the TeamViewer Supporter Control to the newly created form section.
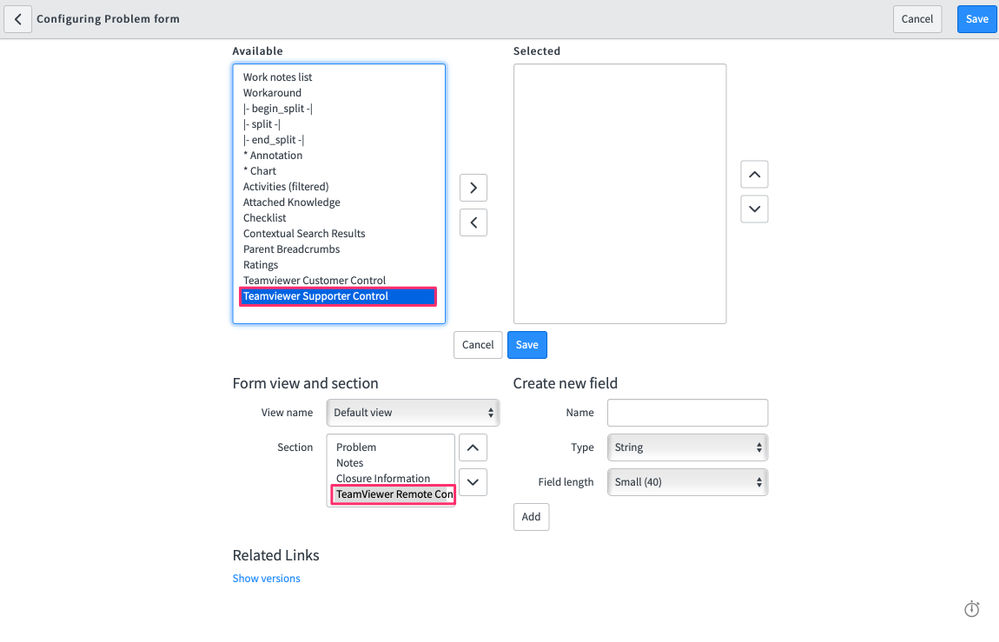
6. Click on Save to apply the changes to the form.
7. The TeamViewer Control should now be visible on the form within a form section.
Adding the TeamViewer Connection Report to the form
The next step is to add the TeamViewer Connection Report to the form, this related list shows the connection history for the open task record. More information on adding a related list to a form can be found here:
1. Open the form of the Task extended record type (e.g. problem, change request, requested item) where you want to add the TeamViewer Connection Report
2. Right-click on the form’s header a go to Configure ➜ Related Lists
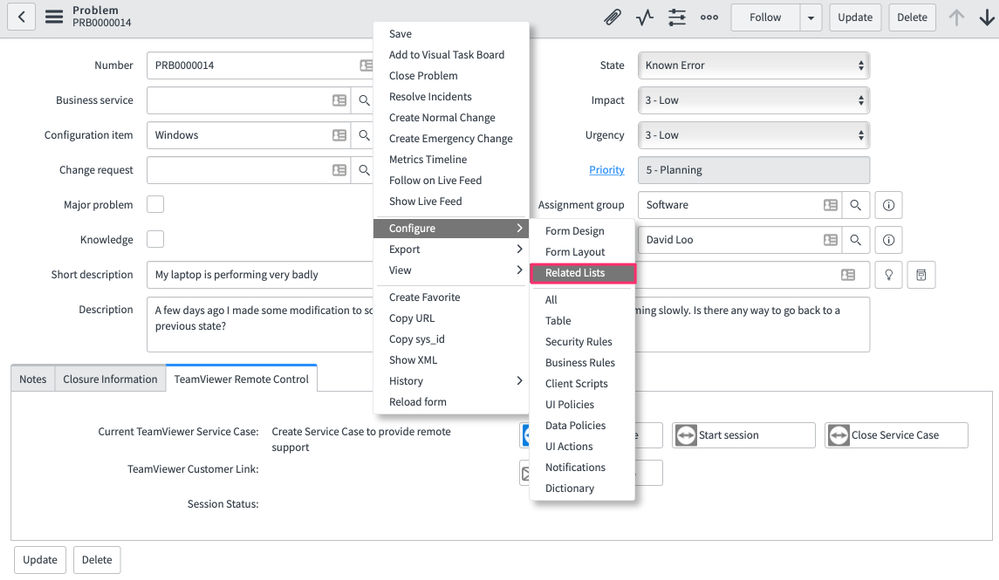
3. Select the TeamViewer Connection Report from the Available list and add it to the Selected list by clicking the Add arrow.
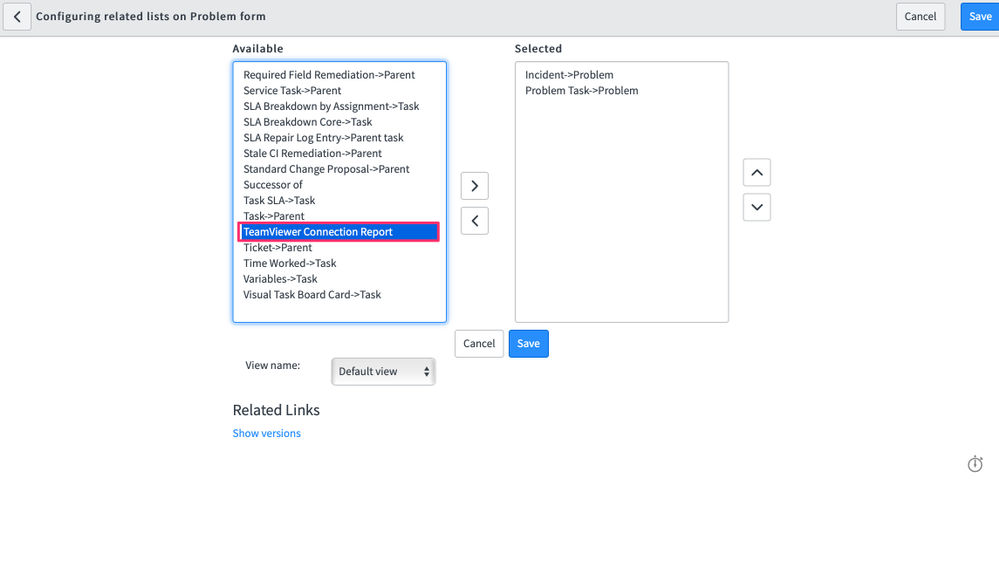
4. Click on Save to apply the changes on the view.
5. The TeamViewer Connection Report is now visible under the related lists at the bottom of the form.
Roles
The application permissions model is based on two roles, the standard itil role in ServiceNow and the x_tvgh_teamviewer.session_history_user for the connection history.
Connection history and Scheduled job
The TeamViewer integration for the ServiceNow application keeps a history of connections created from Sessions via ServiceNow for your account. This is stored in the Connection History table. The information in this table is periodically refreshed and augmented with the relevant information from the session, like the task reference.
Connection history refresh
The connection history is retrieved from TeamViewer via the API on three occasions:
- When a session is closed, the connection history for that session I is retrieved.
- A scheduled job periodically (6 hours by default) retrieves the connection history.
- A user can request a manual refresh of the connection history with the proper role from the TeamViewer Connection Report.
Setting the scheduled job period
Role Required: Admin
The scheduled job that periodically retrieves the connection history runs every 6 hours. The ServiceNow System administrator can update this interval by updating the repeat interval on the scheduled job.
1. Go to the System Definition ➜ Scheduled Jobs
2. Open the record for the job Retrieve TeamViewer connections
3. Run the job once, via the Execute Now button, to make sure the latest connection history is retrieved, and no records are missed due to a changed period.
Both the scheduled job and the refresh action use the time period defined in the scheduled job to determine how far back (in time) connection history must be retrieved. So, if the last job ran 6 hours ago and you update the repeat interval to 3 hours, you miss 3 hours of connection history if you do not run the job once first.

4. Update the repeat interval
5. Click on Update
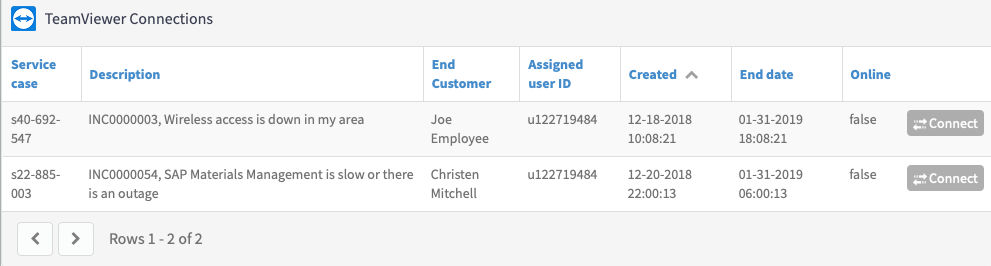
Online Service Cases
Within the TeamViewer Integration for ServiceNow application, a supporter can see all the online service cases from one view using the Online Service Cases Widget, which can be accessed via TeamViewer Integration ➜ Online Service Cases.
Changing the columns
Role required: admin
The columns shown in the Online Service Cases can be changed by the ServiceNow system administrators and impacts all users of the application. To change the columns, follow these steps to go into the widget instance options:
1. Change your application ( Settings ➜ Developer ➜ Application) to TeamViewer Integration for ServiceNow
2. Go to TeamViewer Integration ➜ Online Service Cases
3. Press ctrl on your keyboard and right-click anywhere on the widget
4. Click on Instance Options
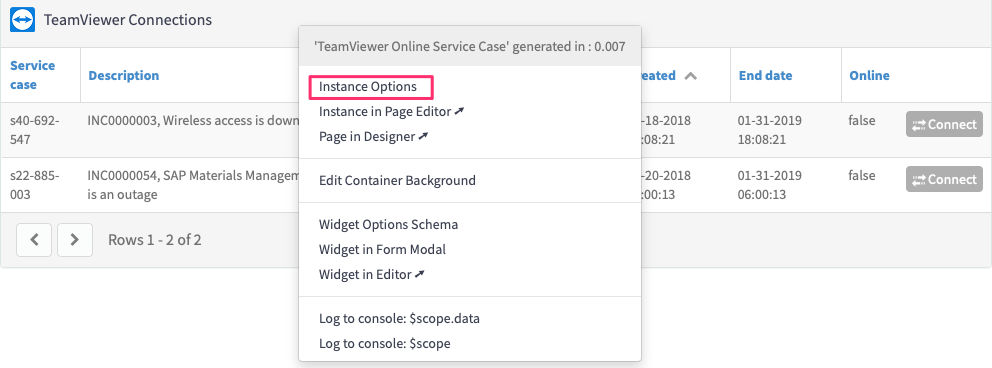
5. Add or remove any columns in the Fields list
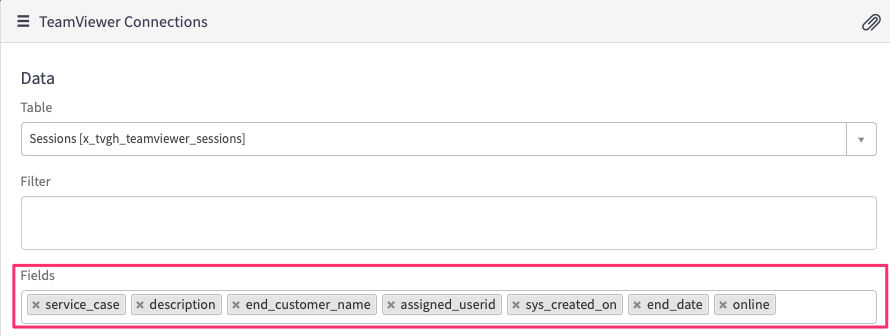
6. Click on Save at the bottom of the instance options dialog.
Change the refresh rate
Role Required: admin
The Online Service Cases Widget automatically refreshes the data as long as the page is kept open; by default, the data is refreshed every 30s seconds. The ServiceNow system administrator can change this.
1. Follow steps 1 - 4 from the previous section
2. Change the refresh interval to your preferred setting; the setting is in seconds

3. Click on Save
Configuring email templates
The Share Session Code functionality on the TeamViewer Remote Control uses the standard Quick Message functionality from ServiceNow to send the session code per email to the customer. Administrators can define the templates for these quick messages.
Naming Convention
Since we use the standard Quick Message functionality of ServiceNow, the Email window shows all the available Email templates in the ServiceNow instance, including email templates created for other applications. To distinguish the email templates for TeamViewer Integration, it is advised to use a clear naming convention for your Quick Messages, e.g.:
- TV_ShareSessionSimple
- TV_ShareSessionAdvance
- etc.
Creating and editing email templates
ServiceNow system administrators can create new quick message templates and edit existing templates. The email templates for the TeamViewer Integration for ServiceNow application can be accessed via the TeamViewer Integration application.
More information on creating an email template can be found in the ServiceNow documentation: https://docs.servicenow.com/bundle/kingston-servicenow-platform/page/administer/notification/task/t_QuickMessages.html
1. Change your application ( Settings ➜ Developer ➜ Application) to TeamViewer Integration for ServiceNow
2. Go to TeamViewer Integration ➜ Email templates
3. Click on an existing Email Template or click on New
4. Fill in the form; you can use variables substitutions to use fields from the task record, e.g. ${caller_id}
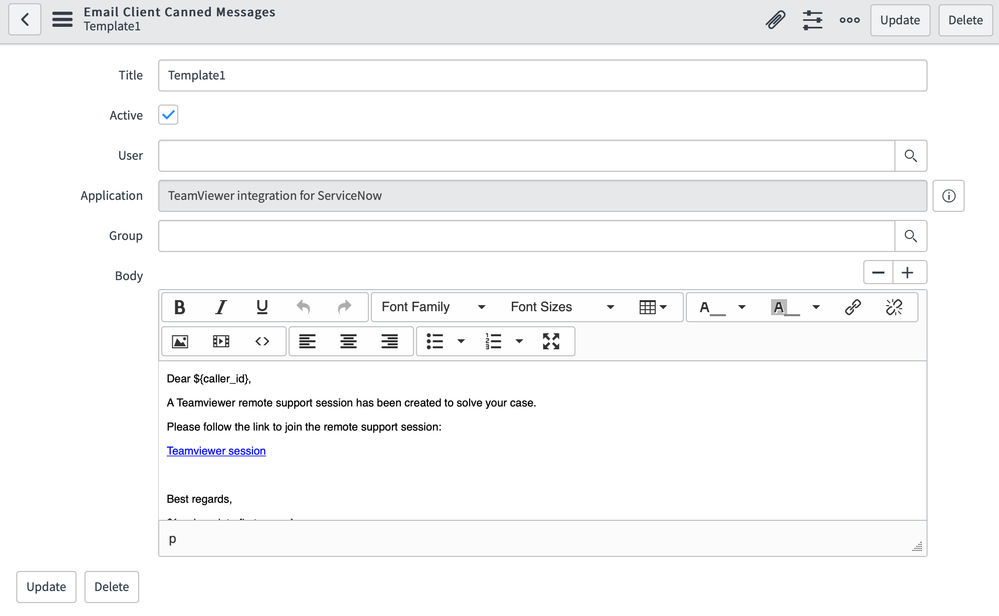
5. Click on Update (for an existing record) or Submit (for a new record)
Using the integration
Once the TeamViewer integration app has been properly installed and configured, it can be used to create service cases and remotely access and control end users’ devices.
Request a demo or watch our video on our teamviewer.com page: ServiceNow
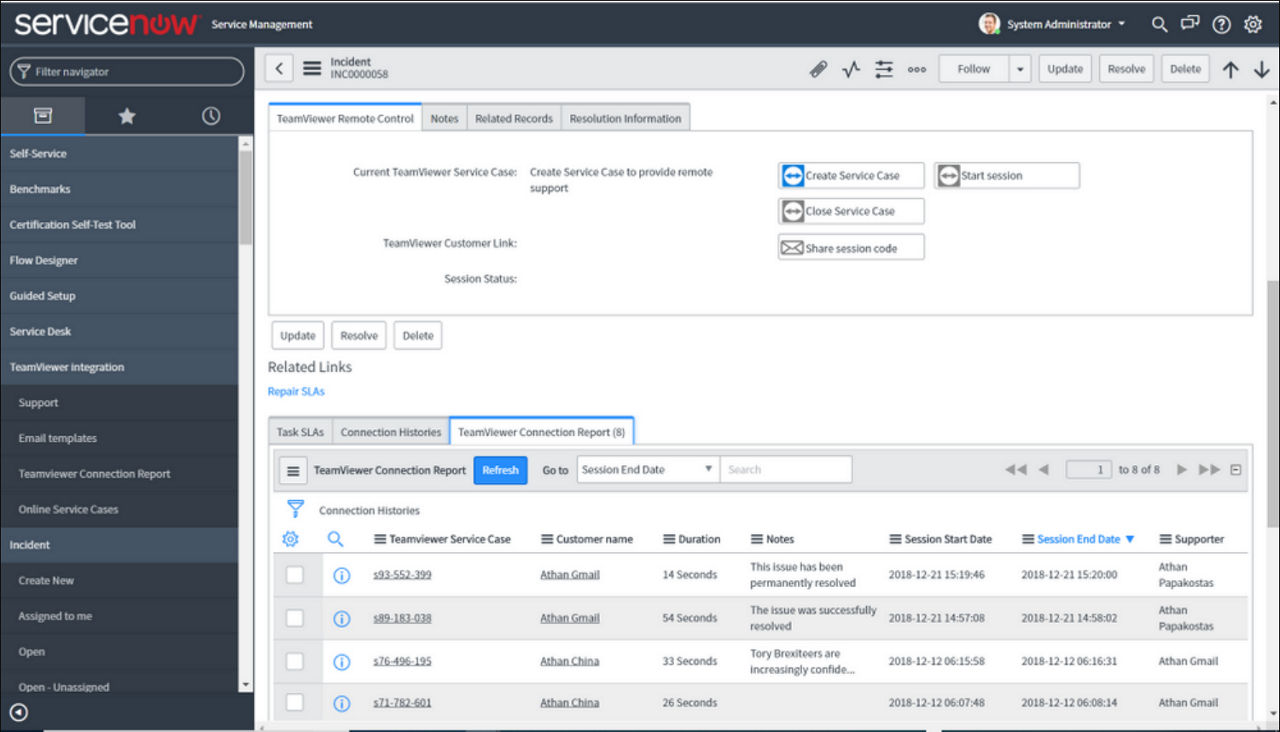
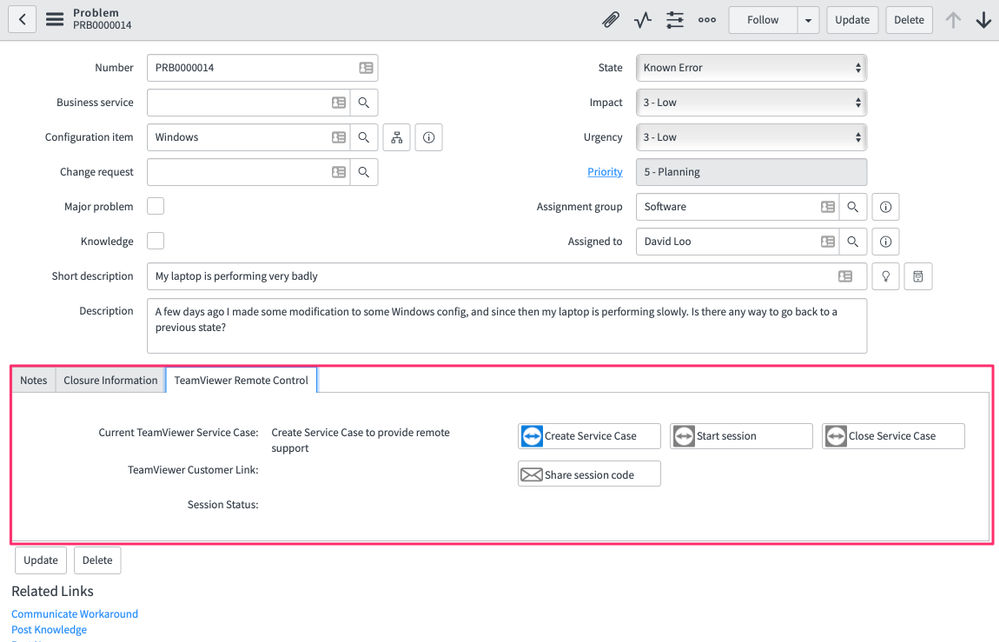
With the TeamViewer Integration for ServiceNow, you can easily create a secure remote support session directly from your incident record.
Creating TeamViewer Service Cases
The first time users attempt to create a service case, they will be prompted to log in with their TeamViewer credentials.
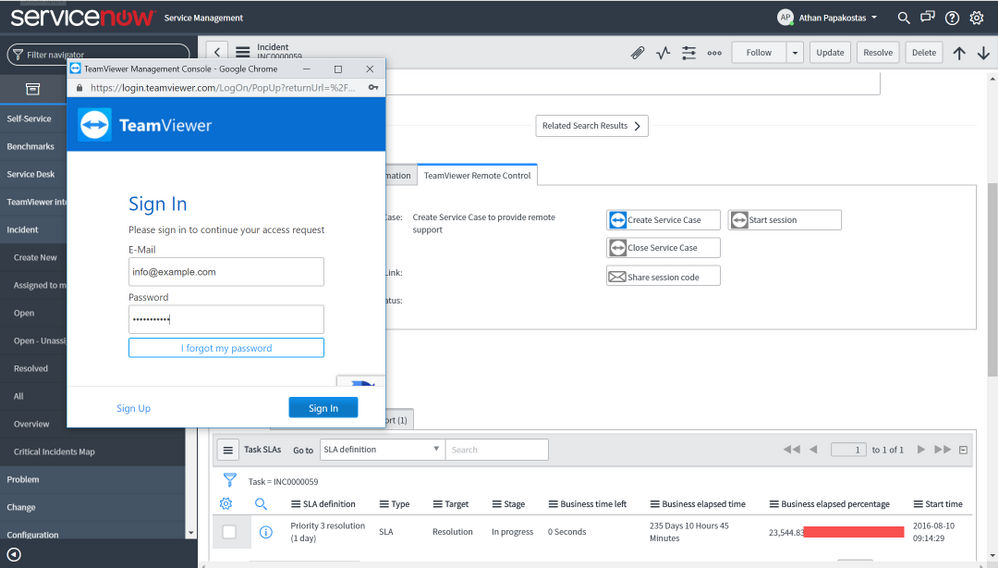
This will only need to happen once per user, and his access token will be stored in the ServiceNow platform until revoked by the user or the administrator from the TeamViewer (Classic) Management Console.
After the user has logged in successfully, the service case will be created.
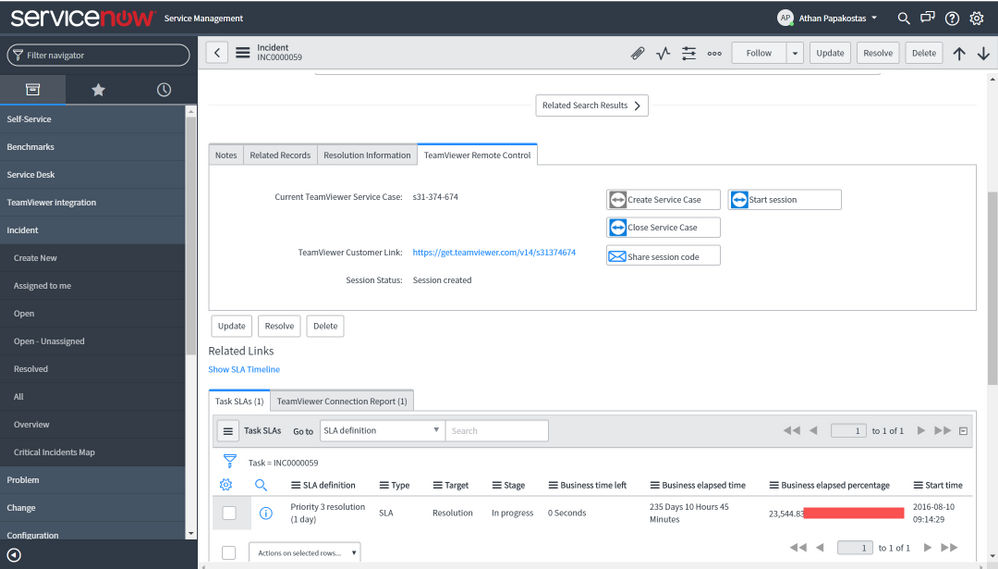
Sharing Service Cases and establishing a connection
Once the service case has been created, the supporter can easily share the session link with the end user by clicking Share Session code. That will open the email window where the supporter can select a pre-defined email template.
The end user's email address and name, the customer link, and the subject/body text of the email can be automatically populated through the pre-configured templates.
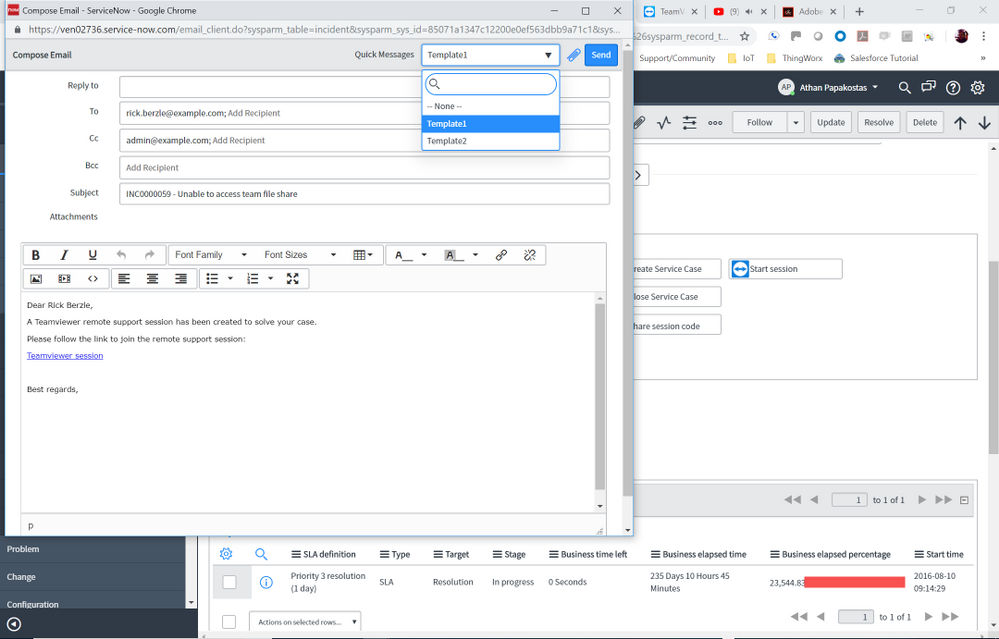
The supporter can then select ‘Start Session’ immediately and wait in a virtual lobby until the end user clicks the link, after which the remote control session will be established. Otherwise, the supporter can wait until the end user selects the link first (in which case they will appear as online in the Active sessions screen) and then start the session.
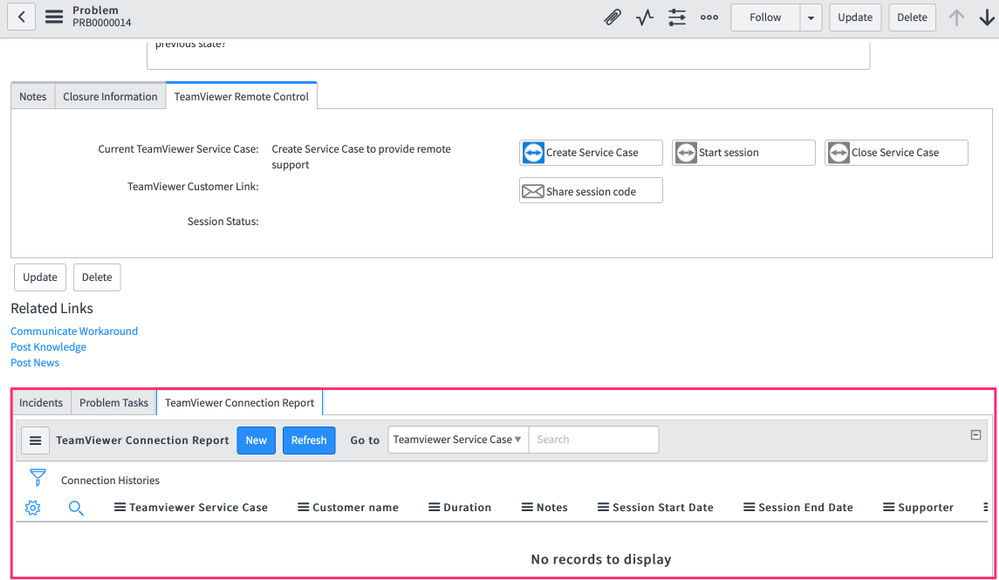
View Connection Reports
In every module (Incident, Problem, Change Request, Control Request), the admin can add a Related list object with the list of remote control sessions used to solve the specific incident.
The list is refreshed either when a service case is closed or when the ‘Refresh’ button is pressed.