With the REACH API, TeamViewer offers an API for integration into RMM or MDM solutions, that allows the initiation of unattended and attended remote control sessions.
This document intends to explain the fundamental concepts behind the REACH API as well as give instructions and guidance for integrating the API into a management solution.
For this purpose, the document is structured into different sections that provide information about the different topics.
The first chapter explains the basic conceptual approach and gives an overview of why certain security mechanisms have been applied.
Following this, an exemplary implementation is explained based on example source code of an example integration, also referred to as VendorExampleApp, that has been developed by TeamViewer.
In the final chapter, specifics on implementing the integration on Android are outlined.
Please keep in mind that Integrations are not included in basic license packages. They have to be purchased separately as AddOns. For more information, please visit our website: https://www.teamviewer.com/en/integrations/
_____
📌Note: All code examples within this article are published under the MIT license:
Copyright (c) 2018 TeamViewer GmbH
Permission is hereby granted, free of charge, to any person obtaining a copy of this software and associated documentation files (the "Software"), to deal in the Software without restriction, including without limitation the rights to use, copy, modify, merge, publish, distribute, sublicense, and/or sell copies of the Software, and to permit persons to whom the Software is furnished to do so, subject to the following conditions:
The above copyright notice and this permission notice shall be included in all copies or substantial portions of the Software.
THE SOFTWARE IS PROVIDED "AS IS", WITHOUT WARRANTY OF ANY KIND, EXPRESS OR IMPLIED, INCLUDING BUT NOT LIMITED TO THE WARRANTIES OF MERCHANTABILITY, FITNESS FOR A PARTICULAR PURPOSE AND NONINFRINGEMENT. IN NO EVENT SHALL THE AUTHORS OR COPYRIGHT HOLDERS BE LIABLE FOR ANY CLAIM, DAMAGES OR OTHER LIABILITY, WHETHER IN AN ACTION OF CONTRACT, TORT OR OTHERWISE, ARISING FROM, OUT OF OR IN CONNECTION WITH THE SOFTWARE OR THE USE OR OTHER DEALINGS IN THE SOFTWARE.
When reusing or redistributing the software, please respect any licenses of included software from third parties, if applicable.
_____
REACH API - Concepts and security
The concepts behind the REACH API, in the end, is divided into three use cases:
- Registration of devices that will be managed with the REACH API also called rollout phase.
- De-registration of devices to remove access via the REACH API.
- The control phase that allows to initiate unattended (connection to a device without user interaction on the remote device) and attended (user of the remote device manually accepts the connection) sessions to registered devices. Both session modes can be full-featured remote control sessions or restricted to be pure view-only connections (only supported on specific platforms).
Registration of devices
The rollout is used to exchange encryption keys between a device and the management solution. These encryption keys are used for the control and de-registration phases and ensure that all communication with a device is secure.
The diagram explains the registration flow:
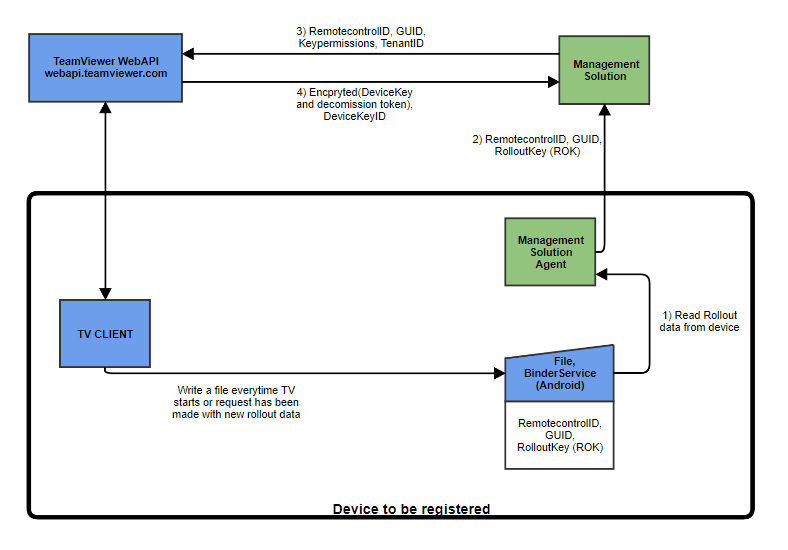
The Management Solution Agent (MSA) is a component that has to run on the device. This agent must have administrative rights on the device and retrieves the data necessary for completing the rollout phase successfully.
To start the rollout, the MSA reads a special file (step 1) that is written upon start of the TeamViewer client and after each successful and unsuccessful rollout request to this TeamViewer client.
📌Note: Step 1 might be different on each platform. The file approach only applies to Windows and macOS platforms. However, the data provided for the rollout is the same on all platforms. For Android specifics, please refer to the Android chapter.
This file contains the RolloutKey (ROK is valid for one request and used to decrypt the API response), a globally unique identifier (GUID) as well as the RemotecontrolID of the device (TeamViewer ID).
With the RemotecontrolID and the GUID from the rollout data and a set of permissions, an API call (POST /oem/devices/createdevicekey) is made to create a new device key (step 3).
This API call is initiating communication from the TeamViewer backend to the target TeamViewer client.
If the data is valid, the TeamViewer client is creating a keypair for future remote control sessions.
The TeamViewer client is encrypting the private key (=DeviceKey) of the newly created key pair with the RolloutKey and sends it together with an identifier for this keypair as well as a decommission token as a response to the API call, passing through the TeamViewer backend (step 4).
The management solution must use the previously obtained RolloutKey to decrypt the DeviceKey. To simplify the decryption process, DeviceKey is encrypted using standard PEM format.
The DeviceKey and the DeviceKeyID are used during the control phase, while the decommission token is needed to unregister a DeviceKey.
📌Note: The decrypted DeviceKey, the DeviceKeyID as well as the decommission token must be stored securely on the management solution side.
Control phase
With the first step is completed, from now on it is possible to initiate remote control sessions to the registered device. To initiate a remote control session, the following process applies:
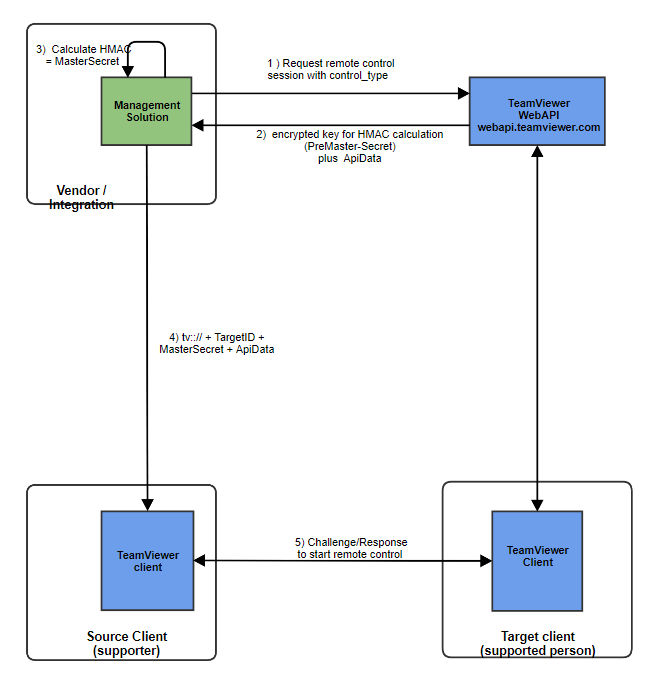
Remote control is only possible after successful registration of a device, as the DeviceKey and the DeviceKeyID are required to initiate a remote control session.
The first step is a WebAPI call (POST /oem/devices/requestcontrol) with the parameters RemotecontrolID, DeviceKeyID and the control type. These parameters will be passed on to the target client which is verifying if the DeviceKey has the control permissions that are requested within the API call.
After successful verification of the request, the target TeamViewer client generates a temporary secret for one-time use (a hashed method authentication message, HMAC) that is comparable to a session password.
The HMAC is computed based on data received through the control request and other data (Target nonce, DeviceSecret) that is generated by the TeamViewer client.
After computing the HMAC, the client encrypts the DeviceSecret with the DeviceKey that has been specified in the API call through the DeviceKeyID.
The DeviceSecret is returned as API call response parameter EncryptedDeviceSecret together with the target nonce and an URL template of a TeamViewer protocol URL ("teamviewerapi://") which is including the placeholder YOURMASTERSECRET.
The ISV implementation has to decrypt the EncryptedDeviceSecret with the DeviceKey and compute the HMAC based on the decrypted device secret, the target nonce and the other information sent in the request control API call.
Once the HMAC is computed, the placeholder YOURMASTERSECRET must be replaced with the HMAC to build a valid TeamViewer protocol URL.
The complete URL containing the HMAC must be presented to the source TeamViewer client to initiate a connection.
This could happen through a browser or as command-line parameter (the TeamViewer protocol is registered with the operating system when TeamViewer is installed and associated with the TeamViewer application).
The source TeamViewer client is now using the information in the URL including the HMAC to establish a connection to the target client.
The unregister phase
In case a DeviceKey is not used at all anymore, the DeviceKey can be unregistered. The diagram shows the basic principle:
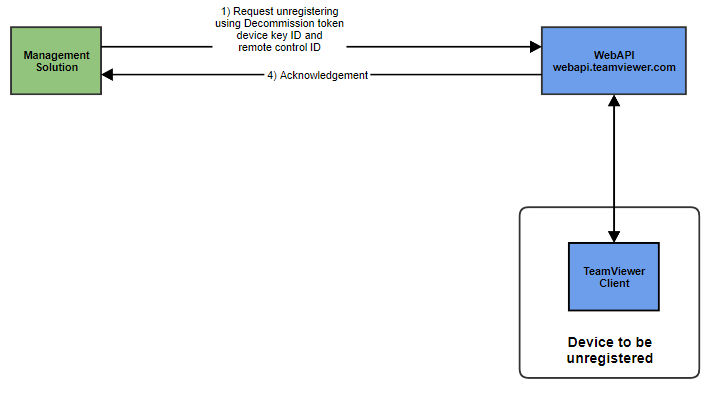
To unregister a DeviceKey, the WebAPI call DELETE /oem/devices/unregister is used.
For successful execution it requires the DeviceKeyID to identify the correct key, the RemotecontrolID of the device as well as the decommission token that has also been issued in the POST /oem/devices/createdevicekey API call response during the rollout phase.
This information will then be processed by the TeamViewer client on the device.
If the information in the API is matching with the information on the client, the local part of the key pair created in the rollout phase will be deleted and a confirmation is returned through the WbeAPI.
From this time on no further remote control session can be established using this DeviceKey.
Integration by example: the VendorExampleApp
Requirements
To follow this guide and perform the integration some information is needed throughout the different phases of the integration, which is
- Vendor ID
- Tenant account
- Script token with remote control permissions
The vendor ID has been given out by a TeamViewer representative to the ISV.
The tenant account can then be created with a script token of the vendor account with tenant management permissions.
Exemplary you could use a tool like Postman to issue the WebAPI calls.
Finally, a Script token from the tenant account is needed that has the permissions to create device keys, request control and delete device keys.
👉Please refer to https://www.teamviewer.com/en/for-developers/#create-script-section for instructions on how to create a script token. (If the above link does not work, please use the following link: https://www.teamviewer.com/en-us/for-developers/#create-script-section)
For the example integration, the provided code examples use the following technologies and libraries:
- C# and .NET runtime
- BouncyCastle security library
For Android the following information is needed additionally:
- APK signature value for your MSA
- ID for APK signature (issued by WebAPI from TeamViewer)
- Account ID of TeamViewer account
The AppKey is the signature of the MSA on the Android device, the AppKeyID is used together with the account ID as an index. Both values are returned with the response of the WebAPI call for registering the AppKey in the web console.
💡Hint: Please be aware that all values used during explanation are to be replaced by your concrete values.
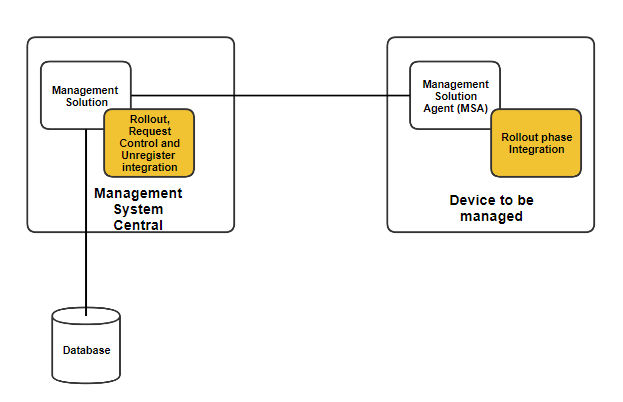
Overview of vendor-side integration implementation
The following diagram gives a brief overview of the parts on the vendor side, where integration has to be done.
Rollout of a device for REACH API
The API call can be done with any HTTP client class.
The pre-condition for this WebAPI call is to read the information from the rollout file that is written by the TeamViewer client.
This file is readable on Windows and macOS platforms with administrator rights.
On Android devices, a registration of the MSA app is required before trying to access the rollout data. This is separately described in the chapter Android integration below.
For our example here we refer to the code as it is also provided in the VendorExampleApp that is available in source code. First, you have to create the JSON body, that can, for example, happen using a data class, like the following exemplary creation of such a data class.
Be aware that the information for RemotecontrolID and RequestID originate from the rollout file:
Creation of request body
var createDeviceKeyRequest = new CreateDeviceKeyRequest
{
    key_permissions = "unattended",
    remotecontrol_id = "r124124124",
    request_id = "{8c4fa1a7-9d1c-41e9-be17-70e95c289080}",
    tenant_id = "t0001"
};
With that data class created and filled with information, the WepAPI call can be issued, by specifying the URL and the method, filling the HTTP request header with the required authentication information and then append the JSON-body containing the serialized data class from above.
For adding the authorization to the HTTP-header, an application script token must be created through the TeamViewer (Classic) Management Console.
It has to be made sure that this script token has the correct permissions to execute the WebAPI calls.
These permissions can only be granted for that script token if the account that owns the scrip token is a tenant.
See an example code in the following box issuing the call parsing the response and returning the deserialized data class containing the response values. This example code is taken from the vendor app.
Request DeviceSecretKey
HttpWebRequest webReq = (HttpWebRequest)WebRequest.Create(apiUrl + "/api/v1/oem/devices/createdevicekey");

webReq.Method = "POST";
webReq.ContentType = "application/json";
webReq.Headers.Add("Authorization", "Bearer "+accessToken);

using (var streamWriter = new StreamWriter(webReq.GetRequestStream()))
{
    var createSecretKeyRequestJson = JsonConvert.SerializeObject(createDeivceKeyRequest);

    streamWriter.Write(createDeviceKeyRequestJson);
    streamWriter.Flush();
    streamWriter.Close();
}

var httpResponse = (HttpWebResponse) await webReq.GetResponseAsync();
if (httpResponse == null)
{
    throw new InvalidDataException("No response received");
}

var responseStream = httpResponse.GetResponseStream();
if (responseStream == null)
{
    throw new InvalidDataException("No response stream received.");
}

using (var streamReader = new StreamReader(responseStream))
{
    var result = streamReader.ReadToEnd();
    return JsonConvert.DeserializeObject<CreateDeviceKeyResponse>(result);
}
With the API response, you are now in possession of the encrypted DeviceKey.
To decode the encrypted DeviceKey which is in PEM format, we chose BouncyCastle as a library here because it makes a lot of stuff easier.
BouncyCastle is also available for Java. But there should be a lot of libraries for every language being able to work with PEM files.
The encryption algorithm is stated directly in the PEM file you get from the API request.
Example:
"-----BEGIN RSA PRIVATE KEY-----\nProc-Type: 4,ENCRYPTED\nDEK-Info: AES-256-CBC,309AA16\n-----END RSA PRIVATE KEY-----\n"
Because of security concerns we HIGHLY RECOMMEND that you use a library to handle the work because libraries usually come with the ability to identify the correct algorithm automatically.
In case of a security problem with the algorithm itself, we can and will change it.
No changes will be required on ISV side if an appropriate library is used, while a manual implementation would never be that flexible.
Using Bouncy Castle, the decryption of the PEM key boils down to code like in the following example.
For simplicity reasons, we store the deviceKey as a decrypted PEM-format string as this can be handled by the BouncyCastle library well and is storable as a string.
Decrypt PEM key
TextReader textReader = new StringReader(encryptedDeviceKey);
PemReader pemReader = new PemReader(textReader, new PasswordFinder(password));
object deviceKeyObject = pemReader.ReadObject();

AsymmetricCipherKeyPair rsaPrivatekey = (AsymmetricCipherKeyPair)deviceKeyObject;

TextWriter tw = new StringWriter();
var pemWriter = new PemWriter(tw);
pemWriter.WriteObject(rsaPrivatekey.Private);
pemWriter.Writer.Flush();
string deviceKey = tw.ToString();
return deviceKey;
Important after this step is that you have to store the DeviceKey, together with the DeviceKeyID and the RemotecontrolID, that has been returned in the response of the WebAPI call, in the context of your management solution.
Additionally, you need to keep the decommission token that is eventually required to unregister a DeviceKey again.
Establishing a remote control session
With the data from the previous phase, the DeviceKey and the DeviceKeyID, a remote control session can be established to the registered device.
It is important that during the request for remote control you use the same control type that you have asked permissions for during the rollout-phase.
Again, in the beginning, a data class instance is first filled with the required information for the WebAPI call.
Request Control data class
var requestControlRequest = new RequestControlRequest()
{
    control_type = "attended",
    device_key_id = "{114fa1a7-abab-41e9-be17-70e95c289080}",
    remotecontrol_id = "r124124124",
    tenant_id = "t0001",
    tenant_nonce = "243dd78d07324ab7befa41390d08d35f"
};
With this data instance in place, the WebAPI call can be issued like in the following C# code.
Again first the URL is added, then the HTTP authorization-header with the script token and finally the serialized data class instance as a JSON body.
Once the request has returned with a response, the data can be deserialized into an own data class instance, which is providing the template for the TeamViewer link.
This link will then be completed with a Hashed Method Authentication Message (HMAC).
Remote Control call
HttpWebRequest webReq = (HttpWebRequest)WebRequest.Create(apiUrl + "/api/v1/oem/devices/requestcontrol");

webReq.Method = "POST";
webReq.ContentType = "application/json";
webReq.Headers.Add("Authorization", "Bearer " + accessToken);


using (var streamWriter = new StreamWriter(webReq.GetRequestStream()))
{
    var requestControlRequestJson = JsonConvert.SerializeObject(requestControlRequest);

    streamWriter.Write(requestControlRequestJson);
    streamWriter.Flush();
    streamWriter.Close();
}

var httpResponse =  (HttpWebResponse)(await webReq.GetResponseAsync());

if (httpResponse == null)
{
    throw new InvalidDataException("No response received");
}

var responseStream = httpResponse.GetResponseStream();

if (responseStream == null)
{
    throw new InvalidDataException("No response stream received.");
}

using (var streamReader = new StreamReader(responseStream))
{
    var result = streamReader.ReadToEnd();

    return JsonConvert.DeserializeObject<RequestControlResponse>(result);

}
Since the API response only returns a link template, the link has to be completed with the HMAC.
The secret to creating the HMAC is returned encrypted in the API response, so the first step is to decrypt the secret.
They key for decryption is the DeviceKey which has been received with the API response during the rollout phase.
As the DeviceKey is stored as a PEM-formatted string, the first part of the code converts this string into a structure that is suitable for BouncyCastle (the "AsymmetricCipherKeyPair"-type variable).
Decrypt PreMasterSecret
using (var reader = new StringReader(DeviceKey))
{
    //Convert to right format
    var bytesToDecrypt = encryptedDeviceSecret.FromBase64SafeUrl();

    //--------DECRYPT WITH PEM DEVICE KEY-------------//
    AsymmetricCipherKeyPair keyPair = (AsymmetricCipherKeyPair) new PemReader(reader).ReadObject();
    var decryptEngine = new OaepEncoding(new RsaEngine());
    decryptEngine.Init(false, keyPair.Private);
    var decryptedDeviceSecret = decryptEngine.ProcessBlock(bytesToDecrypt, 0, bytesToDecrypt.Length);
}
With the decrypted DeviceSecret, the TenantID, the RemotecontrolID of the target and the target and tenant nonces, the HMAC can be created like in the following example, which again is implemented using the security library BouncyCastle.
Generate Mastersecret
//---------HMAC Values to be hashed, recombined in a string ------------//
var hashVerifier = $"{tenantNonce}{targetNonce}{tenantId.Substring(1)}{remotecontrolId.Substring(1)}";


HMACSHA512 hmacsha512 = new HMACSHA512(decryptedDeviceSecret);
byte[] hashmessage = hmacsha512.ComputeHash(Encoding.UTF8.GetBytes(hashVerifier));
var masterSecret =  hashmessage.ToBase64SafeUrl();
The result is put into the TeamViewer link template instead of the string YOURMASTERSECRET.
With that completed string the remote control session can be established either by opening the link in the internet browser of a system that has a TeamViewer enterprise client installed or by passing this link to the command line of a call to TeamViewer.exe
Unregister device
The unregister device call, requires the following parameters, to successfully execute the unregistering:
- Valid script token with correct permission (delete device key)
- Decommission token
- Device Key ID
- Remote control ID
- Tenant ID
As in the previous phases a data class instance for this specific call has to be created, filled with the concrete data for the upcoming call to the WebAPI:
Data structure creation
var unregisterDeviceRequest = new UnregisterDeviceRequest
{
    tenant_id = "t0001",
    remotecontrol_id = "r124124124",
    device_key_id = "{114fa1a7-abab-41e9-be17-70e95c289080}",
    decommission_token = _mState.LastDecommissionToken
};
Again as already previously shown the same pattern of implementation is followed, adding the WebAPI-call URL, adding the method, the application script token to the HTTP authorization header and eventually append the serialized content of the previously created data class in JSON format.
Unregistering
HttpWebRequest webReq = (HttpWebRequest)WebRequest.Create(apiUrl + "/api/v1/oem/devices/unregister");

webReq.Method = "DELETE";
webReq.ContentType = "application/json";
webReq.Headers.Add("Authorization", "Bearer " + accessToken);

using (var streamWriter = new StreamWriter(webReq.GetRequestStream()))
{
    var unregisterDeviceRequestJson = JsonConvert.SerializeObject(unregisterDeviceRequest);

    streamWriter.Write(unregisterDeviceRequestJson);
    streamWriter.Flush();
    streamWriter.Close();
}

var httpResponse = (HttpWebResponse)await webReq.GetResponseAsync();
if (httpResponse == null)
{
    throw new InvalidDataException("No response received");
}

var responseStream = httpResponse.GetResponseStream();
if (responseStream == null)
{
    throw new InvalidDataException("No response stream received.");
}

using (var streamReader = new StreamReader(responseStream))
{
    var result = streamReader.ReadToEnd();
    return;
}
In this case the returned result will contain no data.
The success of the operation can only be verified by checking the return value which should be 204 (also see HTTP common return values).
Specifics for Android integration
Due to platform restrictions on Android (not having proper administrative privilege separation), the rollout differs from other platforms. A verification of the MSA needs to be performed before it can communicate with the TeamViewer Android app and the RolloutKey is obtained differently.
The SHA-256 hash of the MSA’s Signature Key (referred to as AppKey from here on) has to be registered with TeamViewer as a hexadecimal string using the WebAPI call POST "/oem/appregistrations".
This registration step is only required once per AppKey and can be done with any REST-client like Postman.
The communication between the TeamViewer app and the MSA uses the native Android Binder interface (https://developer.android.com/reference/android/os/Binder.html) as described by the AIDL files that you received when registering for the REACH API.
Before any other call, the verify method needs to be called. The verify method requires the AccountID of account that was used to register the MSA AppKey and the KeyID that was returned during the registration. If the verification succeeds you are good to call any of the Binder service's methods. Otherwise a SecurityException will be thrown.
The main difference on Android, except the app registration, is the way how the RolloutKey is obtained. The file containing the rollout data is written in the private application storage of the TeamViewer app. It is only possible to read this information for the TeamViewer application. For that reason, the MSA app has to request the rollout data via the Binder interface. After having successfully obtained the rollout data, using the requestPreKeyData method on the Binder interface, you can then proceed the same way as described in the chapter Rollout of a device for REACH API