The TeamViewer-Intune integration aims to enable IT Administrators to remotely administer an Intune-managed device, providing remote assistance to information workers.
Through the troubleshooting portal, Admins will:
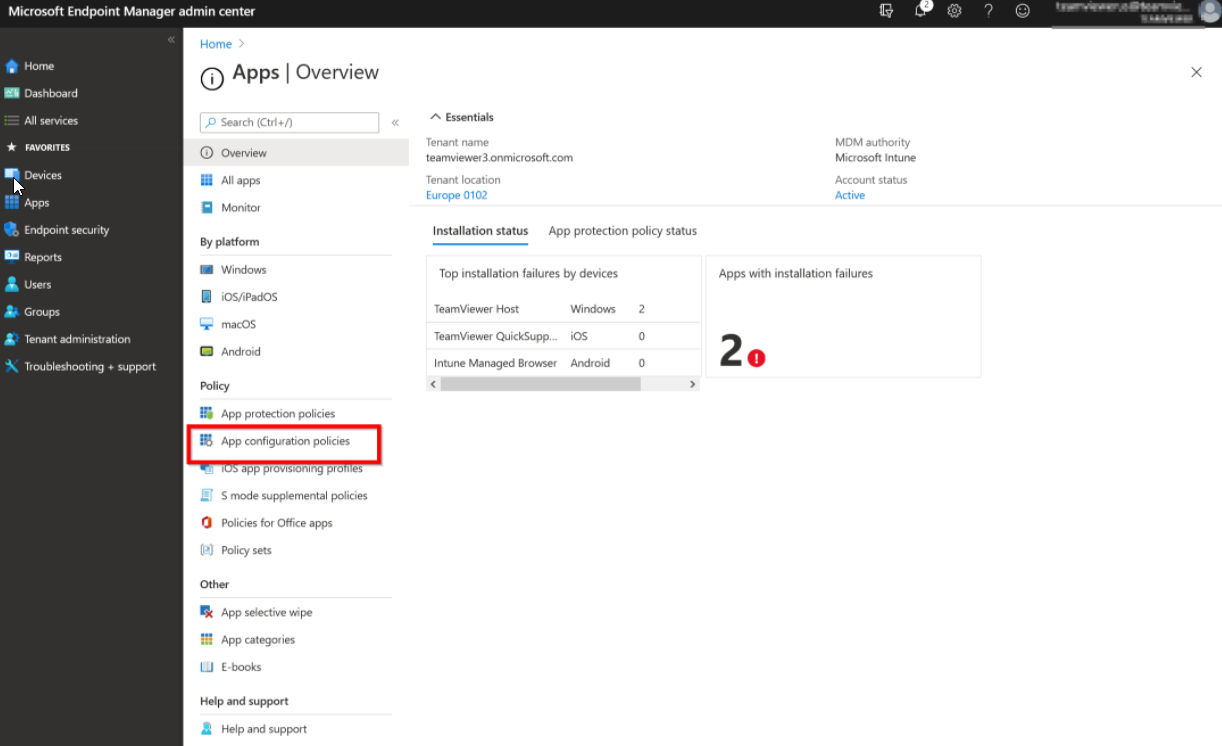
- Remotely troubleshoot issues such as licensing, enrollment, compliance, and even app installation failures.
- Perform remote tasks such as managing mobile apps, file transfer system logs, viewing device system information, and monitor hardware performance, including CPU utilization, RAM usage, and device storage information.
- Save time, cut travel costs for on-site, in-person service calls and maintenance
Please keep in mind that Integrations are not included in basic license packages. They have to be purchased separately as AddOns. For more information, please visit our website: http://www.teamviewer.com/integrations
Audience
This document intends to address Intune IT Admins and Help Desk support staff.
Prerequisites
It is assumed that the reader is familiar with using Intune in Azure.
- Valid TeamViewer account with eligible license. To sign up, please visit: https://login.teamviewer.com
- Intune product license assigned to Intune administrator account.
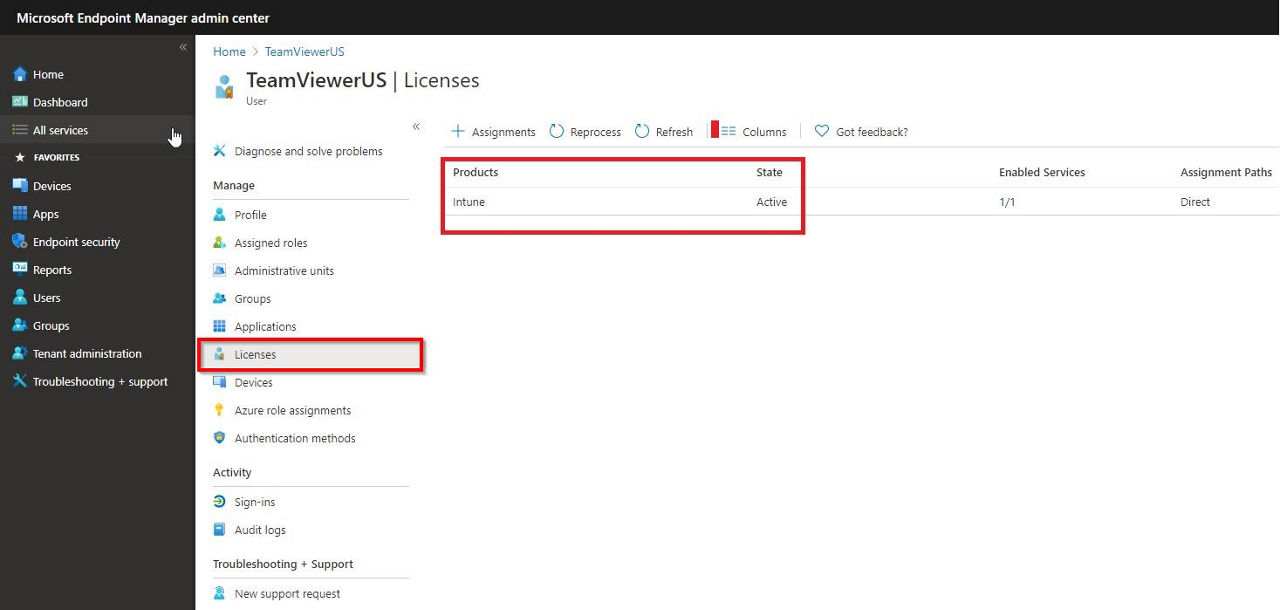
- Adequate permissions. The Intune administrator in the Endpoint Manager admin center must have the following InTune roles:
- Update Remote Assistance: Allows administrators to modify the TeamViewer connector settings.
- Request Remote Assistance: Allows administrators to start a new remote assistance session for any user. Any Intune role within a scope does not limit users to this role. Also, users or device groups assigned an Intune role within a scope can request remote assistance.
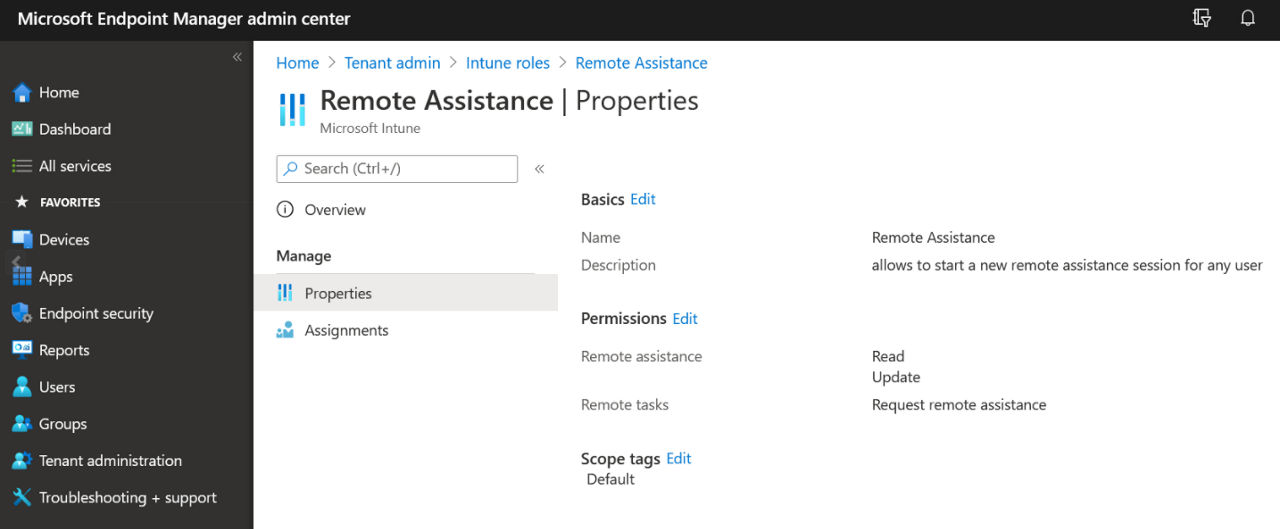
- Microsoft Endpoint ➜ Tenant Administration ➜ Roles - All roles ➜ Intune roles – Permissions ➜ Remote tasks:
- Request Remote Assistance: Initiates a remote assistance session with a user's device by using TeamViewer. TeamViewer must be configured for your tenant. Remote assistance with TeamViewer supports Windows MDM-managed PCs, and Android PCs. HoloLens, Surface Hub, and Windows 10 S devices are not supported.

Software Requirements & Supported devices
- Supported administrator platforms establishing outgoing connections via TeamViewer Full Client App: Windows, macOS, Linux, iOS, Android.
- Supported information worker endpoint platforms allowing incoming connections via QuickSupport App are:
- Windows MDM-managed PCs (Windows devices that are enrolled using "userless" methods, such as DEM and WCD, don't show the TeamViewer notification in the Company Portal app.)
- Android device administrator (DA)
- Android Enterprise personally owned devices with a work profile (BYOD) (dedicated and fully managed Android devices are not supported)
- macOS
- iOS
HoloLens, Surface Hub, and Windows 10 S devices are not supported.
The Company Portal App is required to receive/allow the remote request. You cannot use the integration for devices managed with InTune app.
Key Features
The TeamViewer integration in Intune offers key features and workflows:
- Allowing IT admins to initiate remote sessions in the Intune dashboard seamlessly.
- Notifying Information workers of remote requests via the Company Portal App.
- Supporting multiple, simultaneous tabbed sessions to Intune-managed devices.
- Mass deploying unattended access to Windows and Android devices.
- Securing all sessions using RSA public/private key exchange and AES 256-bit encryption.
The integration benefits administrators, streamlining remote administration when support cases surface, and the TeamViewer Connector is pre-built into the Intune platform. No separate installation is necessary!
About this manual
This manual describes enabling the TeamViewer Connector and initiating the remote assistance request to Intune-Managed devices. It also provides an overview of the various features provided by the integration.
TeamViewer Client Installation
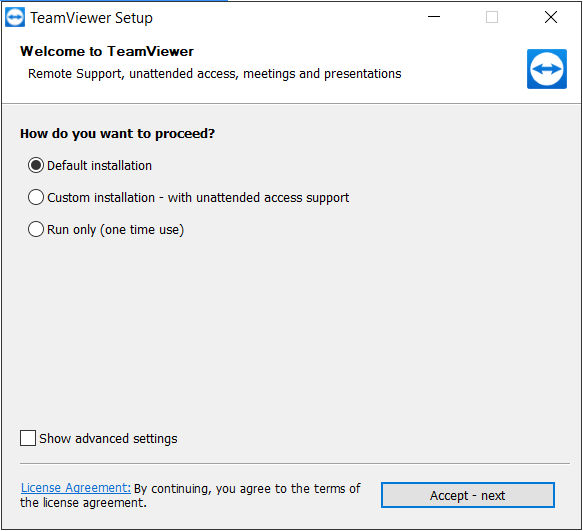
Administrators need to install the TeamViewer full client on their laptops. To install the TeamViewer App, follow the below steps:
- Download the TeamViewer installer for your OS by invoking the following URL: https://www.teamviewer.com/en/download/
- Run the downloaded application. Choose the “Basic Installation” option as shown below and then click the “Accept – Finish” button.
- If the User Account Control dialog pops up, click the “Yes” button. TeamViewer installation will proceed and be complete.
Enabling TeamViewer Connector
The TeamViewer integration in Intune is pre-built, only requiring the end user to enable the integration and link their TeamViewer account.
Please make sure the prerequisites have been met.
To enable the TeamViewer integration:
- Users should go to set up the TeamViewer Connector, access devices, and create client apps.
- The TeamViewer Connector is located in Endpoint Manager Admin ➜ Tenant Administration ➜ Connectors and token ➜ Cross Platform ➜ TeamViewer Connector, as shown in the screenshot below:

- Administrators will be redirected to TeamViewer to enter TeamViewer credentials and accept the required permissions:
- Next, authorize Intune access to the TeamViewer account by choosing: ‘Log in to TeamViewer to authorize’:
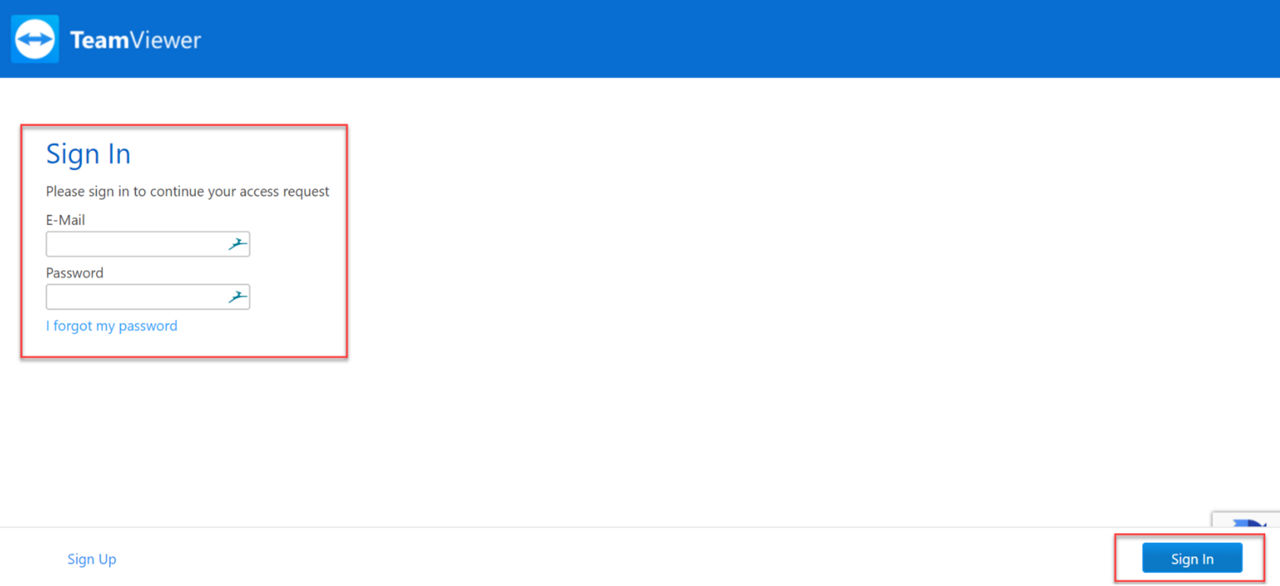
- Authorized TeamViewer accounts will be redirected to Microsoft Intune, requiring sign-in with Microsoft credentials:
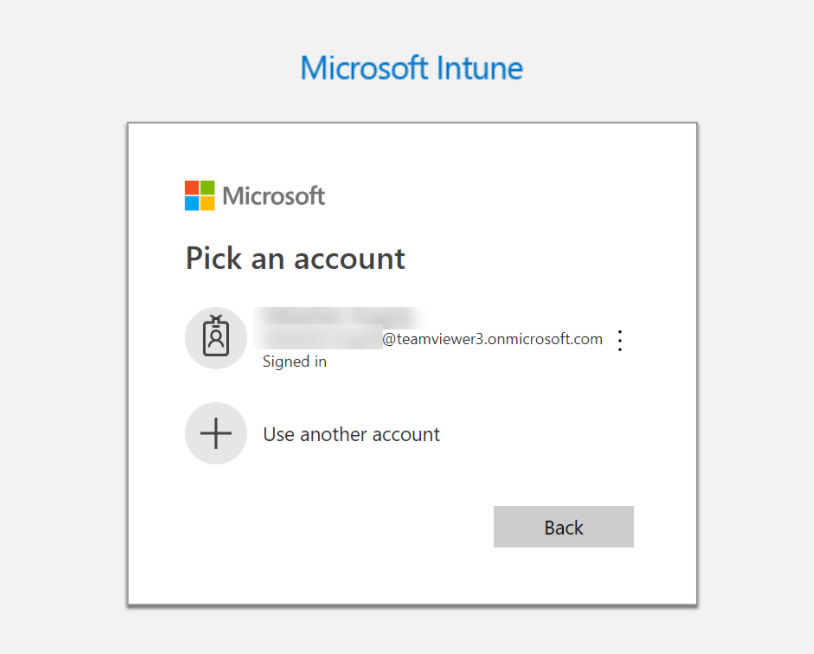
- Once successful, a confirmation message stating: ‘’ will display and the connection status showing green ‘Active’.
If users experience an error message after this step, please ensure a proper Intune license is associated with the account. Please see the section ‘Prerequisites’ for further information.
Request Remote Assistance
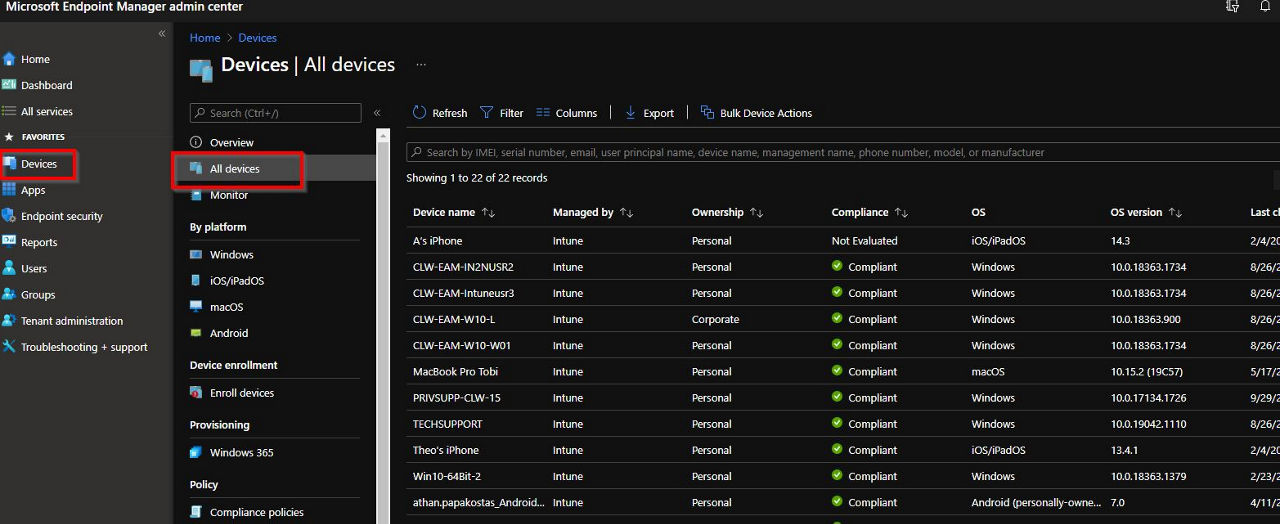
To remotely administer an Intune-managed device, administrators will need to select a device via Microsoft Endpoint Manager “Devices” ➜ “All Devices”. In this use case, we will be requesting remote assistance to a user’s device through the Microsoft Endpoint Manager Remote Assistance session option.
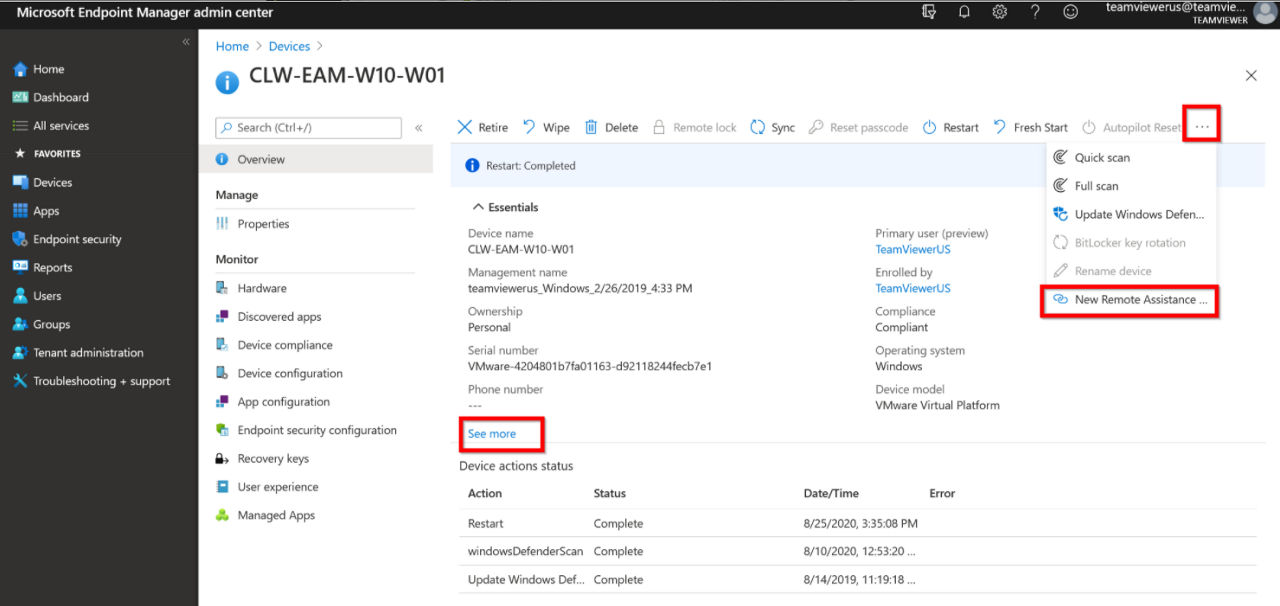
- Once IT selects the problematic device, they can view the full dashboard listing the device status and initiate ‘New Remote Assistance Session’ to the user’s device by selecting ‘…More’ in the top right corner.
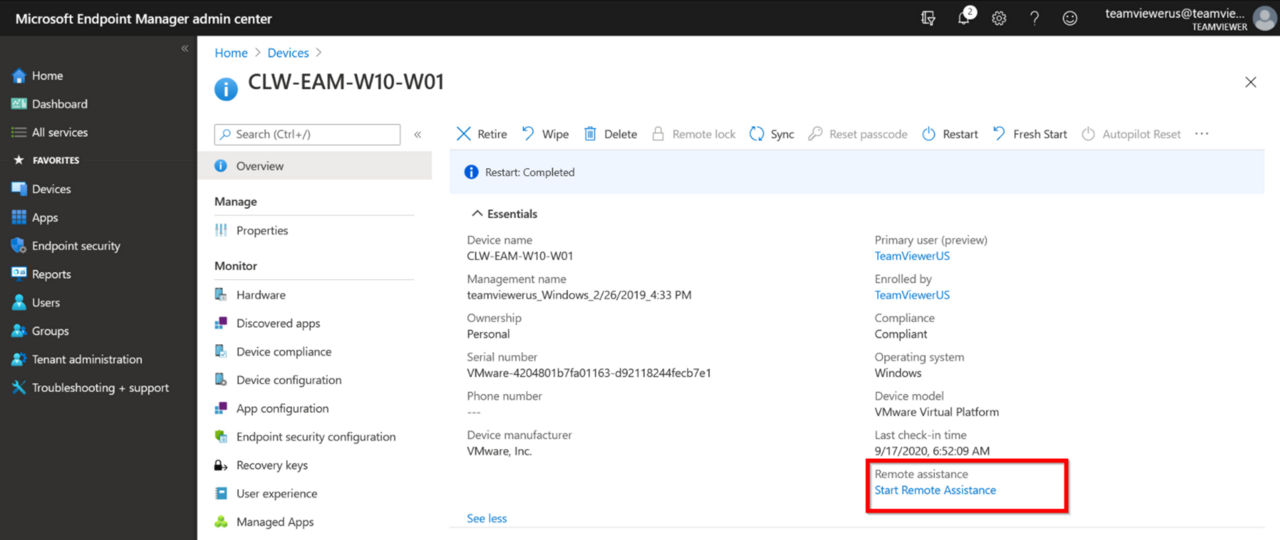
- When the remote assistance session has been generated, ‘Start Remote Assistance’, will appear, bringing the Admin into the waiting portal until the end user accepts the request.
- On the remote side, the Company Portal App’s flag notification prompts the IW to accept the request and confirm to allow remote control.
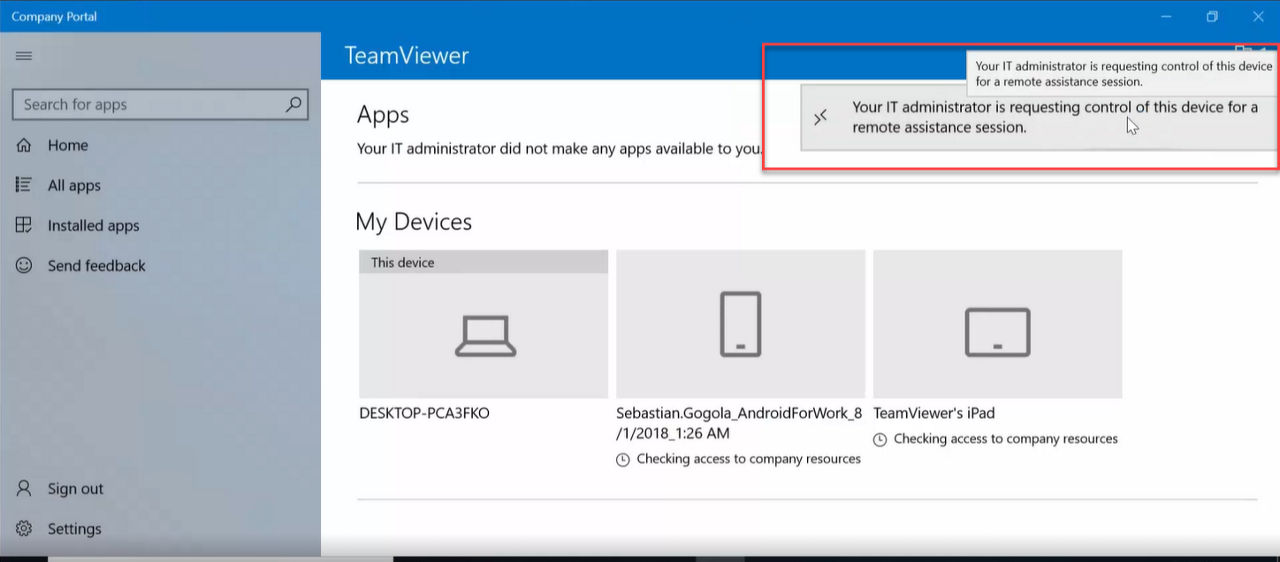
📌Note: If TeamViewer is installed, the device will redirect to the installed application. If no TeamViewer is installed, the device will prompt to download the Quick Support version of TeamViewer to be able to make the connection with the device.
📌Please note:
- Remote assistance is for attended access requiring end-user interaction.
- Remote sessions take place via TeamViewer QuickSupport App, which is added in Intune ➜ Client Apps as a LOB or Managed App.
- TeamViewer Host on Windows OS will only accept remote assistance requests if installed.
- The QuickSupport App and Add-On for mobile devices must be installed prior to a remote session can take place.
- If QuickSupport App is not installed before the remote request, then the end user will automatically be taken to App Store to download after accepting remote assistance.
Deploying TeamViewer (Classic) MSI Package
TeamViewer offers an MSI deployment package to install TeamViewer Full Clients or Host modules to your entire network of Windows 10 devices silently, without IT staff leaving their desks or requiring manual actions from end users.
📌Please note:
- Deploying TV MSI packages does require a TeamViewer Corporate subscription, and the TeamViewer full client is needed to view the managed device(s).
- If the Host is installed on users’ devices, IT admins can still request remote assistance with attended access, allowing the session to be passed through the Company Portal App.
When deploying the MSI as a Line-of-Business App, IT Admins can use command-line switches to:
- Apply the settings of a Custom Host automatically, including a specific settings policy
- Assign the installed host to an account, and
- Enable Easy Access for unattended access
Steps to deploy MSI package:
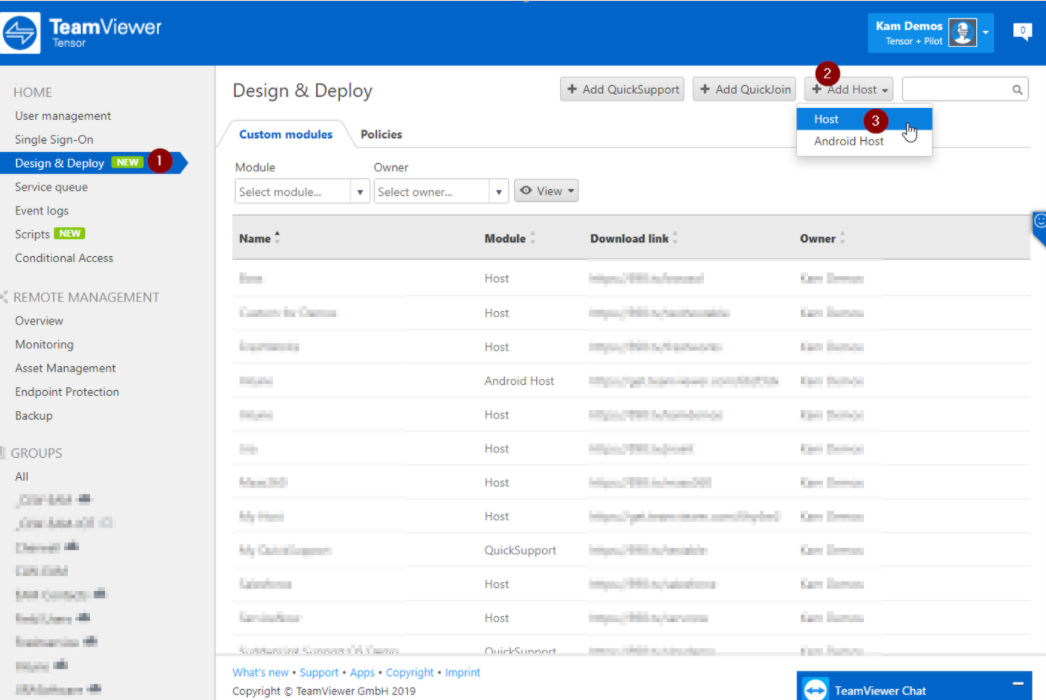
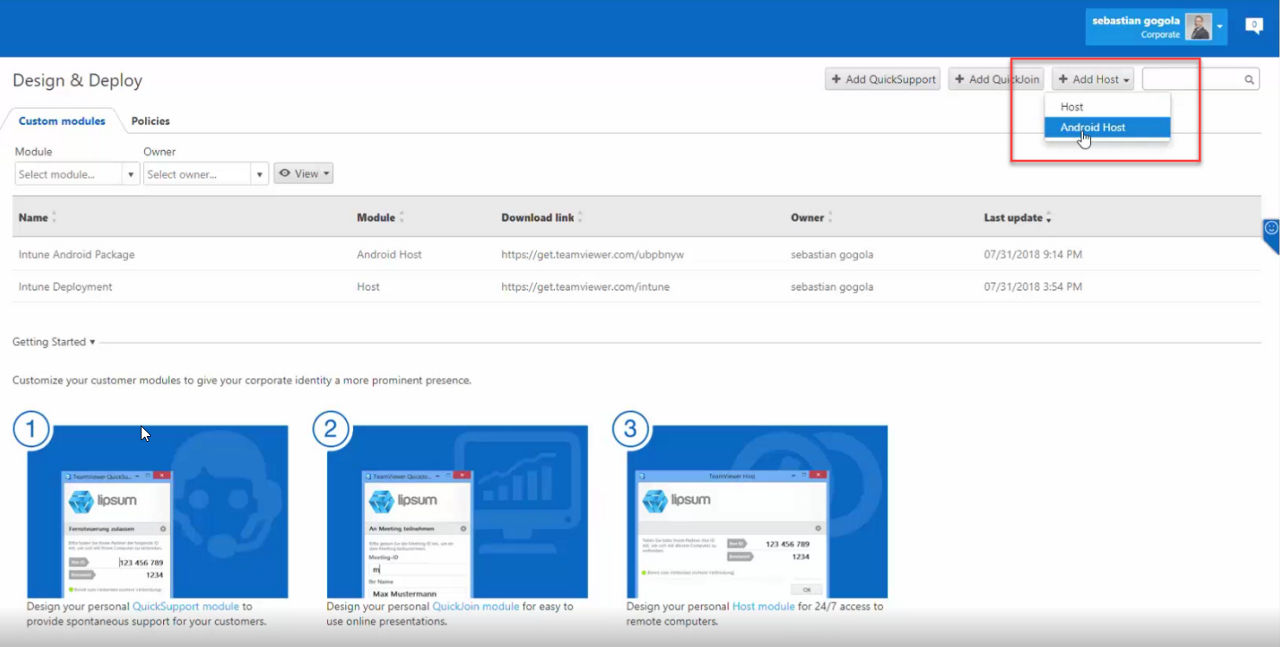
- As a prerequisite, we will need to enter the TeamViewer with the Master admin account or the account of the main TeamViewer administrator. Don’t have a Master admin account? See on why and how you can use one for TeamViewer configuration and central administration.
- On the left side of the screen, choose the Design & Deploy section. Then, in the top right corner of the page, click the Add Host button. In the drop-down menu that appears, choose Host.
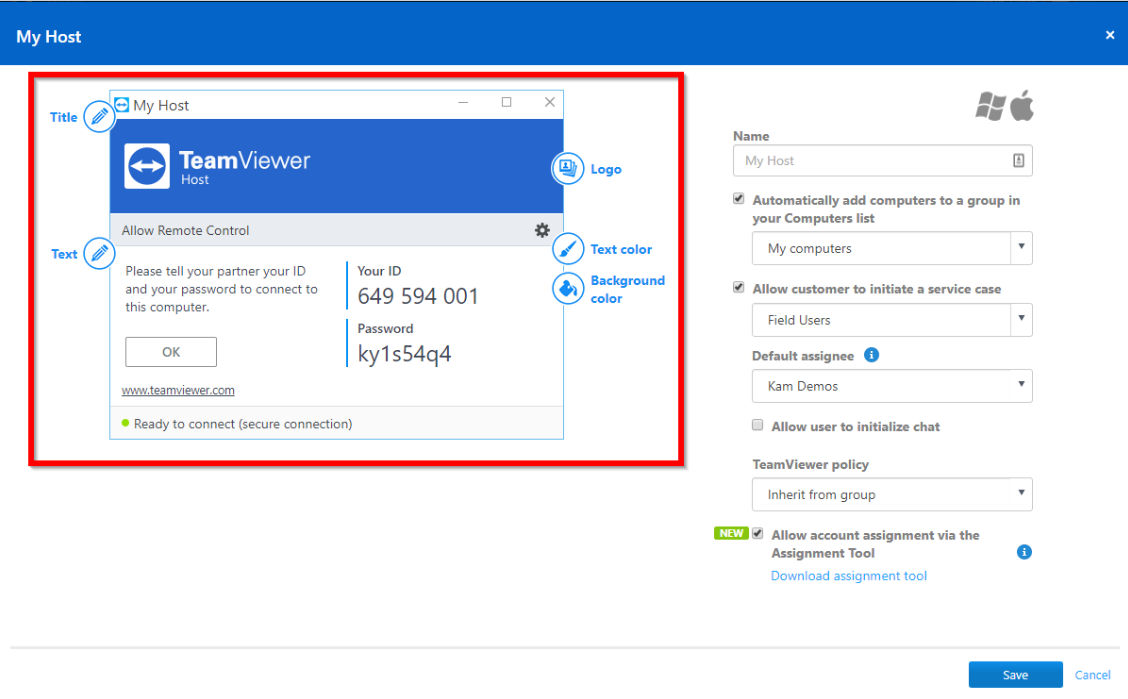
In the configuration screen, you can customize the Host module. The following visual customizations are available for your customized Host:
- Title: You can edit the window title.
- Text: You can edit the welcome text in the main window.
- Logo: Select your logo, which will be displayed in the top part of the main window.
- Text Color: You can edit the font color. Click in the left field to display a color box and select a color.
- Background color: You can edit the background color. Click in the left field to display a color box and select a color.
Custom Host Settings
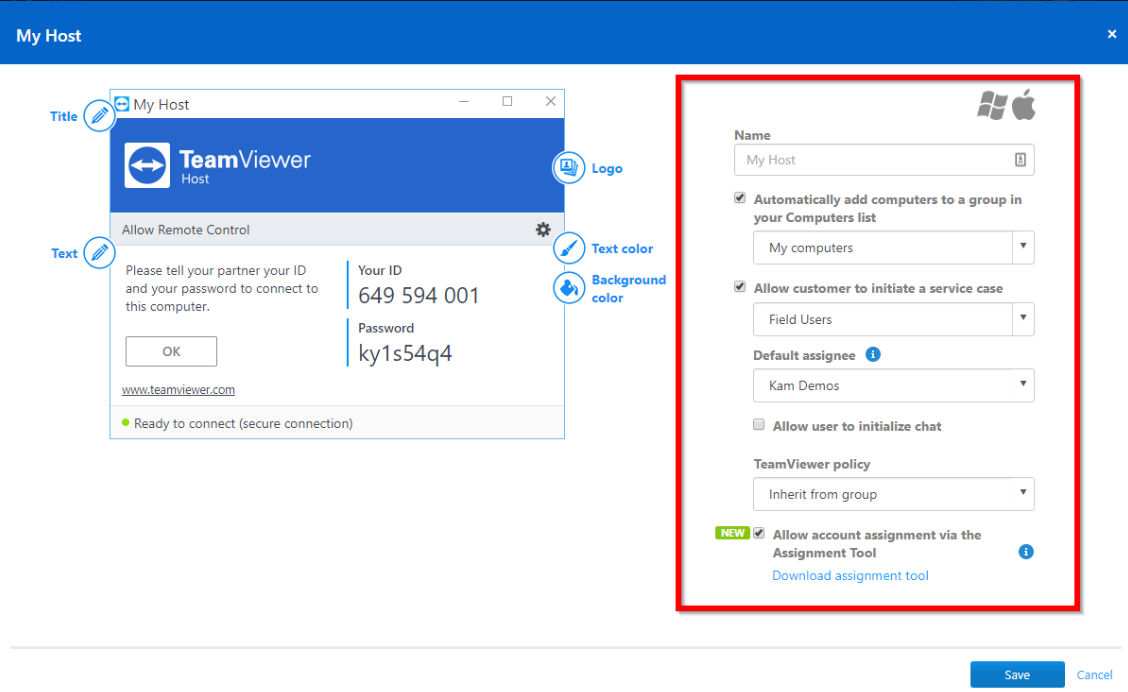
The following settings are available on the custom Host module:
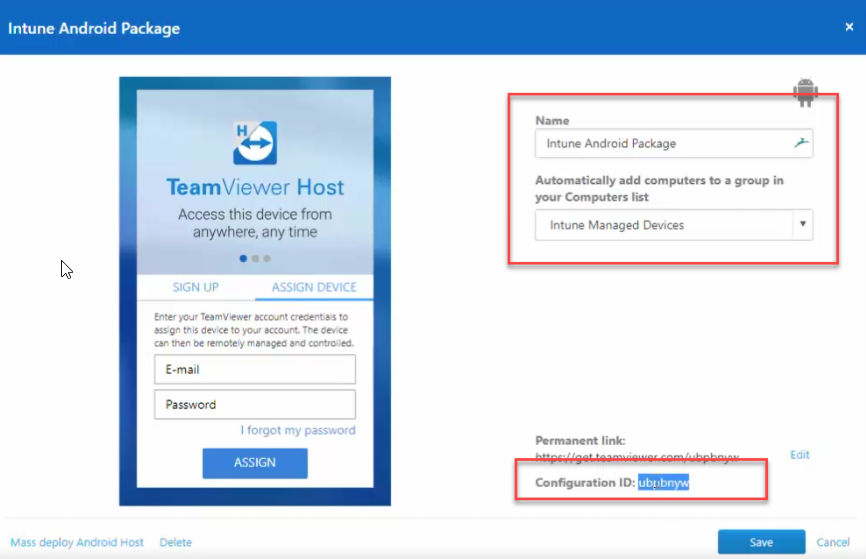
- Name: Serves to identify the modules in the overview of your customized modules.
- Automatically add computers to a group in your Computers list: If the box is checked, every device installed on the TeamViewer Host module will be automatically added to the selected group within your Computers & Contacts list. Select a group for these devices from your Computers & Contacts list.
- Allow users to create a service request: If the box is checked, users of the TeamViewer Host module can start a service case for spontaneous support. For this, a Help me Button will be visible on the Host module when your customer opens the module. Select a group name for these computers in your Computers & Contacts list.
- Default assignee: You can select a default assignee for all service cases created with this customized Host
- Allow customers to initialize chat: A chat box appears in which your customers can send a message before the connection.
- TeamViewer policy: Assign a TeamViewer settings policy to the device. The settings defined within the policy are set for the module during installation.
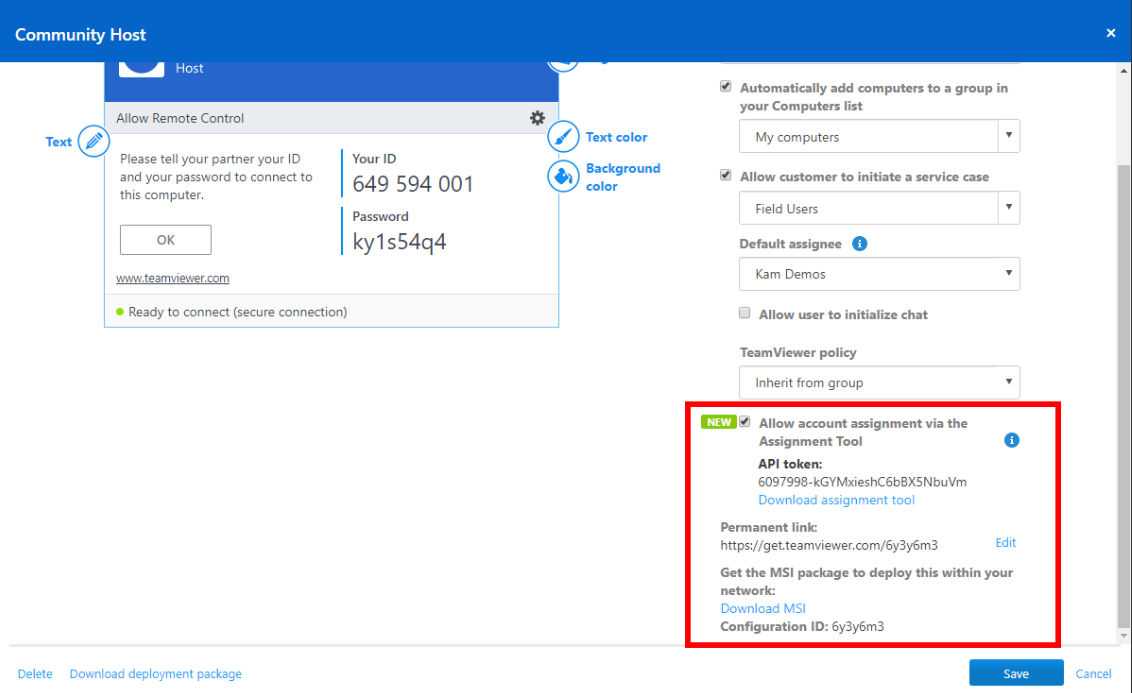
- Allow account assignment via the Assignment Tool: Account assignment without confirmation will activate easy access automatically
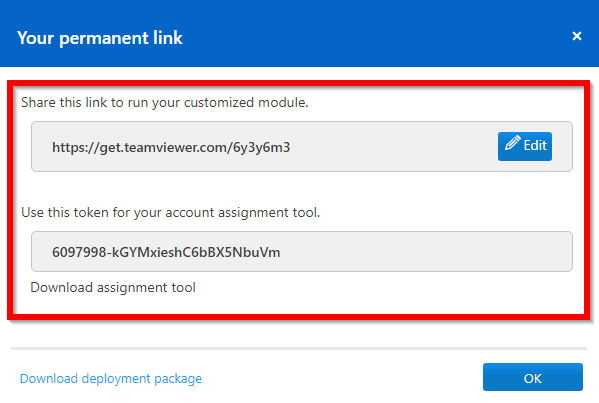
- Once you have configured your custom Host to your liking, click the Save button in the lower-right corner. A dialog will appear with a custom download link for the EXE version of the Host and an API token to be used during the MSI Deployment.
- Copy these items and document them for later use in your deployment. Once documented, click OK in the bottom-right corner to close the dialog and return to the Design and Deploy page.
- On the Design and Deploy page, you will see your new Custom Host in the list. Move your mouse over the row for the host and move to the right edge. Click the Edit button that appears to edit your custom Host settings.

- In the Edit dialog, new information in the lower-right corner will be needed for deployment. You may need to scroll the dialog to see it as pictured below. At the bottom of this section will be a line called the Configuration ID. This string will be needed for the MSI deployment command, so copy and document this string for later use.
- You can then click the link titled Download MSI. This will download a ZIP file containing generic MSI installers for both the Host (TeamViewer_Host.msi) and the full Client (TeamViewer.msi).
- Now that the MSI file and the deployment parameters are available, we can move to create the package in Intune.
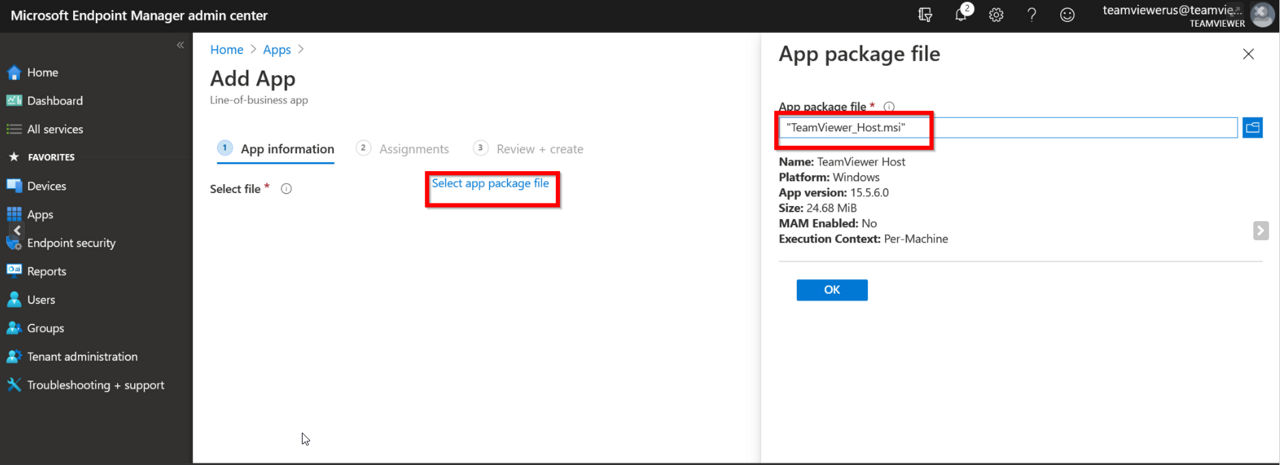
- In the Intune dashboard, we navigate to the Client Apps section, choose Add, and for App type, select Line-of-Business App.

- Under the App package file, open the file explorer and select the previously downloaded and extracted MSI file named TeamViewer_Host.msi. Configure details defining a description for the App, input TeamViewer as the trusted publisher, and, most importantly, paste the required command-line parameters.
Here is a recommended command line to install the custom Host created earlier in this article. Replace %YOURAPITOKEN% and %YOURCUSTOMCONFIGID% with the API token and Configuration ID you previously saved and documented. For Unattended Access, please add the parameter below:
/qn CUSTOMCONFIGID=%YOURCUSTOMCONFIGID% APITOKEN=%YOURAPITOKEN% ASSIGNMENTOPTIONS="--alias %COMPUTERNAME% --grant-easy-access --reassign"
More deployment details, installation switches, and options are available at this link in our full MSI deployment article.
- After saving the parameter, manage the assignment as ‘required’ to silently force the installation, select a group of devices, and confirm all changes have been saved.
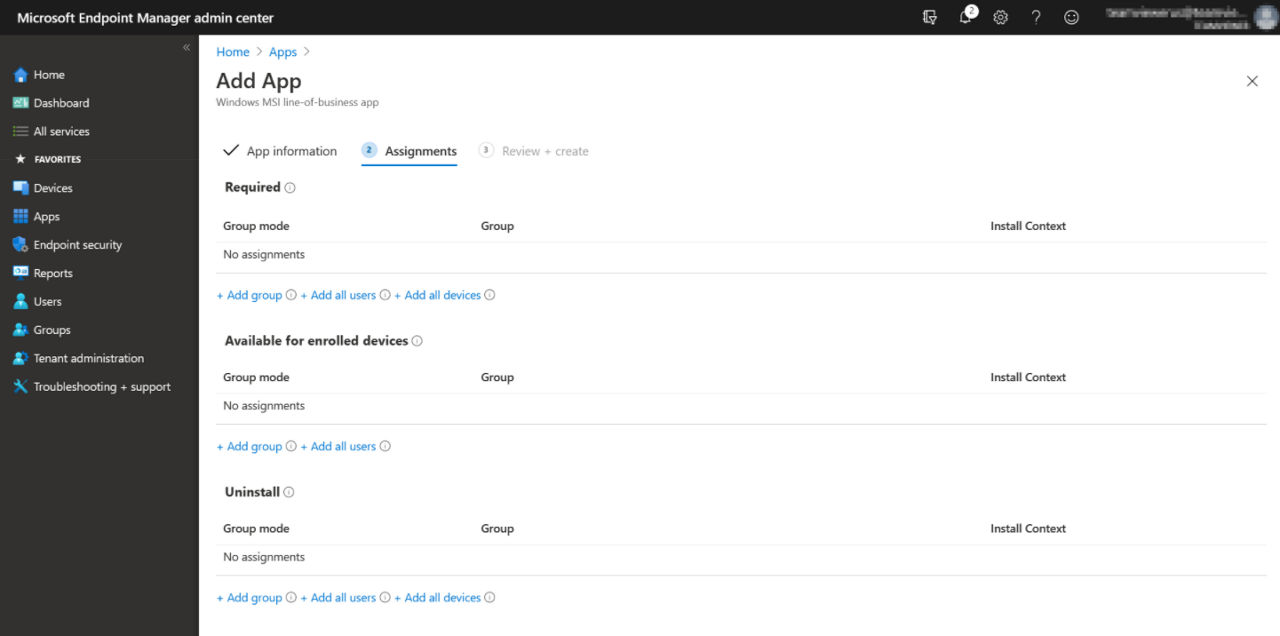
- Then save the app, and the devices will start to install.
- Monitoring the installation status; confirming the deployment was successful, we cross-reference the device’s hostname and secure unattended access from the TeamViewer full client.
Video demonstrations below:
Mass Deploy Android Host
Through Intune’s EMM system - supporting App Configuration Policies for Managed Apps, Admins can deploy the TeamViewer Host App to support Android phones and tablets. Devices include Samsung, Asus, Honeywell, Caterpillar, Lenovo, Sony, and more…. Please check the following Community article for a list of supported devices and Add Ons.
Once the Android Host is deployed, in addition to remote view & remote control, TeamViewer enables chat support, secure file transfer, viewing system information, and the ability to stop or uninstall problematic Apps. Admins can now benefit from accessing unattended devices used as POS systems or Kiosks.
Deploy Android Host:
- We will need to enter the TeamViewer with the Admins account as a prerequisite.
- Navigate to the top right corner and choose ‘Add Android Host.’
- In the configuration, the screen defines a name for the module and select a group where the managed device will display. Make sure to copy the configuration link after saving the module for later steps.
- Navigate to Endpoint Manager ➜ Tenant Administration ➜ Android ➜ Managed Google Play to ensure you have linked your managed Google Play account to Intune, granting permission to send both user and device information to Google.

- Open Managed Google Play store.

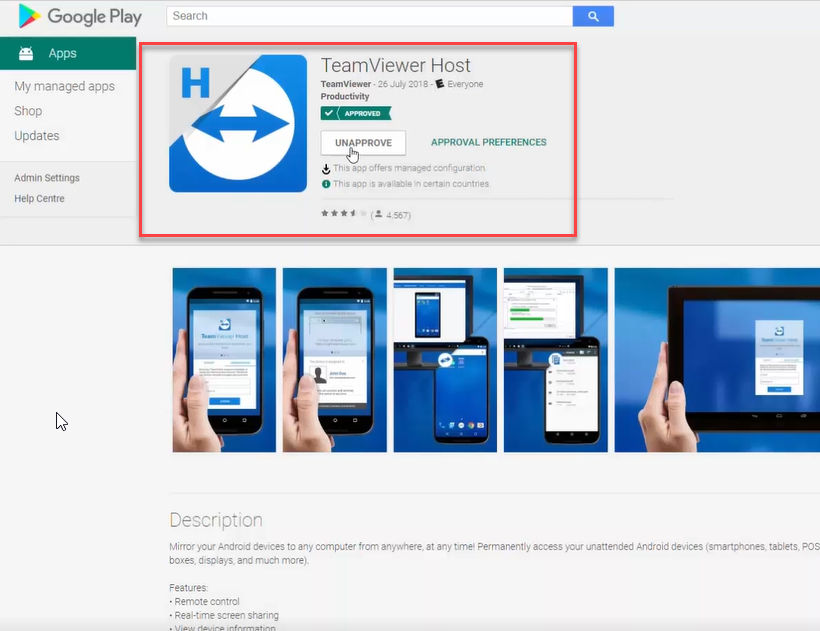
- In the Play Store, the Admin will search for the TeamViewer Host App and make sure it is approved as a Managed App along with any other Add Ons specific to your devices to allow the full control feature.
- Once synchronized, the Managed App will appear in the Intune dashboard, and the Admin will verify the required App is assigned to a group containing the intended devices for deployment.

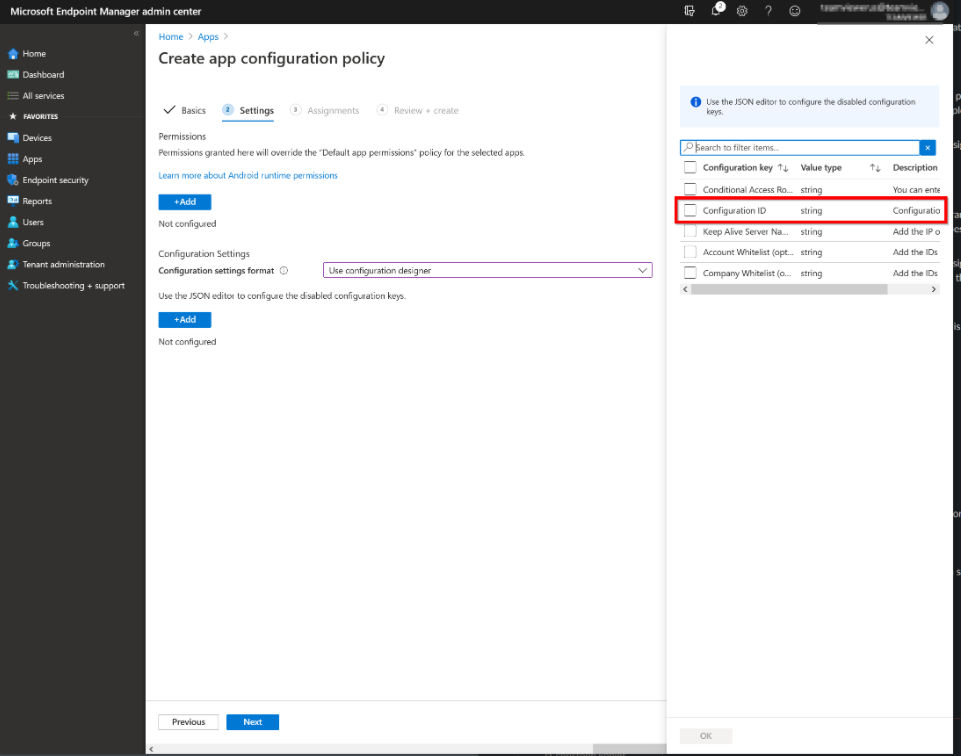
- Using our saved ConfigID from previous step 3, add an App Config Policy including the name, description, and Managed device as an enrollment type.
- After choosing Android as the platform and selecting the associated App, configure permissions using the configuration designer or JSON editor.
- In this example, we use the configuration designer, adding the value type as ‘string’ and pasting the ConfigID as the configuration value.
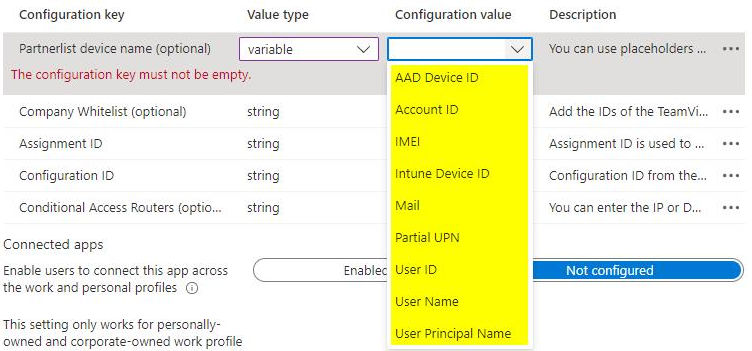
TeamViewer uses the device serial number as a default name value. However, you can also use different variables, as seen below:
There are other options in the Configuration Designer, this is out of the scope of this article. Tensor Licensed customers may refer to an article in that KB for more information.
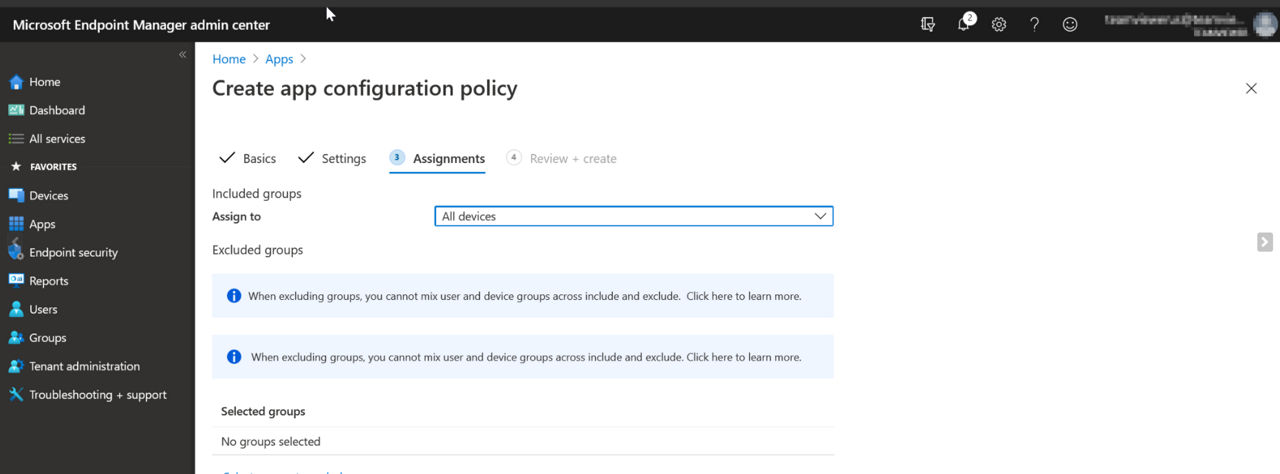
Lastly, assign the scope to the same mobile device group in the mobile app deployment scope.
- The Host will install as a Managed App under a work profile
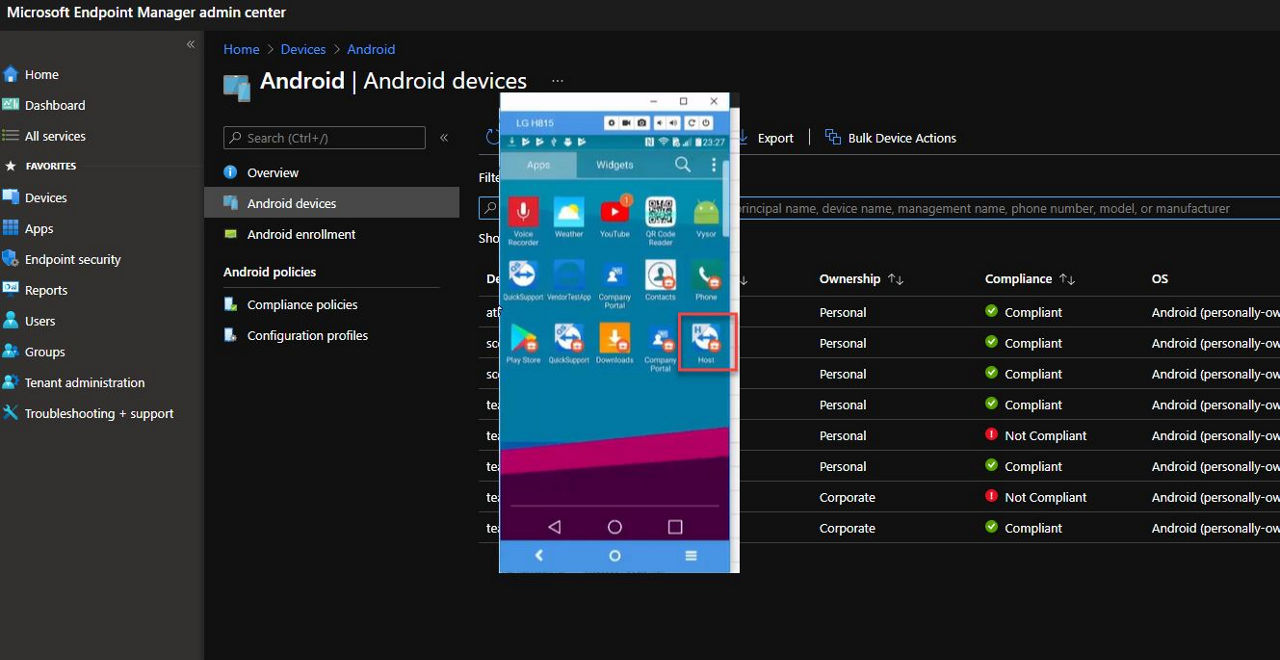
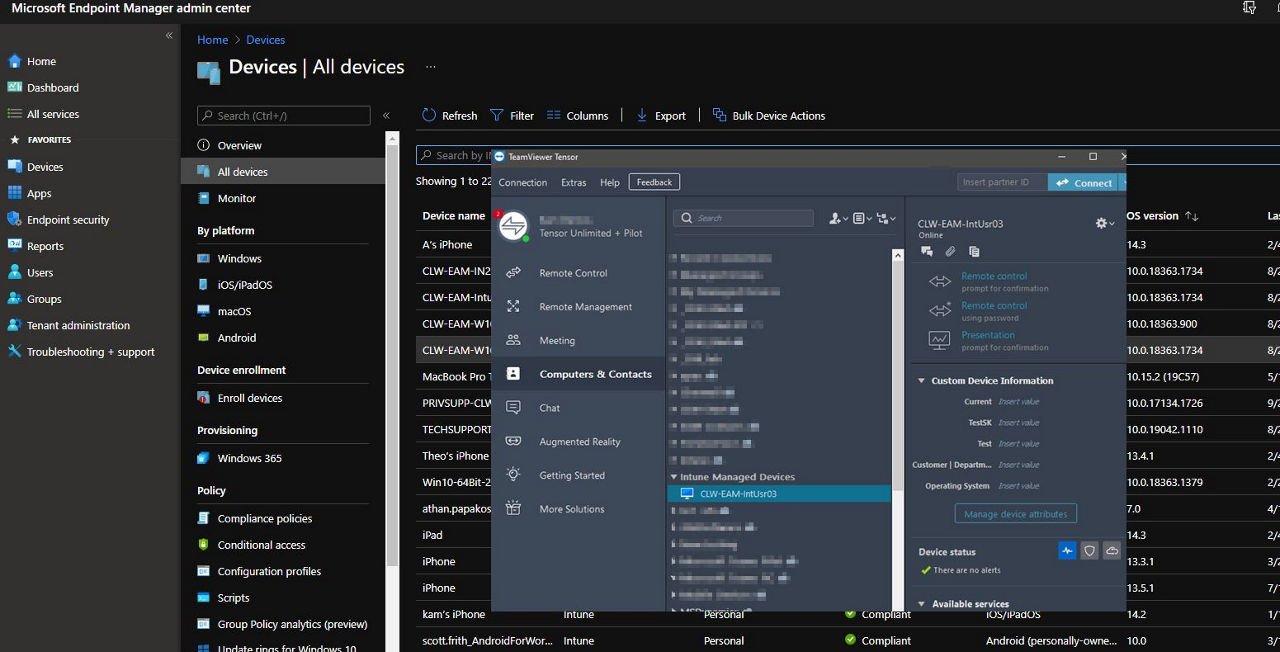
- Opening the TV Full Client, we select the assigned group, double-click the managed device and perform remote administration.

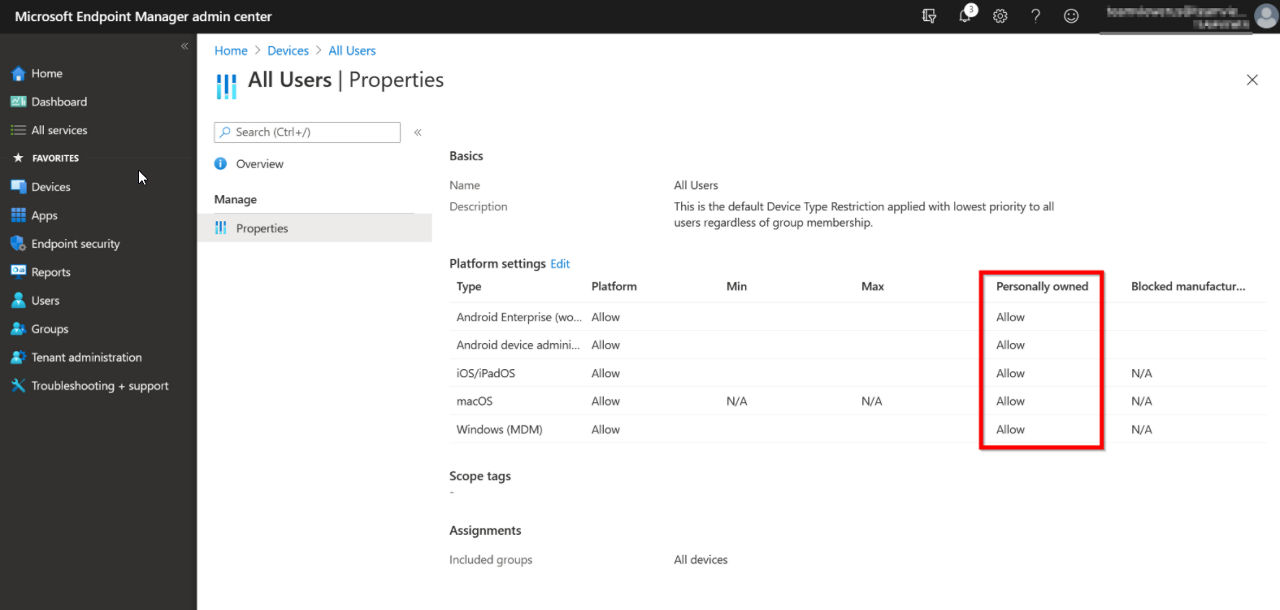
Important: Please make sure that default ‘Device Type Restrictions’ is not blocking ‘Android work profile,’ and the permissions are configured to Allow.
Video demonstrations below: