You can use transfer files within a WebClient session.
As the access to the local file system from a web browser is restricted, the file transfer works differently than via the TeamViewer full version on desktop platforms.
📌Note: Transferring files from Safari via the WebClient is currently impossible. We will update this section as soon as Safari is supported.
This article applies to all TeamViewer customers with a Business, Premium, Corporate, or Tensor license.
How to transfer files via the WebClient
To transfer files via the WebClient, please follow the instructions below:

- Click the Transfer files button in the top menu.
- Select Send files to send individual Files. To send entire folders, select Send folder.
- Depending on the choice above:
- Send files will produce a default browser file selection window. Select the desired file(s) and click Open. Transferred files will appear in the Default Target folder.
- Send folder will produce a default browser file selection window. Only folders are visible in this window. Select the desired folder and click Select Folder. Transferred files will appear in the Default Target folder.
📌Note: As soon as the transfer is started, a new icon will appear on the toolbar next to the Send files to get access to further details on the transfer. Via a process bar, you´ll get information on the overall progress.
See below:

Progress Information
To keep you up-to-date on the file transfer progress, a transfer button is shown once the first transfer starts.
💡Hint: It will be visible from the start of the file transfer until the end of the session.
Clicking on the transfer button will open a separate window where you can see the following information:
- Queued transfers waiting to be processed
- Currently transferred files, incl. progress
- Already transferred files that are done
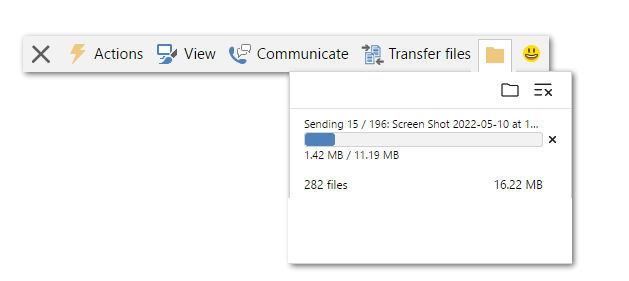
You can perform the following actions:
- Remove single finished transfer (x)
- Clear history: delete all finished transfers (three-lines w/x)
- Open (default) target folder to access the transferred files (folder icon)
How to open the folder containing the transferred files
All transferred files will appear in the designated default target folder. This depends on the operating system used. The following is a list of the most common operating systems:
Windows
- Folder: %USERPROFILE%\Downloads
Linux
- Folder: ~/Downloads (downloads folder in user's home directory)
macOS
- Folder: NSDownloadsDirectory+NSUserDomainMask or ~/Downloads
Android
- Folder: /storage/emulated/0/Download
iOS
- Folder: internal app container. Same as for file transfer from desktop to iOS QuickSupport
To open the folder containing the transferred files, please follow the instructions below:

- Click on the yellow folder icon next to the Send files button. A pop-up will appear.
- Click on the grey folder icon. This will open the default target folder.
Requirements for the remote client
Due to necessary changes on the remote client, the following TeamViewer (Classic) client versions are necessary to support the file transfer in the WebClient:
Use case: Basic file transfer
- Required TeamViewer (Classic) version: Windows: 15.27, macOS: 15.27, iOS: 15.27, Linux: 15.28
Use case: Open the remote folder
- Required TeamViewer (Classic) version: Windows: 15.27, macOS: 15.27, iOS: 15.27, Linux: 15.29, Android: not supported (yet)