The Whiteboard feature allows you to draw or write on the screen as desired in remote sessions.

This article applies to free users and TeamViewer customers with a Business, Premium, Corporate, or Tensor plan.

How to turn on the Whiteboard

During a Remote Control session

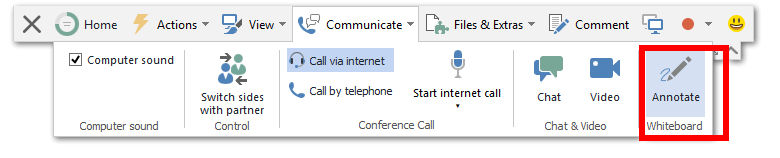
To turn on the Whiteboard during a Remote Control session:

  1. Click on Communicate.
  2. In the Whiteboard section, click on Annotate.
TeamViewer (Classic) whiteboard during a remote control session.png

How to use the Whiteboard

Once you turn the Whiteboard on, you will see an additional toolbar that gives you tools to draw on the remote side or the presenter's screen. Both sides will see the additional toolbar, and you can start drawing.

The following tools are available: 

How to use the TeamViewer (Classic) Whiteboard.png
Tool Description

1.    On/Off

Shows/Hides all previous drawings and allows/denies participants to draw. 

2.    Remote Control

Pauses the drawing mode and lets you control the computer normally. The same can be achieved with a right-click on the desktop.

3.    Pen

Lets you make freehand drawings. With a right-click on the icon, you can select a color and the size of the pen.

4.    Highlighter

Used for highlighting texts. With a right-click on the icon, you can select a color and the size of the pen.

5.    Eraser

Lets you delete parts of a drawing. With a right-click on the icon, you can adjust the size of the eraser.

6.    Rectangle

Lets you draw a rectangle. With a right-click on the icon, you can determine the frame and fill color as well as the width of the line. Press CTRL while drawing to draw a square. Press SHIFT to center the rectangle. Press CTRL+SHIFT to draw a square with center alignment.

7.    Ellipse

Lets you draw an ellipse. With a right-click on the icon, you can determine the frame and fill color as well as the width of the line. Press CTRL while drawing to draw a circle. Press SHIFT to center the ellipse. Press CTRL+SHIFT to draw a circle with center alignment.

8.    Text

Lets you write a text. With a right-click on the icon, you can determine the font size, color and type.

9.    Speech balloon

Lets you draw a speech bubble. Click on any position to create the speech balloon. Write your text and then click again to define the direction of the speech balloon. With a right-click on the icon, you can determine the font size, color and type.

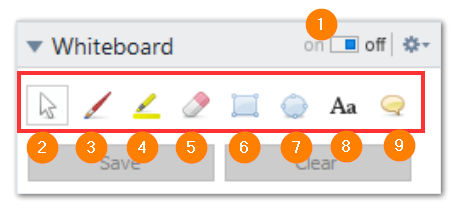
If you set the switch off, the participants can no longer draw on the screen.

💡Hint: To leave a specific whiteboard feature, do a single right-click

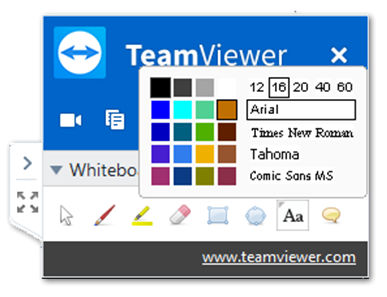
To change colors and fonts etc, Right-Click the option whose settings you would like to change.

How to change the font and color in TeamViewer (Classic) Whiteboard - Table.png

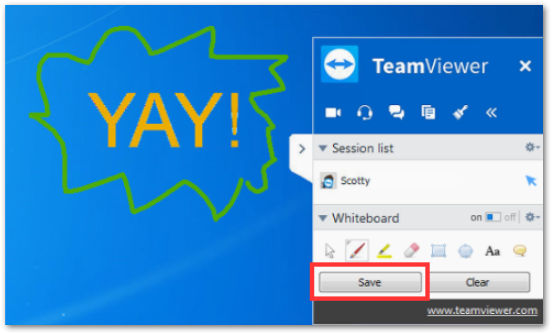
How to save the drawings

You can easily save your drawings by clicking on Save. You can choose where you would like to save your drawings and which format you would like to save the screenshot incl. the drawing in a PopUp dialog.

How to save TeamViewer (Classic) Whiteboard drawings.png

📌Notes:

  • Only the person who receives the remote control session can save or delete any drawings in a remote control session.
  • The TeamViewer panel with your Remote Control information will not be displayed on the screenshot. The panel will be greyed out.

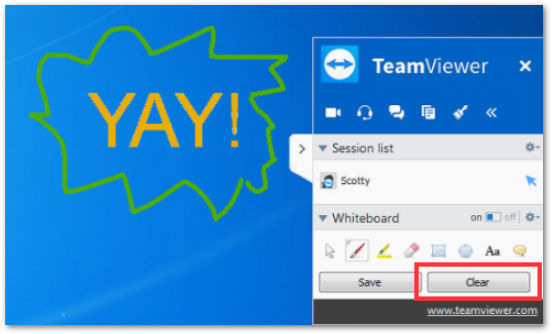
How to clear the drawings

You can easily remove parts of your drawings using the eraser from the additional toolbar. If you would like to clear the whole screen, click on Clear

How to clear TeamViewer (Classic) Whiteboard drawings.png

📌Note: Only the person who receives the remote control session can save (or delete) drawings in a remote control session.