Using TeamViewer Printing, you can print documents from remote computers directly on a locally accessible printer. This allows you to print documents from remote computers on your printer without transferring files.
From the remote computer, you can access the same printers (including network printers) as you would on your local computer.
Remote Printing is available for Windows and macOS. Remote Printing in color is also possible.
🚨Important note:
If Windows 10 Version 1903 or 1909 is installed on the remote computer:
- TeamViewer (Classic) Version 14.7 or higher: Printing documents on macOS is possible with an installed XPS viewer on the local computer. Please follow the instructions below on how to use an XPS viewer
- Any TeamViewer (Classic) Version lower than 14.7: TeamViewer Printing does not currently work due to OS changes in the Windows versions. This is fixed for higher Windows versions starting with build 2004.
If Windows 10 Version 2004 (or higher) is installed on the remote computer:
- TeamViewer (Classic) Version 15.5 or higher: Everything works as before once the printer driver is installed. Due to a fix by Microsoft, direct printing in connections from macOS to Windows was re-enabled.
This article applies to TeamViewer customers using Windows and macOS with a Remote Access, Business, Premium, Corporate, or Tensor license.
TeamViewer Printing on Windows
Install remote printing driver on Windows
The first step to set up Remote Printing is to install the printer driver.
To install the printer driver:
- Open TeamViewer (Classic).
- Access the TeamViewer (Classic) options (⚙) by clicking the gear icon in the top right corner.
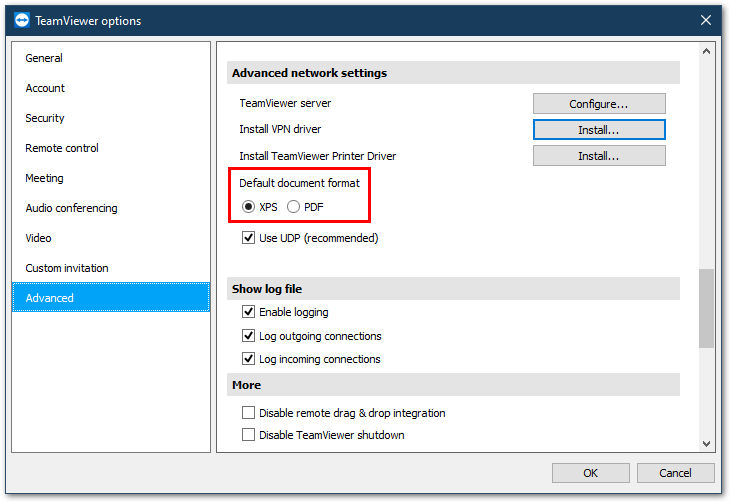
- Click on Advanced and Show advanced options.
- Go to Advanced network settings, and next to Install TeamViewer Printer Driver, click Install...

📌Note: The native format on Windows is XPS. However, with the Windows 10 April 2018 Update, Microsoft has made the XPS-Viewer an optional feature. Therefore, you can select the format (PDF or XPS) to open documents within the Advanced Settings. By default, XPS is selected. If you selected PDF but do not have a PDF reader, the document will be opened as XPS as a fallback.
When installing the print driver, TeamViewer selects the default printer and calls it TeamViewer (ID). This improves general usability during the remote printing process.
Activating remote printing within a session on Windows
Once the drivers have been installed, you can connect to your remote computer and activate remote printing in the TeamViewer (Classic) toolbar under Files & Extras.
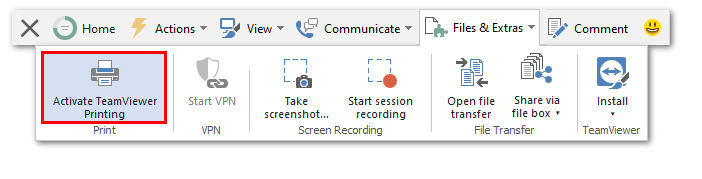
📌Note: The local printers will now be displayed in the print dialog boxes on the remote computer. They will be labeled [name of the printer] via TeamViewer.
Starting a print job
To run a print job, follow these simple steps:
- Open the desired document, and access the standard print dialogue box
- Select a printer ending with via TeamViewer
- Start the print job
📌Note: For TeamViewer (Classic) Version 12 or below, the remote printing function is only available for connections from Windows to Windows. The printer(s) used must support PostScript or EMF. More information can be found here. For compatibility with your printer supporting PostScript or EMF, please go to the manufacturer’s website and search for the printer model.
TeamViewer Printing on macOS
Install remote printing driver on macOS
To install the printer driver on a Mac:
- Click on TeamViewer in the top left corner.
- Access the Preferences.
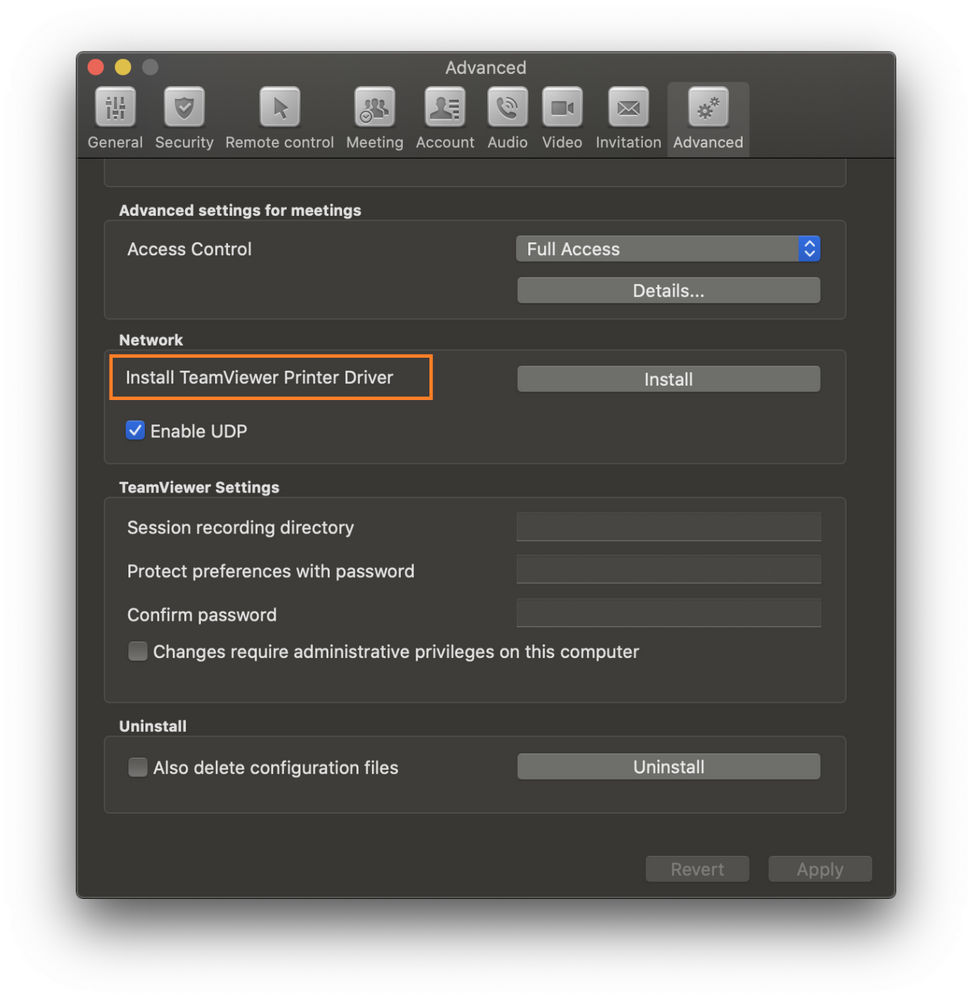
- Go to Advanced, and navigate to Network.
- Next to Install TeamViewer Printer Driver, click Install.
Activating remote printing within a session on a Mac
Once the drivers have been installed, you can establish a connection to your remote computer and activate remote printing in the TeamViewer (Classic) toolbar.

Print documents with macOS using an XPS Viewer
If you are connecting from a macOS to a Windows machine, it might be necessary to have an XPS viewer installed, dependent on the Windows and TeamViewer versions.
- Install an XPS Viewer on your local computer running macOS.
- 📌Please note: Free XPS Viewer software might come with restrictions like limited page numbers. Please check for the viewer software that best fits your needs, and keep in mind that TeamViewer does not support this third-party software.
- Open the file to be printed in your XPS viewer in the remote session.
- Go to File ➜ Print in the XPS reader
- Choose the local printer for printing and click Print in the print dialogue.
Open document in XPS Viewer or direct printing
Due to the nature of your local client and the computer on the remote side, you may need an additional tool for printing. Each Operating System has its standard format for printing. If you connect devices running on the exact Operating System, you can directly print to any printer. If you have different Operating Systems on both sides, you might need an additional tool to start the print job.
The native format on Windows is XPS (in some versions, PDF is also supported), and the one on macOS is PDF.
XPS Reader/PDF
Due to the nature of the remote machine, an XPS reader is required to print remotely for the following connections:
- Windows7/8.1 to Windows7/8.1
- macOS to Windows 7 – Windows 8.1.
A PDF reader is required for the following connections:
- macOS to macOS
- macOS to Windows 10
- Windows to macOS