Improve Customers Experiences with TeamViewer 12 Service Case Chat

When receiving support, your customer might like to get in touch with you first.
They will look for a quick and easy solution to contact you instantly.
Communication is a vital part of the user experience.
While the priority is to get the issue fixed, your customers will probably like to know what’s going on, too, and make sure there’s no misunderstanding between you.
They won’t be chained to their desks anymore, but arrange details on how/when the support session is going to take place.
Also, they might want to describe what the issue is before it can be fixed or, respectively, provide further information, if needed.
How do you usually stay in touch with customers – do you keep them on the phone or send emails back and forth? Or maybe they have no contact info at all, but just the ticket.
If the problem is common and described in the ticket with a few words, chances are you can fix it without additional information, nevertheless.
At some point before or in the middle of the session, however, they might have a quick question concerning your work and the need for a convenient way of contact.
Well, the Service Case Chat gives you exactly that! But that’s not everything.
TeamViewer 12’s Service Case Chat
The Service Case Chat’s accessibility is straightforward.
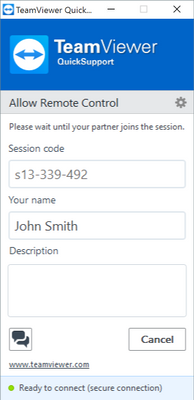
You or your customers can just start a conversation from your contacts or the QuickSupport application to get in touch even before the actual remote session starts, so they no longer feel left in the dark about what’s going on.
But why choose it over email or phone?
A chat is definitely faster than an email and doesn’t pile up in your inbox, which is meant for other things.
While that’s not true for a call, a clear advantage is that it delivers a form of documentation that is directly bound to the ticket.
What’s specifically interesting for you supporters: Messages will be saved even if you decide to assign the case to another supporter and will only be deleted, when you do so yourself.
It’s also a way to circumvent forcing customers to give cryptic and incomplete descriptions of e.g. error codes, that they’d have to provide over the phone. Those can simply be copied and pasted.
How to Start a Service Case Chat
You can configure a custom QuickSupport module in such way, that whoever will launch the module is able to start a chat conversation right out of the custom QuickSupport module. This feature is bound to modules that have the Automatically add users to a group in your Contacts list option activated and therefore create a new Service Case every time the module is launched.
By default, the user can either chat with the owner of the custom module, or the assignee of the respective Service Case.
Create Your Custom QuickSupport Module
The custom QuickSupport module has to be created in the TeamViewer Management Console which is a web-based application.
1. To call up the TeamViewer Management Console, open the page https://login.teamviewer.com in a web browser.
2. Enter your TeamViewer account login information in the E-Mail and Password fields.
3. Click Sign In.

Note: Devices, apps and web browsers that you’ve never used with your TeamViewer account must be approved at the first login. For more information, see the TeamViewer Manual – Remote Control.
--> The user interface of the TeamViewer Management Console will load.
4. Click Design & Deploy in the left menu bar.

5. To create a custom QuickSupport module, click the Add QuickSupport button.

Define your individual QuickSupport preferences:
Custom QuickSupport modules can be configured in several ways. You can find further information in the TeamViewer Manual – Management Console.
1. To set up the chat option, select the checkbox Allow user to initialize chat.

2. Set up other desired preferences.
3. Click on Save.
Start the session
Before the session can be started, the created custom QuickSupport module has to be downloaded to the customer’s computer. To do so, follow these steps:
Supporter
1. Copy the download link of the custom QuickSupport module and transmit it to the customer. (e.g. via email)
Customer
1. Click on the received link.
--> The custom QuickSupport setup file will be downloaded.
2. Click on the downloaded file.
--> The custom QuickSupport module is running.
3. To start a chat conversation, click on the speech bubbles icon.

--> A chat conversation window with the supporter opens up.

4. Type in a message.
5. Hit the enter button.
Supporter
1. Answer the message with TeamViewer or in the Management Console.

Note: If you assign the service case to one of your employees, he may also start the chat with the customer by right-clicking the service case and using the chat icon in the TeamViewer full version.
Chat with Us in the Comments
Personally, I think the Service Case Chat is a great alternative to stay in contact with one another in a support situation.
The best part of it is that neither of you needs an additional tool to keep in touch, but it’s already there with no further installation processes needed.
What do you think about the Service Case Chat? Let me know in the comment section below!
Former Community Manager
