Manual Group and Device Assignment - TeamViewer Tensor™ Setup Guide

Read this article in Japanese
This article applies to all TeamViewer Tensor customers.
TeamViewer Tensor provides a secure, easy-to-use remote work infrastructure, so your teams can access company resources like desktop computers, mobile devices, server systems, and applications, or intranet sites from home or on the go.
- Get Started
- Step 1
- Step 2
- Step 3 -Follow A or B
- A: If you already have a TeamViewer account
- B: If you do not have a TeamViewer account
- Step 4
- Step 5
- Step 6 (Optional)
- Create your company profile and a Master Account in the Management Console
- Create users
- Create a group for your new devices.
- Add new settings policy
- Deployment on Company Devices
- Step 1:Create a deployment package for your TeamViewer Hosts
- Step 2: Deploy your Hosts
- How to share the TeamViewer ID to specific users
- Step 1:Create a separate group for every user that you want to set up as remote worker
- Step 2:Move the users' computers into their corresponding group
- Step 3: Share the groups
- Step 4: Connecting your remote workers
- Questions or issues
Get Started
Step 1
Download and install TeamViewer on your device: teamviewer.com/download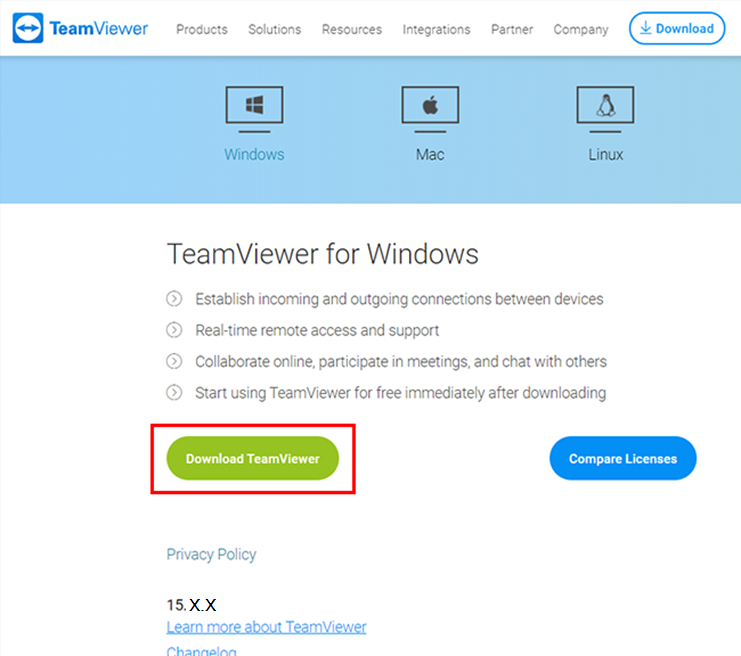
Step 2
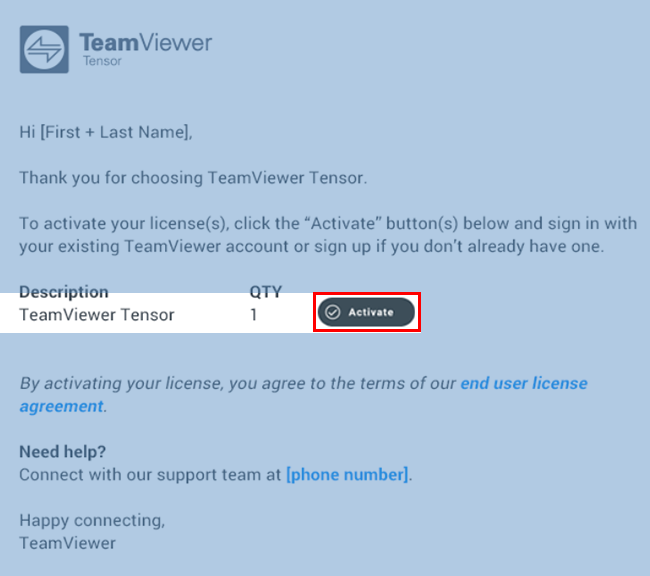
Open the License Activation email that was sent to the email account used to purchase the license. Click "Activate".
Note: If you have purchased more than one product, each license must be individually activated.
Step 3 - Follow A or B
A: If you already have a TeamViewer account
Sign in with your existing TeamViewer account, click Activate and go to Step 4.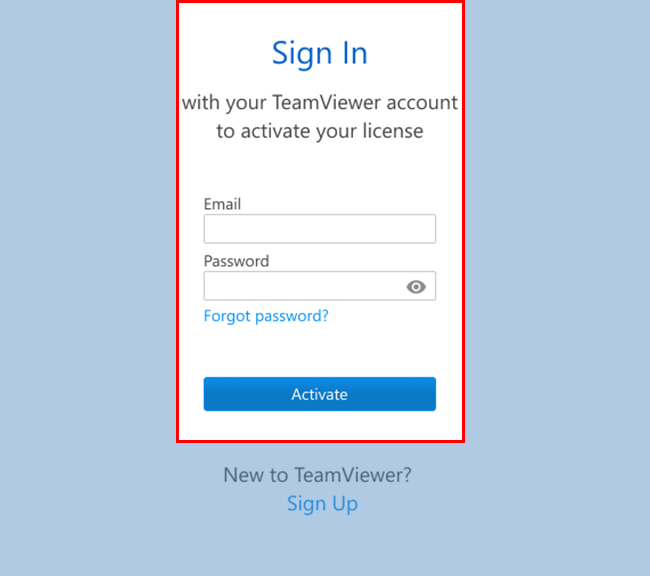
B: If you do not have a TeamViewer account
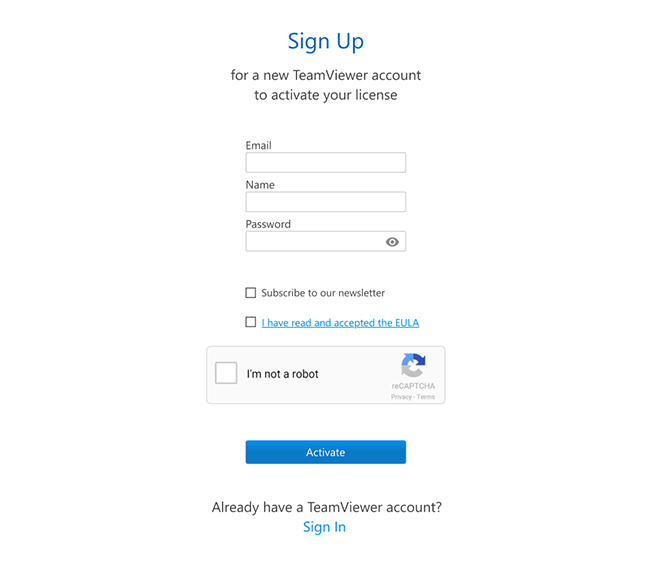
- Create an account by clicking Sign Up.

-
Enter your email address, name and create a password. Read and accept the EULA and mark the captcha box. Click Activate.
-
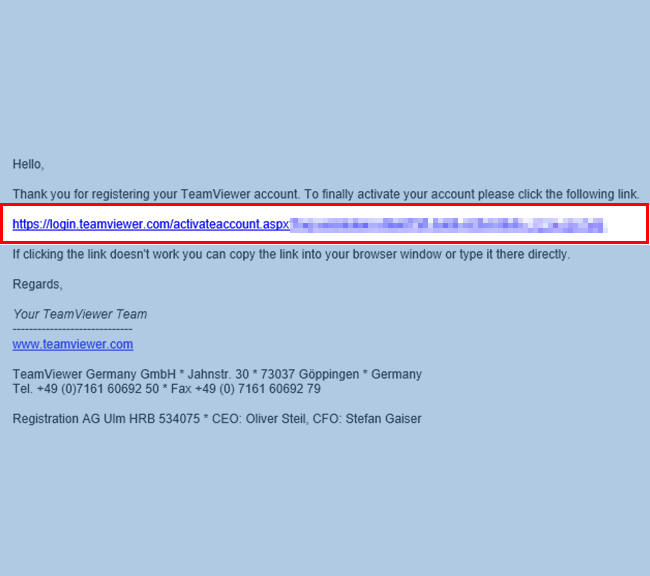
An email has been sent to your inbox for account verification. Click the link in the email to verify your account and complete your license activation.
Step 4
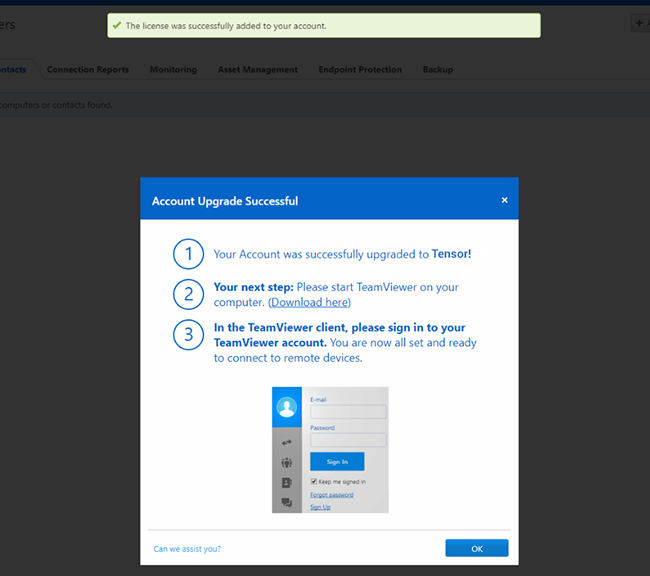
You will be redirected to the Management Console where a pop-up that confirms your license was successfully activated. Click "OK".
Step 5
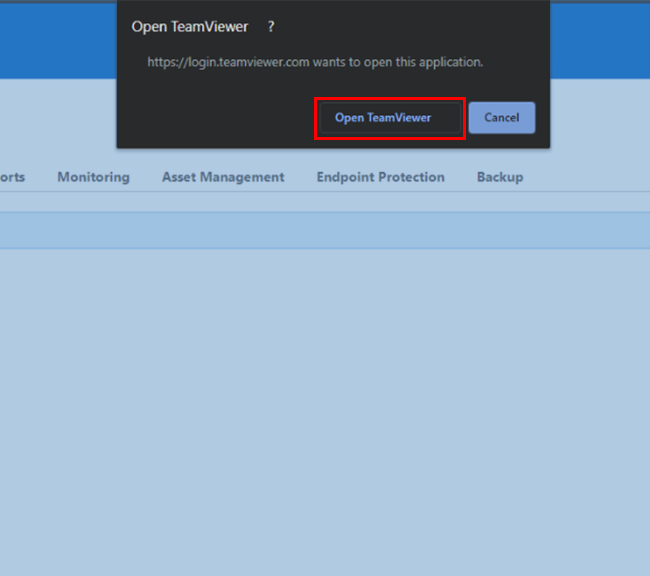
A pop-up is displayed with the option to open the TeamViewer application. Click Open TeamViewer.
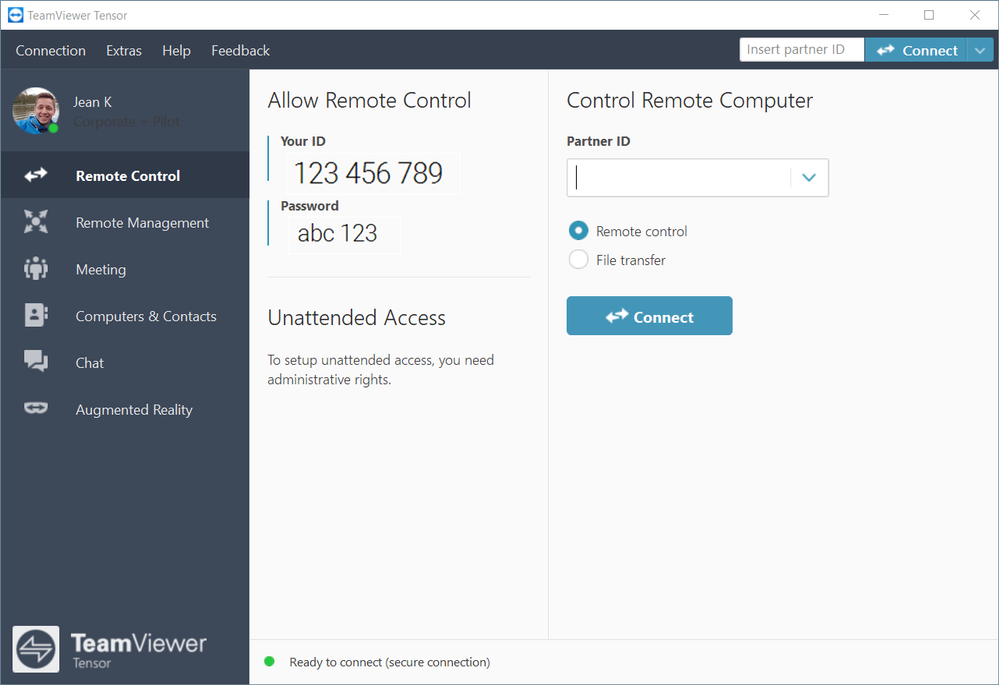
You are now signed into your TeamViewer account and have successfully activated your license.
Note: Please keep in mind that you always need to be signed in to your TeamViewer Account to have licensed connections. If you are not connected, you will be running with the free version.
Step 6 (Optional)
Follow the instructions for two-factor authentication in our Knowledge Base article Two factor authentication - Activation and Deactivation to complete the activation of your TeamViewer license. If you want to skip this step, click Not Now.
Create your company profile and a Master Account in the Management Console
1 Create a company profile by following the instructions in the section Create your company profile.
2 Once your company profile is created, we highly recommend creating a Master Account, which will serve as a generic administrative account.
Why create a Master Account?
- Your company’s primary administrator(s) of TeamViewer will know the account credentials.
- This account will be used for all future configuration steps, so administrative control and ownership are not tied to one specific person.
- TeamViewer administration won’t be disrupted, even if the original administrator leaves that role.
For more details, follow the steps in our Knowledge Base article Using a Master Account for the TeamViewer Management Console
Please note:
- Make sure you do not create a Master Account with an e-mail distribution list (e.g., all@example.com), but with a specific e-mail address.
- The created account must have a valid email address that can receive the account activation email (i.e., either a mailbox or an email distribution list you have access to).
- We recommend using a non-personal email address for the Master Account.
- We highly recommend protecting your TeamViewer account with two-factor authentification. For details, please refer to our Knowledge Base article Two factor authentication - Activation and Deactivation
Create users
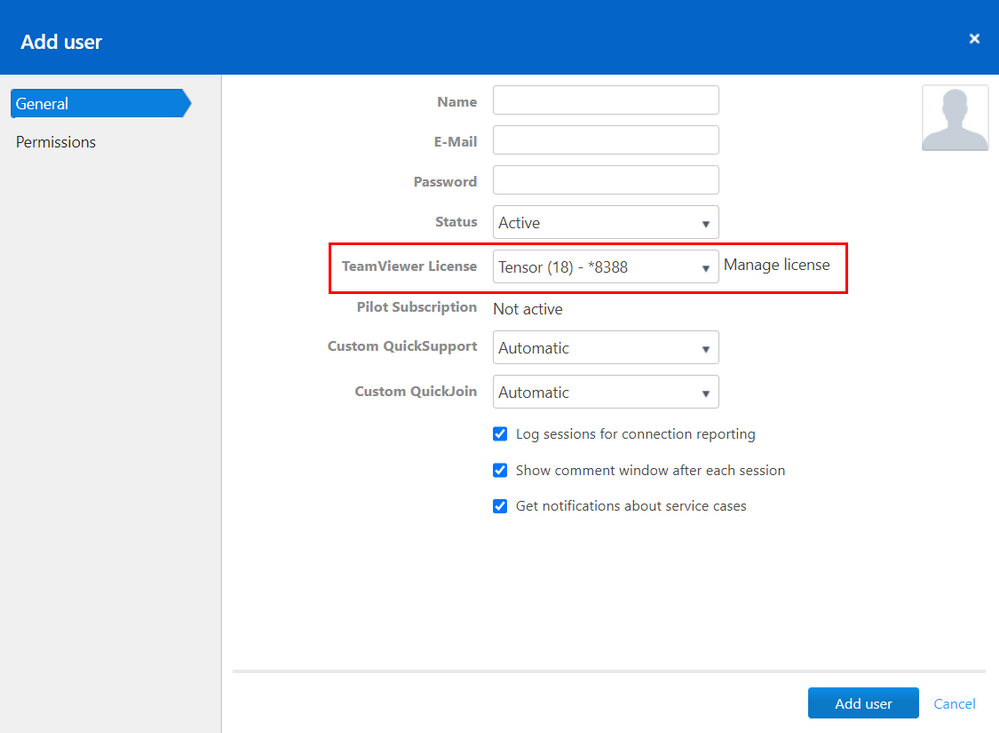
Under User management in the left navigation panel of the Management Console, click Add user to add people to your company profile that need to access their company devices remotely, along with every person that needs to be set up for remote work.
Follow the detailed steps in our Knowledge Base article All about the TeamViewer company profile

Please note:
- All users will receive a confirmation email for account activation.
- Users will have to log in in order to activate their account and set a password. TeamViewer Tensor allows the use of single sign-on (SSO). Please visit Single Sign-On (SSO) for more information.
With TeamViewer, you may want to use the following options down the road:
- Local Active Directory using TeamViewer Active Directory (AD) Connection is described in our Knowledge Base article Active Directory Connector (AD Connector).
- Azure AD provisioning is described in SCIM Configuration for Azure Active Directory
- You can download the tool for bulk import via PowerShell from our TeamViewer website.
Activate SSO by following the instructions in our Knowledge Base article Single Sign-On (SSO) .
Create a group for your new devices.
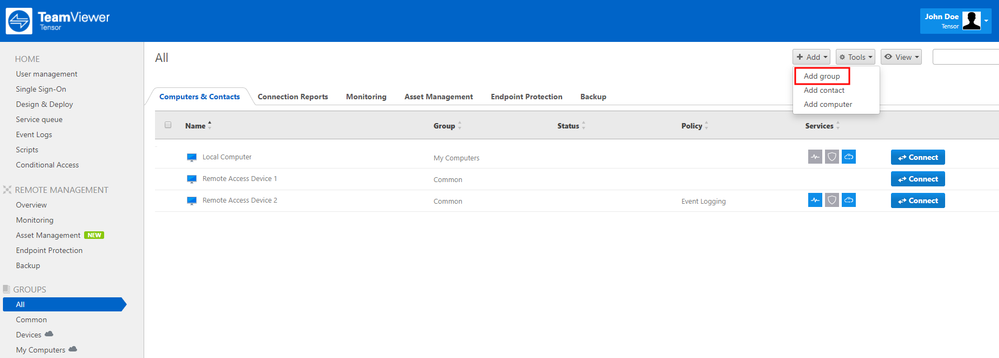
In the Management Console, click All in the left navigation panel.
Click Add group to create a group for your new devices. Later, the group for each company device will need to be shared with your remote workers.
Add new settings policy
The settings policy facilitates the management of your installed TeamViewer clients. You can centrally enforce settings and options for them.
In the Management Console, click Design & Deploy in the left navigation panel and then click Add policy.
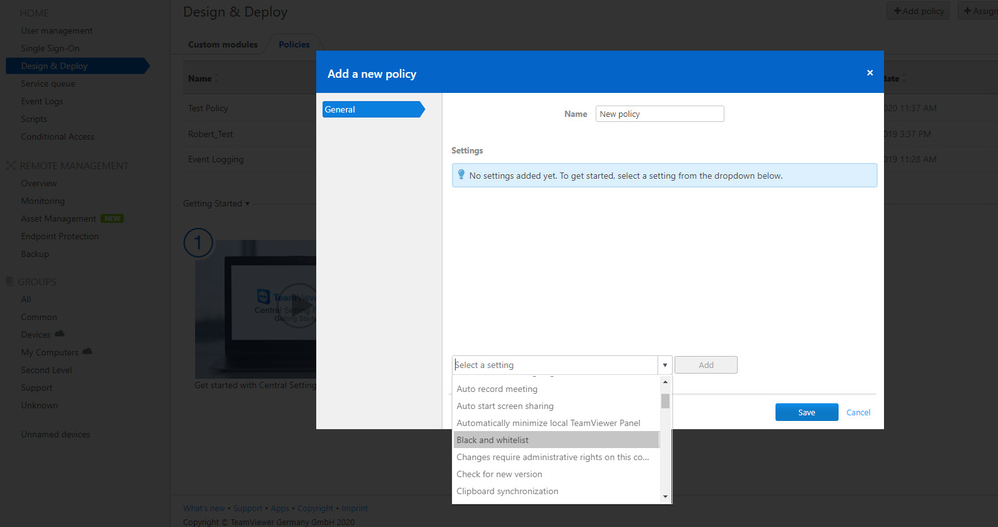
Follow the detailed steps in our Knowledge Base article How to add a new settings policy .
Recommended policies for this scenario:
- Block and Allowlist: Add your entire organization and click the option Allow access only for the following partners and then Add. In the following dialog, select the option with your company name.

- With this option, all members of your Your Company will be whitelisted
Note: All connection attempts from others will be blocked, even if they know the TeamViewer ID and the password of the target computer.
- Access control (incoming connections): Select Full access.
We recommend to use the following custom settings:
- Start TeamViewer with Windows: Select Enabled.
- Disable TeamViewer shutdown: If activated, TeamViewer cannot be shut down. This is useful, for example, if the administrator wants to guarantee the continuous availability of a computer.
- Prevent removing account assignment: Account assignment of the remote machine cannot be changed. The only way to remove the account assignment is to disable the policy.
- Password strength: Select Disabled (no random password). Easy access will be granted to your remote workers instead.
- Report connections to this device: If activated, connections to this device will be reported and can be viewed in the TeamViewer Management Console. For more information, see the manual for Management Console, section 7.2 “Device reports”, page 56.
- Changes require administrative rights on this computer: TeamViewer options can only be changed by Windows user accounts with administrative rights.
Please note:
- We recommend enforcing all policies.
- Enforced policies can only be changed in the Management Console.
Deployment on Company Devices
Step 1: Create a deployment package for your TeamViewer Hosts
1.1 In the Management Console, click Design & Deploy in the left navigation panel and then click Custom module. Select the option Host in the drop-down menu.
1.2 Check or uncheck Allow customer to initiate a service case depending on if you want to allow customers to create service cases. Visit Improve support in teams with the Service Queue for more information about this feature.
1.3 Use the editing options on the left side to customize your Host. On the right side:
- A: Enter a name.
- B: Select the group you created in Step 4.
- C: Select the policy you created in Step 5.
- D: Activate Allow account assignment.
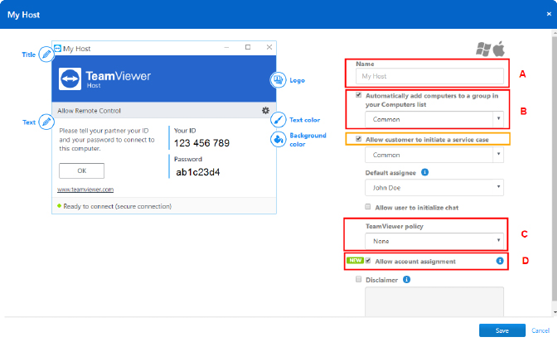
Note: By assigning a device to your Master Account, the device can be remotely managed and monitored by the Master Account at any time. The assignment is mandatory if you want to apply policies.
1.4 Click Save.
Step 2: Deploy your Hosts
IMPORTANT: Before you start any deployment, make sure to check your company firewall configuration:
1. Firewall configurations for ports:
- TCP/UDP PORT 5938:
- For performance reasons, we recommend opening the TCP/UDP port 5938 (outgoing). On networks that allow UDP protocols, TeamViewer attempts to get a peer-to-peer connection (will be tried with udp.teamviewer.com). TeamViewer prefers making outbound TCP and UDP connections over port 5938 — this is the primary port used for the best performance possible.
- TCP PORT 443:
- If TeamViewer can’t connect over port 5938, it will next try to connect over TCP port 443. Note: Port 443 is also used by our custom modules which are created in the Management Console. If you’re deploying a custom module (e.g., through group policy), then you need to ensure that port 443 is open on the computers to which you are deploying. Port 443 is also used for a few other things, including TeamViewer update checks.
- TCP PORT 80:
- If TeamViewer cannot connect over port 5938 or 443, it will try using TCP port 80. The connection speed over this port is slower and less reliable than ports 5938 or 443 due to the additional overhead used. There is no automatic reconnection if the connection is temporarily lost. Therefore, port 80 is only used as a last resort.
2. Firewall configuration for URLs:
Allow these TeamViewer processes for antivirus purposes:
- TeamViewer.exe
- TeamViewer_Desktop.exe
- TeamViewer_Service.exe
Allow the following URLs on the proxy/firewall level:
- *.teamviewer.com
The deployment of your Hosts on your remote workers' computers depends on the deployment method you use. We recommend referring to the Knowledge Base article Mass deployment improvements for more information.
In order to install and mass deploy TeamViewer on all your corporate devices without requiring user interaction, use the following command from within your script (see Example code below), directly from command line or in your deployment solution.
Before you begin, you’ll need the following information: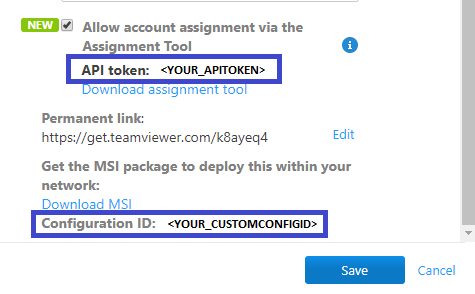
-
API token: You can retrieve the API token under the host created
-
Custom configuration ID: You can retrieve the custom configuration ID under the host created
- Group ID: Select the group where the device should show up and select the group ID in the URL g/123456789. Don’t forget to remove the / in your command line.
Example code:
Deployment using the Windows MSI installer via command line (value names in red are the values you need to enter):
start /wait MSIEXEC.EXE /I "MSIPATH" /qn CUSTOMCONFIGID=ConfigId DESKTOPSHORTCUTS=0
choice /C X /T 30 /D X > nul
"C:\Program Files (x86)\TeamViewer\TeamViewer.exe" assign --api-token=YourToken --grant-easy-access --alias %COMPUTERNAME% --group-id gXXXXXXXX --reassign --proxy ProxyUrl
Note:
-The option "--grant-easy-access" must be included so that no password is required on the remote machine
when connecting to it.
-You can import TeamViewer options or settings during the installation process. For more information please see the section Apply TeamViewer options (recommended) in our Knowledge Base.
How to share the TeamViewer ID to specific users
Step 1: Create a separate group for every user that you want to set up as remote worker
This group will be used to share access to their devices.
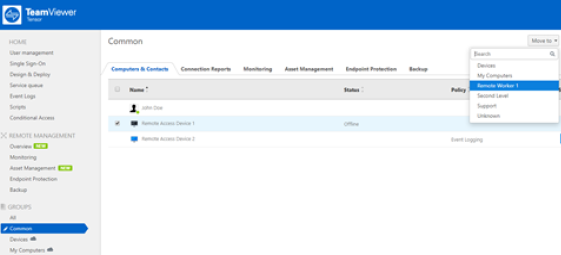
Step 2: Move the users' computers into their corresponding group
Move each device from the New devices group into the corresponding group that you have created in Step 4 for the remote workers (e.g., move John@yourcompany.com to the group John’s devices).
Step 3: Share the groups
Share the groups with the appropriate person who should have access to the group where the computer is located.
3.1: Click Share in the group options.
3.2: Share the group with Read-only permissions, as remote workers do not need to change anything by themselves. Visit the Knowledge Base article Sharing groups for more information about group sharing.
Step 4: Connecting your remote workers
Note: Please see our User Quickstart Guide How to Use TeamViewer to Access Your Company Device from home for detailed instructions.
4.1: Ask your remote workers to download and install TeamViewer on their computers.
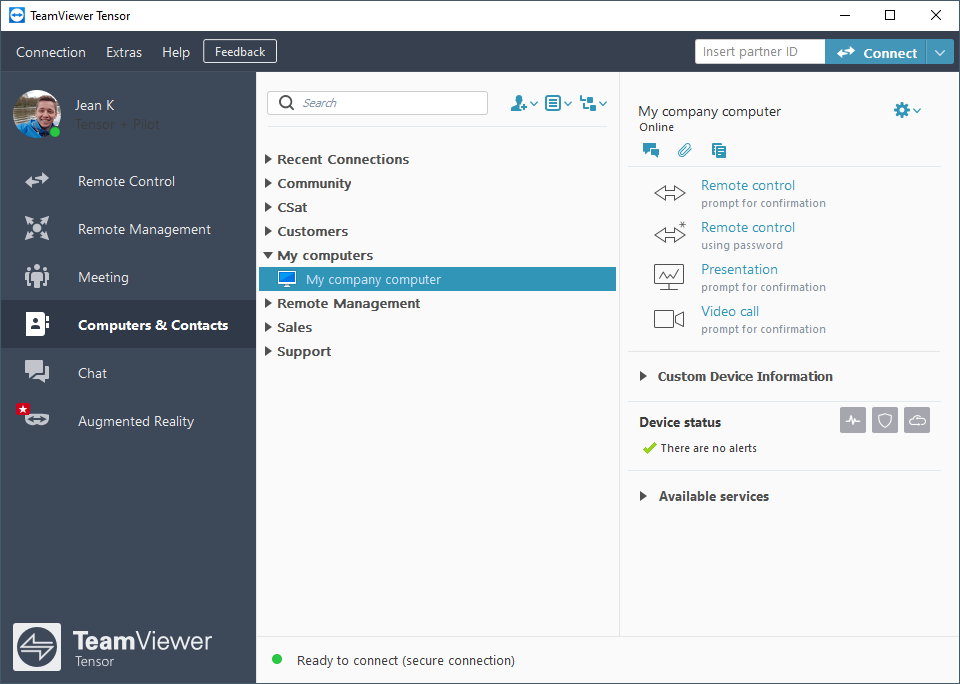
4.2: After they log in to their TeamViewer accounts, they will find their company computer in the Computers & Contacts list.
4.3: With a double-click on their company device they are connected to their remote computer.
Questions or issues
If you have any questions, please do not hesitate to create a ticket or to call the TeamViewer Help desk.
We speak your language!
- France
- Monday to Friday from 08:30 to 18:00 (GMT): 09 75 18 01 38
- Spain
- Monday to Friday from 08:30 to 18:00 (GMT): 09 14 19 77 50
- Italy
- Monday to Friday from 08:30 to 18:00 (GMT): 05 1376 3017
- United Kingdom
- Monday to Friday from 07:00 to 17:00 (GMT): 020 8099 7265
- USA
- Monday to Friday 8:00 AM to 8:00 PM (EDT): 1 800 638 0253
- Further countries:
Former Community Manager