Are you new to macOS or new to TeamViewer on macOS? If yes - welcome to the fantastic world of Apple and TeamViewer!
I am happy to share some best practices and tips and tricks around using TeamViewer on your Mac.
For this, I interviewed a couple of colleagues who are literally building TeamViewer for macOS and know everything around it as well as I smuggled in one of my favorite tricks 🤗.
Get started
Before it makes sense for you to read the best practices one by one, make sure to download your TeamViewer from teamviewer.com/download.
👉The page will automatically recognize your macOS and send you to the correct download page - no need to search for the specific version that will fit your operating system.
Like Apple, TeamViewer strives to be as user-friendly and intuitive as possible.
After downloading and installing TeamViewer on your Mac, you need to go through a couple of settings to ensure you have the most optimal experience with your TeamViewer on your Mac. And here, our tips are starting.
1️⃣ Access Permission settings
My first interview partner @Fab is one of my oldest friends at TeamViewer and ever since I know him, he is working on a Mac. And as the leader of our technical support team in Germany, he is perfectly equipped to start the series of our tips and tricks with the Access Permission Settings.
Fab says that one of the remarkable things about Apple products is that they will let you decide what you want and whatnot. I couldn't agree more and support the idea of giving the user the power about their settings.
To fully utilize TeamViewer and the features our software is offering, you may want to opt-in to grant TeamViewer access to
- Screen Recording
- Accessibility
- Full Disk Access
If you want to be ready at all times, you can allow all three settings. But if you for example do not require file transfer, you can let the Full Disk Access permission untouched. It´s your call ✅
For sure - you can always change the permission settings on your Mac easily and swiftly 🙌
Let quickly check how to do this:
Let´s assume you decided to not grant all permission access rights when installing TeamViewer. Now, you will see an exclamation mark icon (=⚠) in the top row of your TeamViewer application.
This icon is your fast lane to the access settings - ready for you whenever you need it.

Also - the same settings are accessible for you at any time under Help --> Check System access ⚠. The exclamation mark icon helps you to find it again easily:

Isn´t that smooth?
By the way, we collected some more information about this topic in this article:
2️⃣ Connections in tabs
The next expert I found for you is @MoreCoffee - one of our beloved Mac developers who is also very active in our community.
And her tip is actually mindblowing for me: She shows us how to use connections in tabs.
Ohhh yes - Connections in tabs is one of the hidden champions when it comes to TeamViewer features, but believe me: It is incredibly useful in case you are having multiple connections open. And for sure: It is available on macOS, too.
Getting your connections in tabs is easy to achieve - however, kind of hidden and therefore, a real pro-tip.
First of all, to use this feature, you need to start at least two TeamViewer connections. Those can either be to one device having two or more monitors or to two different devices.
Now - make sure that both windows are open and navigate to Window --> Merge All Windows. That was easy, right?

The great thing is, now you can switch your TeamViewer connections in tabs similar to switching open websites in Safari. Same look and feel. A mac-worth feature!
3️⃣ Share files directly with contacts or computers
Honestly, I didn´t know that trick before @KlemmbausteinDroide - the Senior Developer building this feature - explained it to me. And this makes me even more excited to share it here with you 🙌
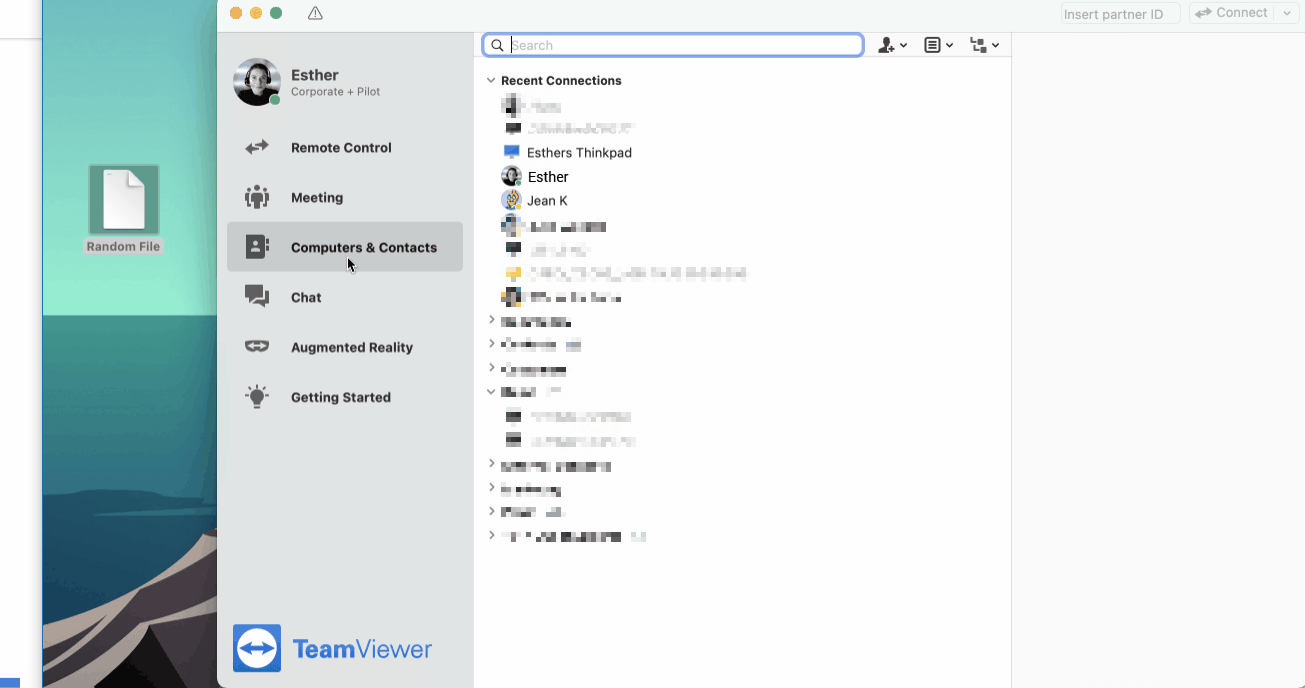
It is about sending files through the Computers & Contacts list per drag & drop.
How does it work?
Let´s assume, you have the most awesome recipe for a strawberry cheesecake on your Mac and you want to share it with a person (or computer) saved in your Computers & Contacts list.
Now the beauty of this tip:
👉You drag and drop the file from your mac onto the name of the account or computer in your list.
And -voilá- TeamViewer sends a "Send file"-request to the selected person asking whether they want to accept the files you are sending. And this even if they are on a Windows device:

The above PopUp appears on their screen and they need to click Allow to allow the file transfer or Cancel (as there is still the possibility that they think their own strawberry cheesecake recipe is the best and they do not want to get yours).
And don´t worry - if they do not click anything, the request will get rejected automatically after 30 seconds. As always, no unwanted file transfer is possible.
One last thing - I am soo curious now: Did you know this one before?
4️⃣Easy Access
Our Platform Product Owner for Mac, @Oliver1979, had no doubt that this best practice belongs to a post about TeamViewer on Mac: Activate Easy Access for your TeamViewer account.
In case, you didn´t hear Easy Access before, let me quickly define it for you:
👉 Easy Access is TeamViewer’s password-less access functionality that can be seen as the most modern and secure setup for unattended access 🔒
The setup on a Mac is as easy and straightforward as you would imagine it:
Navigate to TeamViewer --> Preferences --> Security --> Unattended Access and enable the tick box for Grant Easy Access
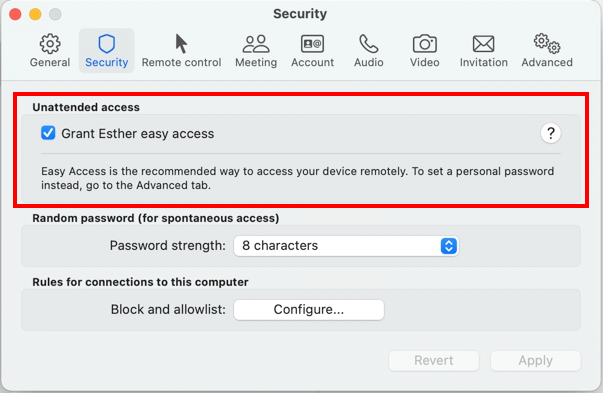
In case the device has not been assigned to your account before, you will need to make the assignment now, but no worries - TeamViewer will guide you gently through the process for a smooth and secure TeamViewer experience.
5️⃣Tile Window to left/right of Screen
Our last tip is again focussing on making your work experience as smooth as possible and is brought to you by ___. Yes - this one is mine 😉
It will help you in case you are like me and multi-tasking all the time. Or in case, you need to follow a protocol in a TeamViewer connection and you do not have enough monitors to showcase the to-do list and the connection.
But when using the Tile Window to left/right of Screen setting, you can have your TeamViewer connection open and find information in Safari at the same time - even if you only have one monitor!
And thanks to the brilliant monitors of your MacBook or iMac, you can still see everything clearly due to the high resolution.
Do you want to know how to make the setup? Read on my friend!
When having your TeamViewer connection open and in front, navigate to Window --> Tile Window to Left of Screen (or: Tile Window to Right of Screen)

Depending on what side you choose, your TeamViewer connection will go to the left of your screen and you can pick another open window (like Safari or Notes) to be shown on the right side of the screen. And now you can see and control both apps at the same time and with this - work more efficiently.
Speed up your work
I hope these tips and tricks help you to utilize TeamViewer on your Mac even better and that they speed up your work.
Do you have any tips for using TeamViewer on Mac to share? Feel free to drop them in a comment below 👇
Thanks!