The first impression counts – learn how to create the perfect TeamViewer profile picture to achieve maximum likability with your customers!
You need them virtually everywhere, be it on social media, application forms, work tools, and so on and so forth: profile pictures.
While you’re not exactly forced to set a profile picture, there’s no denying that having one comes with a bunch of practical and psychological advantages.
Or do you recognize this dude?

Neither do I.
Now, there are some simple lessons that psychology and photography have taught us, and that we can apply to get the best possible profile picture.
That will help with making a good first impression, let you appear likable and competent, so customers will feel comfortable and happy to receive help from you.
Tips on Creating the Perfect Profile Picture
Before we look into the usual tutorial section, let’s shortly go through some things you can do in order to create a great profile picture yourself.
These tips are a summary, so if you’d like to learn more details about this topic you’re welcome to do so.
Preparations
1. Suit up! Formal dress serves for a more competent appearance. Also, don’t wear sunglasses or a hat, because they’ll make you look less likable.
2. Grab a friend – preferably one with a good camera. Don’t even think about taking a selfie.
3. Search for a location you feel comfortable in. Generally, the background doesn’t have a big effect on people’s perception of you as a person.
4. You should face the source of light. Make sure the photo is not overexposed, but you’re clearly visible.
Keep this in Mind when Shooting the Photos
1. The final output that will be your profile picture should be a square image of 600x600 pixels. This format will look great on most platforms. As a side note: The minimum size for TeamViewer profile pictures is 120x120 pixels. Rectangular images will be cropped with the center as a reference point.
2. A great profile picture should show you either from head to shoulders or head to waist, so adjust the distance or zoom as needed.
Posture and Expression
1. Try to emphasize your jawline, or rather the contrast between it and your neck. The shadow line should ideally be visible all around your jaw.
2. Make eye contact with the camera and slightly squinch your eyes. This will make you look more competent and likable.
3. Smile with your teeth visible. While this will increase the perceived competence and likability, a laughing smile will indeed further boost likability, but not competence.
Now take some photos until you have a couple of good ones to choose from. Surely, there will be some that look a bit goofy, but don’t be afraid to experiment.
Editing
Image editing certainly isn’t a skill that everyone owns, but nowadays, chances are there’s someone in your circle of acquaintances that does know the basics.
There are some free tools out there that will do the job for these few steps:
1. Crop the image to the right size, e.g. 600x600 pixels (as suggested earlier) to fit most profiles.
--> As for the rule of thirds, that some of you might be familiar with, you can do that, but on square images, arranging your face dead-center will be fine.
2. You can adjust the brightness, if you’re not satisfied. Don’t overdo it, though, because pictures that are too dark or have a very high color saturation will perform worse.
Are you satisfied? Well done! If everything went according to plan, you should now have a truly great profile picture.
Set Your Profile Picture in TeamViewer
You can change your TeamViewer profile picture either in the TeamViewer client or in the Management Console.
In the TeamViewer Client
1. Open the TeamViewer Client on your desktop and click on the icon that displays your current profile picture.
--> It is always located on the upper left side of the client.

2. Click on the gear-wheel symbol on the upper right side and select Edit profile.
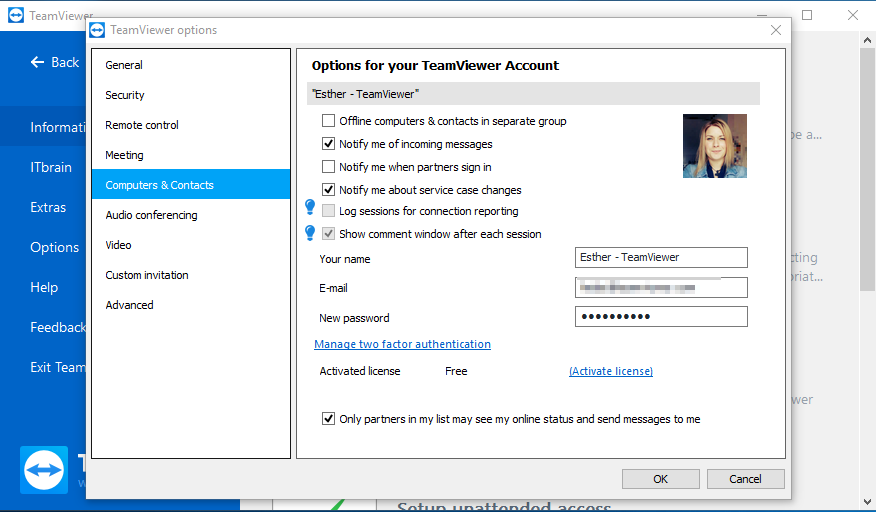
--> The TeamViewer options window will pop up.

3. As you’ll see, you’re now in the Computers & Contacts section of the TeamViewer options, where your current profile picture is displayed on the right side. Click it.
--> You can now choose a new profile picture from your file explorer.

In the Management Console
1. Log into the Management Console.
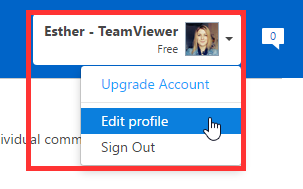
2. Click on the icon on the upper right side that displays your name, license and profile picture. Then select Edit profile.

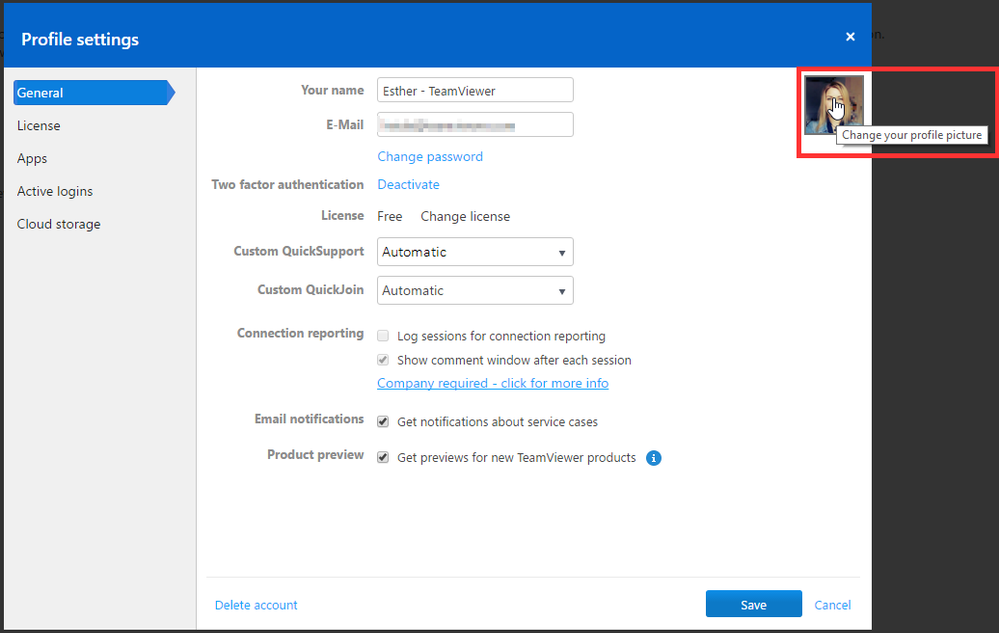
--> The Profile settings window will pop up.
3. You’re now in your Profile settings. Click on your current profile picture, which you will see in the upper right corner of the window.

--> You can now choose a new profile picture from your file explorer.
It’s the Small Things
I hope you liked this little excursion into the world of photography and that this sort of shortened advice helps you to create a great profile picture yourself.
Furthermore, as I said in the introduction: You can make use of a nice picture of yourself in lots and lots of places, so I’d say it’s definitely worth investing some time in this.
Now you can be confident that your customers get the best first impression possible, when contacting you.
Do you have any advice on taking a great profile picture? Share it in the comment section below!