Thought your file transfers were already fast? You haven’t seen anything yet! File Transfer has had a major upgrade in TeamViewer 12, meaning you can transfer files at warp speed between devices on almost all platforms.
Whether we’re at work transferring a Virtual Machine image to a new server, or at home trying to move vacation videos to your mum’s PC – we need it to happen quickly.
Time spent watching a progress bar is time we could better spend getting on with our day.
We’ve got a million things to do, and we just want to get on with it.
Massive File Transfer Speed Improvements in TeamViewer 12
With every new release of TeamViewer, we pay particular attention to performance improvements. Because we know how important speed is to all of us.
With TeamViewer 12 you can now transfer files up to 20 times faster than before, with transfer speeds up to 200 MB/s with UDP only.
That’s some serious speed improvements. Gained by optimizing various technical properties of files such as their potential compression ratios.
Then we tested the performance by comparing the file transfer speeds of the same file, with TeamViewer 12 and the previous version.
The exact performance increase you will experience depends on a few factors of your current set up and situation. For example:
- Your local network speed
- Computer performance
- Internet connection
You’ll notice a huge difference. To take advantage of these improvements, all you need to do is install TeamViewer 12 on both sides of the connection and start transferring files.
How to use File Transfer
You can choose between three different options to use the TeamViewer File Transfer function, depending on what suits you best:
The File Transfer Window
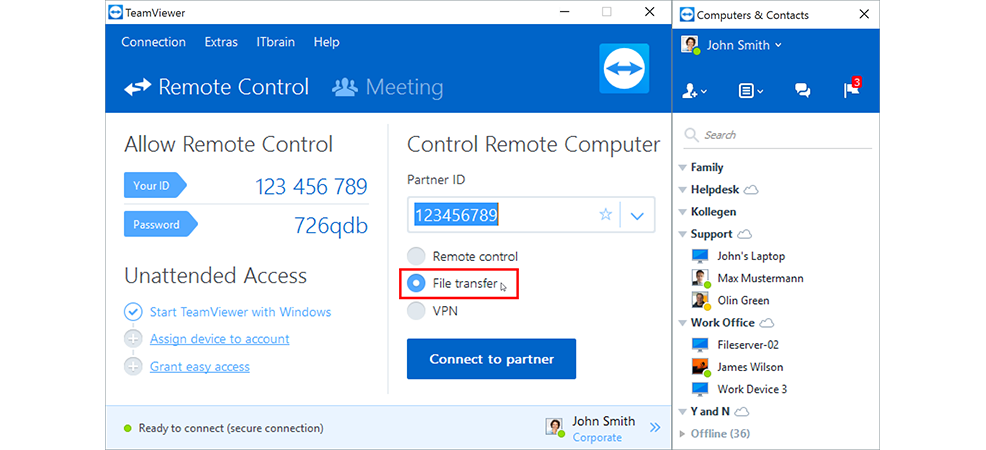
1. On the Remote Control tab, select the File transfer option before starting the connection.

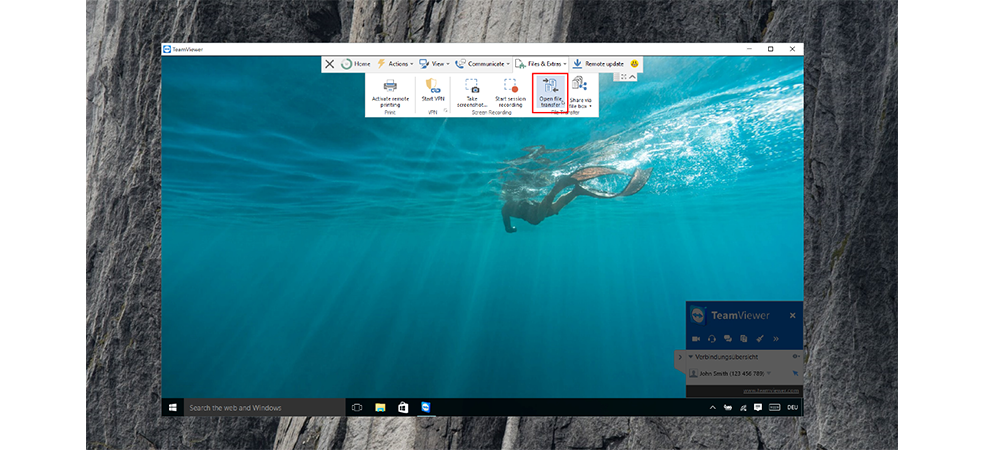
2. Alternatively, after establishing a remote control session, click Files & Extras | Open file transfer in the tool bar of the session window.

Transferring Files Using Drag and Drop in Windows
1. On Windows computers, files or folders can be dragged and dropped from either of the connected computers to the other. This is not a distinct feature of the File Transfer mode, but can be performed in the Remote Control mode.
a. Connect to the remote computer.
b. Drag the file to transfer from the computer that has the file on it.
c. Move it to either the local screen or the window displaying the remote computer.
d. Drop the file. It will now be transferred.
File Transfer Via the Windows Context Menu
Another option for transferring files between your computer and the remote one is to send them via the Windows context menu.
In this case, you can send files with TeamViewer using the Windows context menu to computers or contacts from your Computers & Contacts list.
1. Select the file in Windows Explorer.
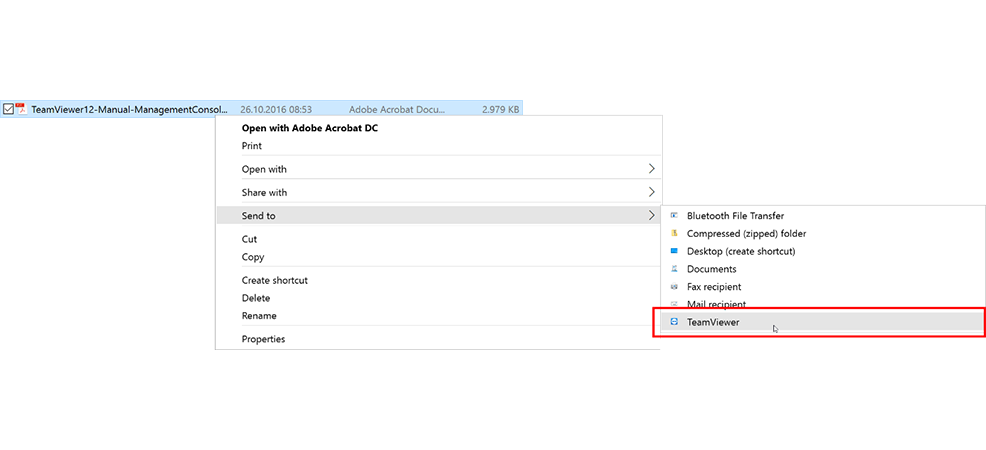
2. Right-click the file. The Windows Context Menu will open.
3. Select Send to | Teamviewer. The TeamViewer Send file to … dialogue box will open.

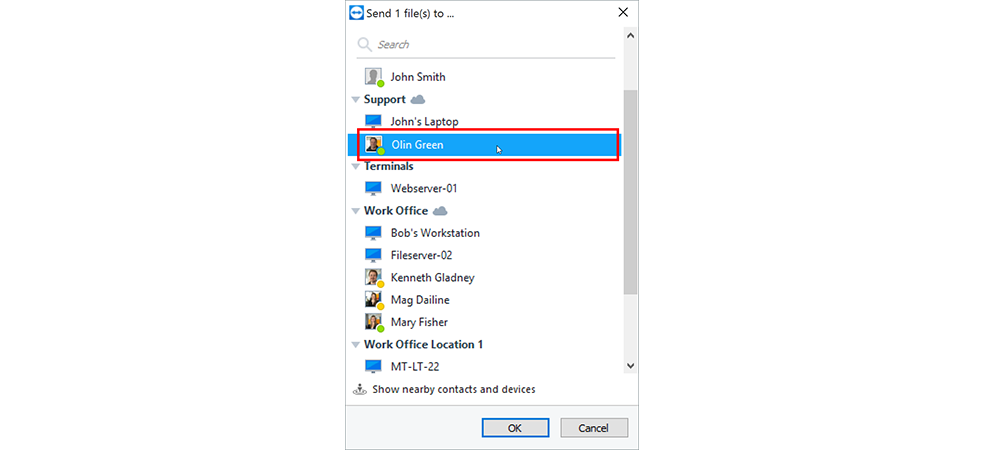
4. Select the computer or contact that should receive the file.

5. Click the “OK” button.
6. The computer or contact must confirm the request.
 The file is saved on the computer or on the contact’s device in the Download folder under
C:\Users\%username%\Downloads
Note: Files cannot be sent or received without the confirmation of the recipient.
Transfer Files Even Faster with These Best Practices
When it comes to your daily routine of working with larger files, there are several parameters you can fine-tune to get the best file transfer possible:
Make Sure Your Environment Is Up to Speed
This is especially for working on files large of size and a little less about just transferring them. Nevertheless, these both come hand in hand most of the time.
- Add more RAM if necessary
- Make sure your CPU can get the best out of your RAM
- Make sure your LAN/WAN devices have great connection and can handle high speeds
Minimize File Size
Since smaller files don’t need as much time to be transferred, you should ensure you only transfer exactly what you need.
There’s no point sending a folder full of images and videos if you only need a handful on the remote device.
What About Compression and File Splitting?
Since TeamViewer automatically compresses and decompresses files during the transfer, there is no need to compress to an archive beforehand.
In fact, it’s better not to. This is because pre-compressed files cannot be compressed any further – which results in slower transfer speeds.
For a similar reason, there is no need to archive and split files into smaller pieces – as each piece will have the same pre-compression issue.
Instead, reduce the file size manually by only transferring exactly what is needed, and then use Secure File Transfer with the file uncompressed.
Now It’s Your Turn
Ready to test out TeamViewer 12’s File Transfer speed?
What kinds of files do you often need to transfer to another device? Let me know in the discussion below!