Find out how the Automated Service Case Assignment feature can be a key to awesomely quick customer service.
Previously, we’ve already talked about how to make full use of your TeamViewer Custom Modules to strengthen your brand and develop an integrated appearance.
Today’s article will deal with a new way of letting your Custom Modules work for you. And since they’re the means of contact for many a customer, their effective use is not to be underestimated:
Custom Modules allow you to pre-set any connection initiated through them, individually brand them for better recognition value, or allow your customers to initiate service cases themselves.
All these options make it possible for supporters to make sure their customers are more satisfied thanks to the resulting quick service case resolution.
Now, with first impressions, but also repeated customer contact in mind, the new Automated Service Case Assignment feature is another huge step forward for your customer satisfaction.
As its name suggests, it automatically assigns service cases to supporters and can therefore drastically reduce customers’ waiting times.
Because let’s be honest: Nobody likes waiting. Especially when you’re in a hurry to finish something up and your computer just crashed.
So let’s have a look at how to activate the Automated Service Case Assignment feature together.
How to Activate TeamViewer’s Automated Service Case Assignment
Prior to the Automated Service Case Assignment, unassigned service cases had to be assigned to the right supporter manually.
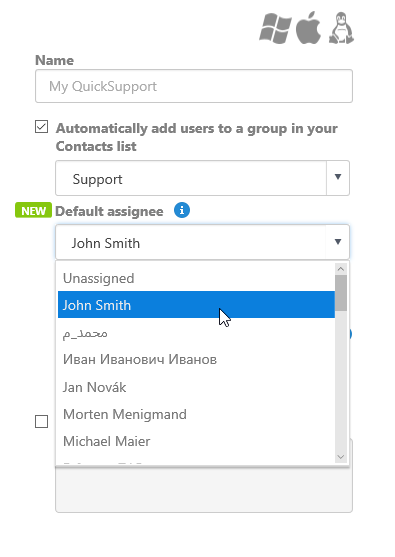
The new feature, however, enables you to set a default assignee in your QuickSupport and Host modules for service cases issued by the associated module.
To create a custom QuickSupport or Host module with a default assignee,
1. Log into the Management Console at login.teamviewer.com.
2. Go to Design & Deploy and click either Add QuickSupport or Add Host.
3. Set up the module according to your preferences.
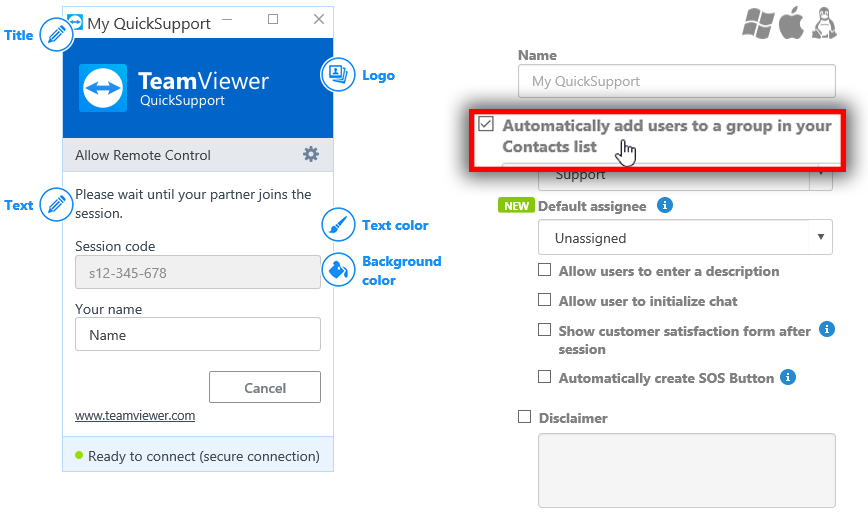
4. Tick the box that says Automatically add users to a group in your Contacts list and choose a shared group.

5. To choose a default assignee, click the drop-down menu and select one of the entries.

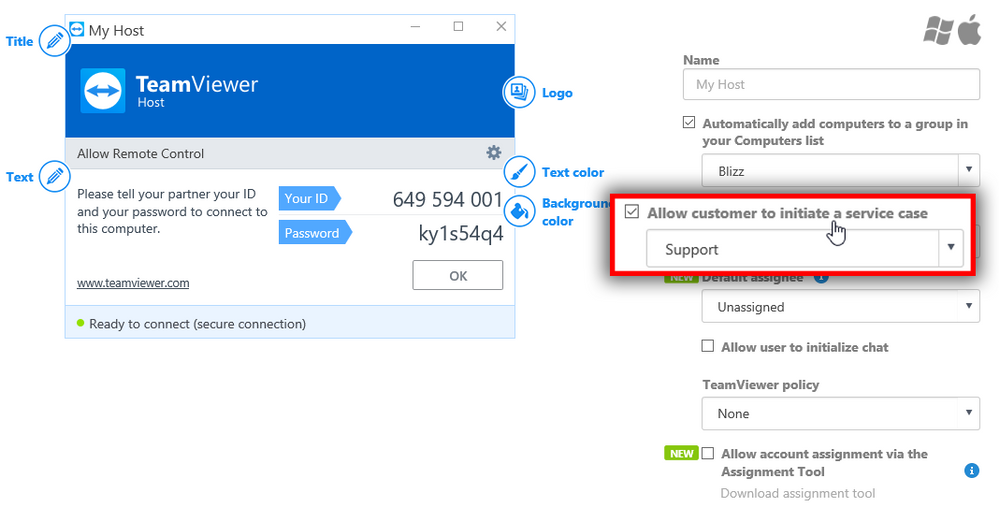
6. For a Host module, check the box that says Allow customer to initiate a service case and choose a default assignee as well.
 7. When you’re done, save the module and deploy it to your customers.
Now any service cases initiated by using that custom Host or QuickSupport module will automatically be assigned to the selected supporter.
Getting Your Customer Service One Step Ahead
Immediate responsiveness has become more and more important to customers over the years.
The new Automated Service Case Assignment feature can provide a serious advantage over your competition by cutting nerve-wracking waiting times to a minimum.
Try out the Automated Service Case Assignment today and get your customer service one step ahead!
Do you have any feedback regarding this new feature? Let’s hear it in the comment section below!