How to Get Started with TeamViewer Remote Control

Esther
Esther Posts: 4,051 Former Community Manager
edited April 2023 in Blog

How_to_use_TV_header.png

Attention newcomers, this one’s for you:

In this very basic article I’ll explain how to get started with TeamViewer and use its main function, the remote control.

Do you want to use TeamViewer as a free tool that works across operating systems to help out your family and friends no matter what the distance is?

Or maybe you’re an experienced IT technician who’d like to introduce the most popular remote control software to their company?

TeamViewer is not only a powerful, but also an immersive and intuitive tool to remotely control other devices. Soon after starting to use it, you’ll feel confident with TeamViewer.

Let’s get you started and explain the basics.

Download and Installation

The first step towards remotely controlling one device from another is to install the TeamViewer full version on the controlling and another full version or a QuickSupport module (no installation necessary) on the controlled device.

The full version of TeamViewer is free to use for non-commercial purposes.

To download the full version, visit teamviewer.com/en/download.

Then, click on Download TeamViewer and run the .exe file, which will look like this (on Windows):

TV_installation.PNG


For simplicity’s sake, let’s just stick to the basic installation for now.

Got it? Great! Press Accept – finish to end the installation process. TeamViewer should be ready for use now.

The Remote Device

On the remote device, you have two options depending on how you plan on using TeamViewer.

  1. If you’d like to initiate remote connections from this device, too – be it now or in the future – just repeat the full version installation.
  2. Run a TeamViewer QuickSupport module for single use.

The advantage of QuickSupport modules is their simplicity: They don’t require an installation, but you just run them.

To get a QuickSupport module, just go to either

  • get.teamviewer.com, where you can enter a session code which can be generated using a TeamViewer full version on the controlling computer or
  • connect.teamviewer.com and it will be downloaded automatically. Then run the .exe file. To hand over control to another TeamViewer instance, give the supporter Your ID and Password.QS_Module.png


Establish a Connection

With both ends of the connection using the full version of TeamViewer, the partner that wants to remotely control a device types in the TeamViewer ID and Password of the device they want to control into their own TeamViewer. 

TV_window.PNG

--> A TeamViewer ID is unique, will always stay the same for every device and can be used to contact that device from any other instance of TeamViewer. Passwords are generated randomly with every start of TeamViewer.

As soon as you entered your partner’s info into your own TeamViewer and click Connect to partner, the remote session will start.

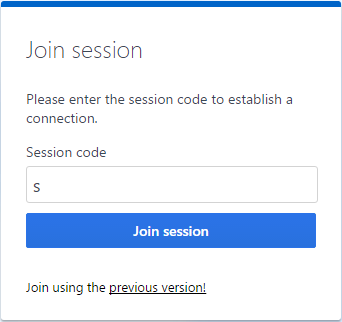
If you have decided to go with the QuickSupport module that requires a session code on the remote side of the connection, enter the respective session code your partner provides you with into the module and the remote session will be established:
tv_host.PNG


Now, to create a session code:

1. In a TeamViewer full version, go to your Computers & Contacts list and click the add contact symbol. Then click Create session code

Create_Session_Code.png


2. Invite a partner to the session by providing them with the session code. You can do that, e.g., via email by clicking Invite in the created session contact that will now be displayed in your Computers & Contacts list.

Create_Session_Code_2.png


Work With an Immersive Remote Experience

Once a connection has been set up between the two devices, you can control the remote device as if you were sitting directly in front of it.

Additionally, TeamViewer offers a lot of helpful features, such as Remote QuickSteps,

Remote Sticky Notes or superfast File Transfer.

Now It’s Your Turn

If you were a newbie to TeamViewer at the beginning of this article, I hope I was able to teach you something new today.

For more tutorials on how to use TeamViewer and its new features, take a look at other articles on the TeamViewer Community Blog or the community’s Knowledge Base.

In case you have any unanswered questions, you can resort to thousands of dedicated community members.

If you recently tried out TeamViewer for the first time, how was your first experience with it?

Share your thoughts in the comment section below!

Former Community Manager

Comments

  • jj
    jj Posts: 1

    I download a Teamviewer 11 ver. 11.1.8373.0 today in a freshly installed O.S Windows XP spk 2. And after that, I installed it. But sad to say I wasn't able to use it because as I open the newly installed Teamviewer 11, there is an error stating: "entry point not found the procedure entry point GetLogicalProcessorInformation could not be located in the dynamic link library KERNEL32.DLL". What is it mean?

  • Viktoral46
    Viktoral46 Posts: 6

    Hi

    I have same problem ! Who can give me an solution ?

    22/05/2017 Teamwiever 12 under XP sp2

    Sorry with my english

  • Viktoral46
    Viktoral46 Posts: 6

    I found the solution for xp sp2
    First, download sp3 for XP with the following link:

    http://www.clubic.com/lancer-le-telechargement-255038-0-windows-xp-service-pack-3.html

    Then run the software on the PC
    The problem with kernel32.dll is resolved, Teamwiever is working correctly
    Hopefully this solution will help you...

  • MadAuto
    MadAuto Posts: 2

    Hello Everybody!!

    same problem also for me, unfortunately, in this PC i cannot install SP3 for compatibility problem with other softwares installed.

    is there another possibility to fix this problem with SP2 or are incompatible?

    Bye!

  • MadAuto
    MadAuto Posts: 2

    sorry, i forgot an important info...

    problem occur if i try to install Teamviewer 11 HOST and Quick Support generated from personal page. with classic version, no problem

    Bye!

  • Great Article on getting started. I will be using the free individual license approach since i am only trying to help my elderly relatives with their computer issues. I think the quicksupport module approach, for now, seems good. In my testing with another PC in my house, i do notice that when you request session id and then invite - you are actually asking the other computer to save/run a file which ends up in the directory on that other PC. Which is fine - just wanted to check that in the article its says download/installing is needed. So is their a way to just run the file vs actually saving it to a directory and then running it? Every time i remote to that other PC will it want to save and run a file? And remain in that download directory until i delete it?
  • Jeremy
    Jeremy Posts: 107 Staff member 🤠

    Hi @abbottepa1,

    The QuickSupport module needs to be downloaded first, into your Downloads folder for example, before you can run it. It wouldn't be possible to run it without downloading it first. However, the advantage of the QuickSupport module is that it doesn't need to be installed, in the way a regular program is installed. It simply runs on the spot, without installing any files into your Program Files directory. Once you're finished with it, you can just delete the file if you wish, without needing to uninstall anything.

    Or, if you are likely to want to connect to the same computer again in the future, you can keep the file and use it the next time. There's no need to re-download the same file every time you wish to connect to that computer.

    Regards,
    Jeremy
    TeamViewer Quality Assurance Engineer
  • KHJ
    KHJ Posts: 1

    Have a licensed corporate version.  So far, I find this product both confusing and overwhelming.

  • Esther
    Esther Posts: 4,051 Former Community Manager

    Hi @KHJ 

    First of all: I am happy to welcome you to TeamViewer and our Community!

    Let´s just use the Community-crowd power to answer all your questions! Please feel free to ask your questions in the TeamViewer 12 board or check out our Knowledge Base or the Forums part for some useful help.

    All the best and have a great start into your TeamViewer experience!

    Esther

    Former Community Manager

  • mhenry
    mhenry Posts: 1

    Are there any feature differences between using "connect.teamviewer.com" versus the "get.teamviewer.com"?

    The "connect.teamviewer.com" method seems a little easier to initiate with an end user, but, if the "get.teamviewer.com" method provides additional features/functionality during the remote session, I'll go ahead and generate a session key on my end and have the end user connect to "get.teamviewer.com"


  • heyy!!!! THanks a lot that this post make my step easy towards using the team viewer and the is quite good for the educational and office purpose.


  • Hola, tengo un problema y os agradeceria si me pudierais ayudar, he instalado teamviewer quick supprot en un tv box S10 con amlogic s912 y android 7.1, la aplicacion arranca bien y me asigna el ID, pero cuando intento conectarme a el desde una tablet samsumg con teamviewer instalado para coger control remoto del tv box me sale el mensaje de que el dispositivo no es compatible con la pantalla compartida.

    Por favor alguien me puede ayudar para ver como solucionarlo ¿?

    Muchas gracias y un saludo.

  • so nice teamviewer for long-distance work done anytime any place
  • Nora_v1121
    Nora_v1121 Posts: 2
    edited September 16
  • How to get session code

Leave a Comment

Rich Text Editor. To edit a paragraph's style, hit tab to get to the paragraph menu. From there you will be able to pick one style. Nothing defaults to paragraph. An inline formatting menu will show up when you select text. Hit tab to get into that menu. Some elements, such as rich link embeds, images, loading indicators, and error messages may get inserted into the editor. You may navigate to these using the arrow keys inside of the editor and delete them with the delete or backspace key.